August 12, 2026
Adorable Light Scorpion – Detailed Amigurumi Crochet Pattern with Wire Poseability
Bring this striking, segmented scorpion to life with this comprehensive amigurumi pattern! Featuring a fully wired frame for custom posing, intricate pincers, and clever folded ridges for a realistic back, it’s a fantastic project for intermediate crocheters ready to level up their structural skills.
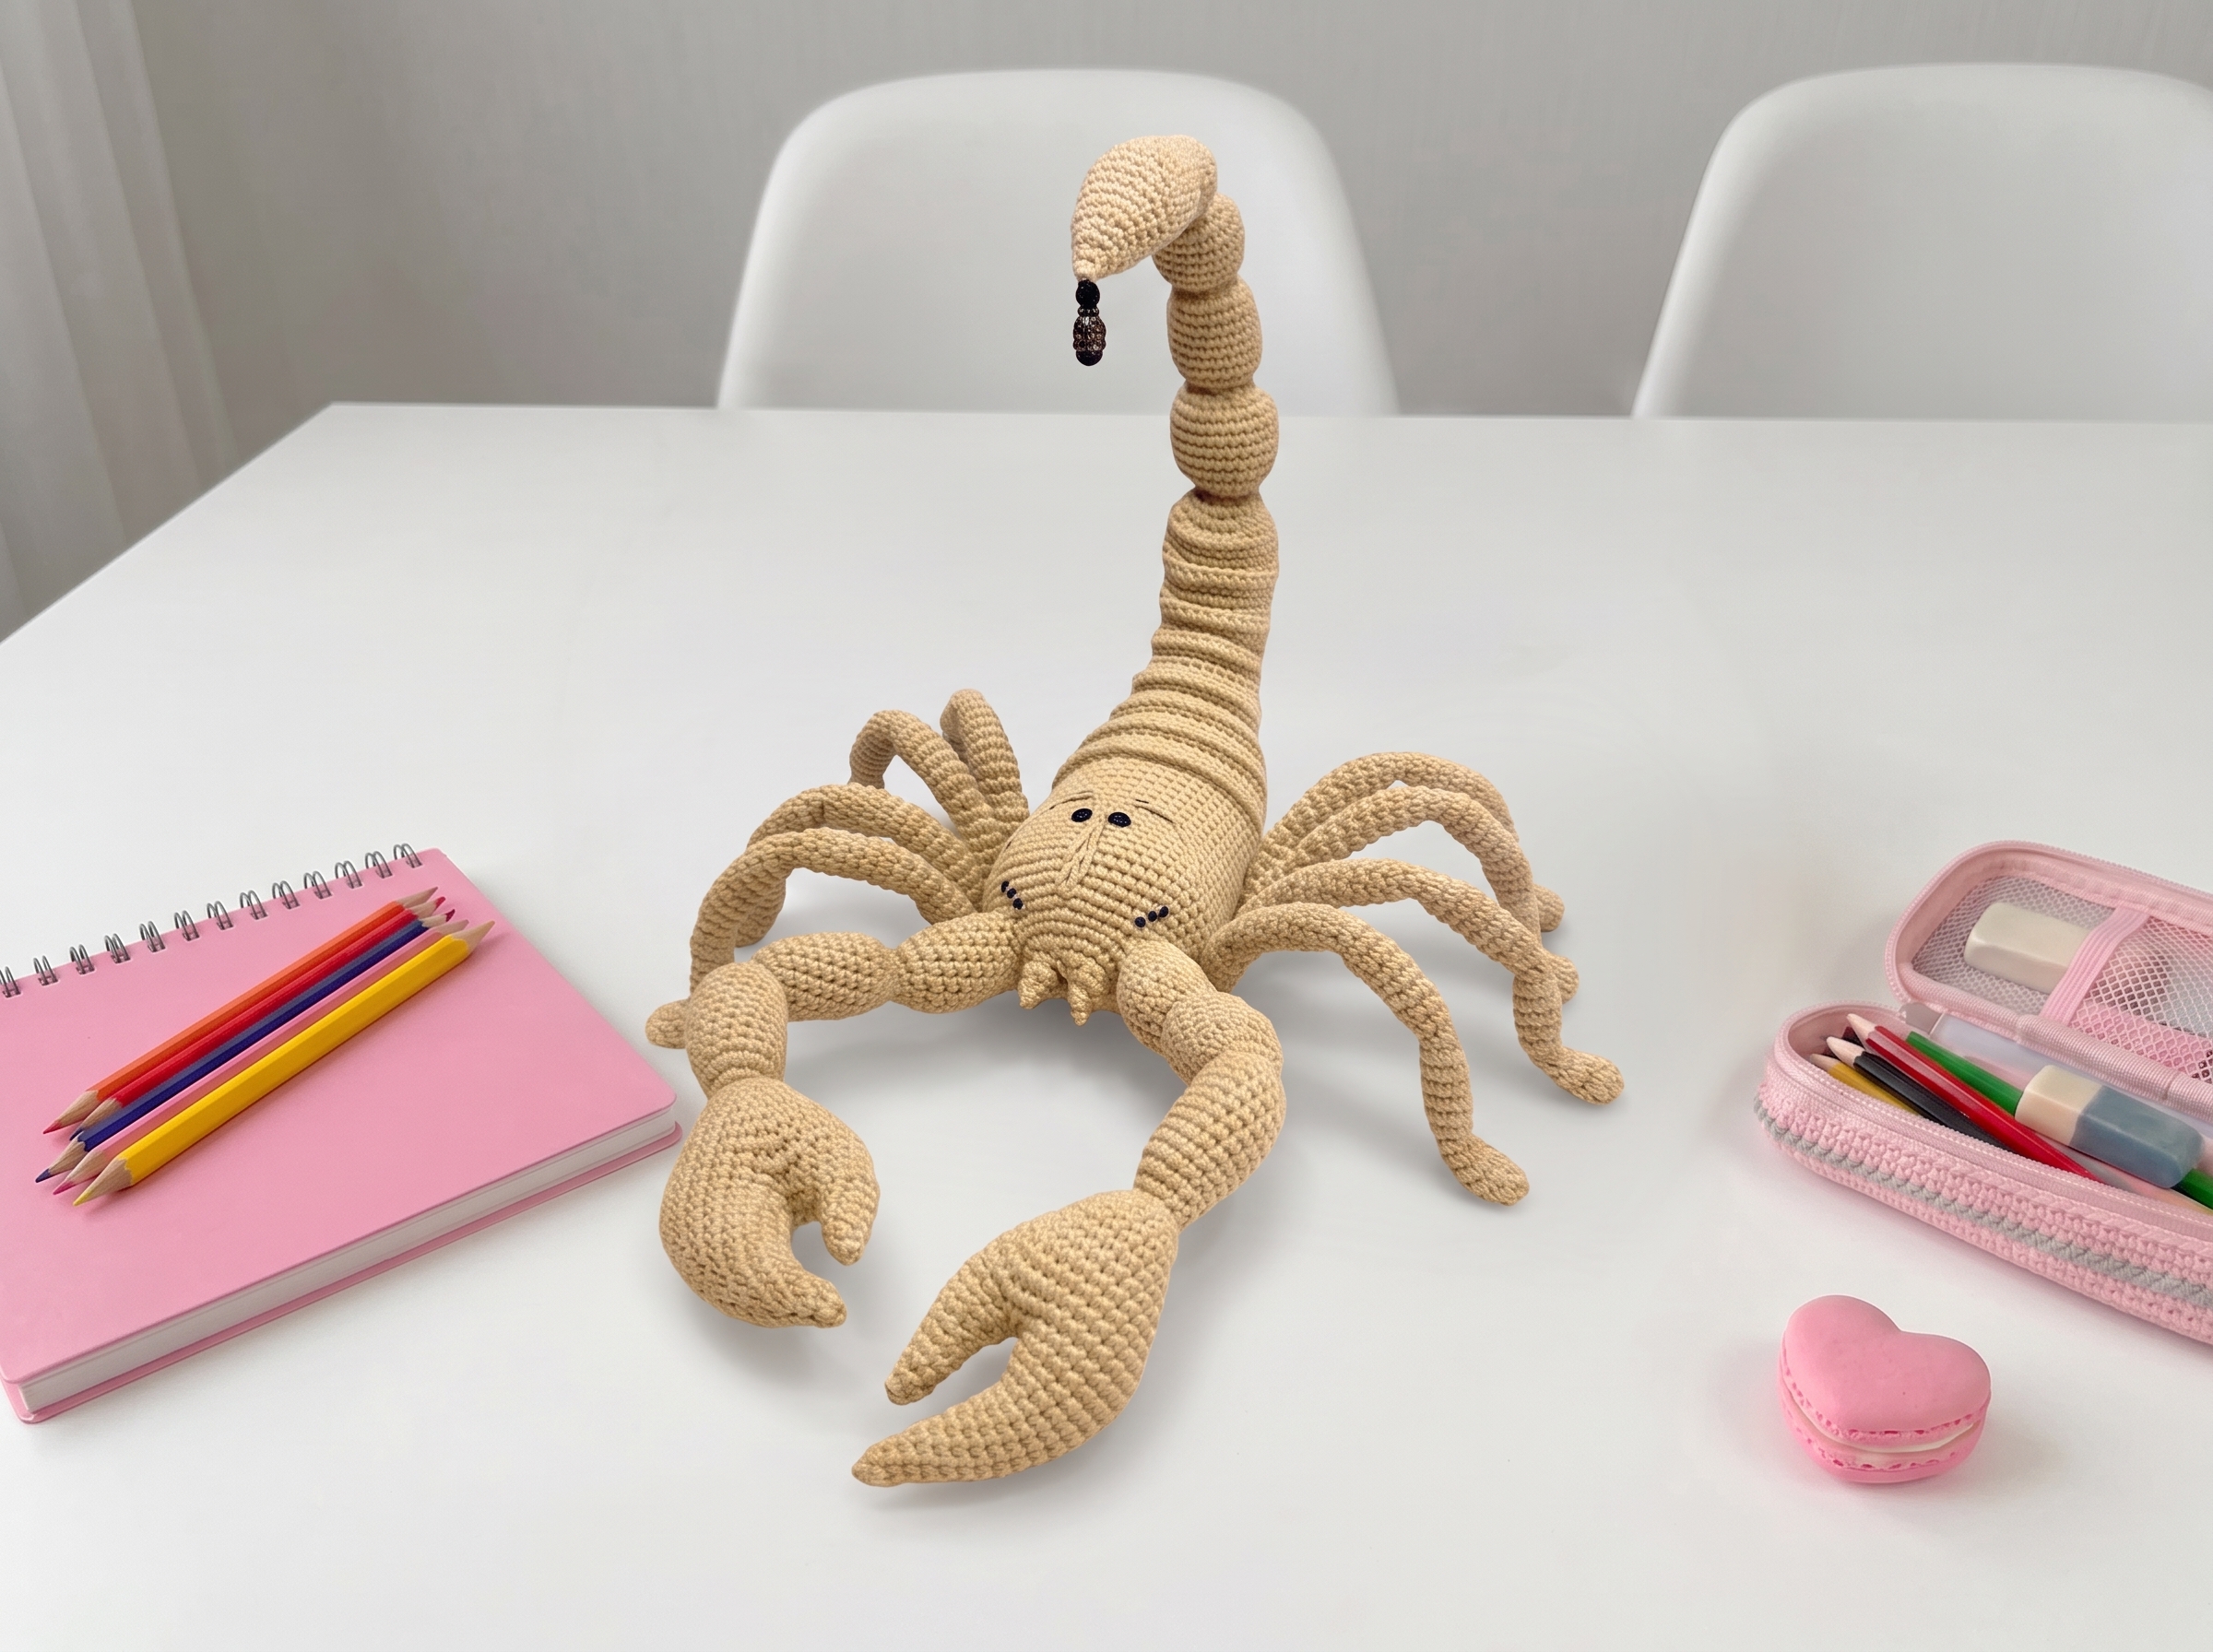
Adorable Light Scorpion – Complete Step-by-Step Pattern
1. Materials & Abbreviations
Grab your favorite light-colored and black yarns, and let's get ready to make something wonderfully wild! Using a wire frame is the secret to making this scorpion poseable, so don't skip the notions list.
- Yarn: YarnArt Jeans (or similar cotton blend). Light color (approx. 1.5 skeins) and Black (approx. 1.5 skeins).
- Wire: 2.5 mm craft wire with coating (approx. 230 cm total, but grab a bit more just in case!).
- Hook: 1.5 mm (or size needed for a tight, stuff-proof gauge).
- Notions: Poly-fil stuffing, 5 mm rhinestones (2 pcs) and 2 mm rhinestones (6 pcs) for the eyes, transparent craft glue (like Moment Crystal), stitch markers, marker thread, electrical tape (for wrapping wire ends), and a tapestry needle.
- Abbreviations:
- MR – magic ring
- ch – chain
- sc – single crochet
- inc – increase (2 sc in one stitch)
- dec – decrease (2 sc crocheted together)
- BLO – back loop only
- FLO – front loop only
- shifted st – shift the stitch marker forward by the indicated number of stitches to create a spiral seam effect.
What it teaches: Proper tool selection for wired amigurumi, gauge management, and familiarization with standard international crochet abbreviations.
2. Pincers & Claws (Make 2)
The pincers are worked in two distinct parts to create that classic scorpion claw shape. We'll be inserting a wire frame right at the start, so take your time wrapping those wire ends with tape to keep your fingers safe!
Main Claw Base:
- R1: Ch 6, join with a sl st to form a ring. (6)
- R2: 6 sc (6)
- R3: 6 inc (12)
- R4: (3 sc, inc) x 3 (15)
- R5: (4 sc, inc) x 3 (18)
- R6: 18 sc (18)
- R7: (5 sc, inc) x 3 (21)
- R8: (6 sc, inc) x 3 (24)
- R9: 24 sc (24)
- R10: (7 sc, inc) x 3 (27)
- R11: (8 sc, inc) x 3 (30)
- R12: 30 sc (30)
- Important detail: Tie a piece of marker thread around your work, go backwards, skip 9 sts, and place your stitch marker.
- R13: Sc 9 sts; then work on the back side, sc another 9 sts back to the marker thread. (18)
- R14: 18 sc (18)
- Frame Prep: Cut your wire into two pieces (8 cm and 20 cm). Wrap them with electrical tape so the smaller piece is about 1 cm shorter than the larger one. Insert the frame into the claw and add a tiny bit of stuffing.
- R15: dec, 16 sc (17)
- R16: dec, 15 sc (16)
- R17: 7 sc, dec, 7 sc (15)
- R18: dec, 13 sc (14)
- R19: 6 sc, dec, 6 sc (13)
- R20: dec, 11 sc (12) [Gradually add stuffing as you go]
- R21: 5 sc, dec, 5 sc (11)
- R22: dec, 9 sc (10)
- R23: 4 sc, dec, 4 sc (9)
- R24: dec, 7 sc (8)
- R25: 3 sc, dec, 3 sc (7)
- R26: dec, 5 sc (6)
- R27: dec, 4 sc (5) [Try to pack the stuffing all the way to the tip!]
- Finishing: Close the remaining stitches, cut yarn, and hide the end.
Upper Claw Finger:
- R1: Attach yarn to the 7th stitch of R11. Sc 12 sts. (12)
- R2: 5 sc, dec, 5 sc (11) [Don't forget your stuffing!]
- R3: dec, 9 sc (10)
- R4: 4 sc, dec, 4 sc (9)
- R5: 9 sc (9)
- R6: dec, 7 sc (8)
- R7: 3 sc, dec, 3 sc (7)
- R8: dec, 5 sc (6)
- R9: dec, 4 sc (5)
- Finishing: Stuff firmly to the end, close the stitches, cut yarn, and hide the end.
What it teaches: Working in joined rounds to create flat bases, integrating wire armatures safely, and progressive decreasing for tapered limbs.
3. Front Phalanges (Fingers)
These segmented fingers give the pincers that authentic, jointed look. We'll be working them in continuous segments with stuffing in between to keep them nice and plump.
- R1: Attach yarn to the 1st row of the claw (where the initial ch-6 ring is). 6 inc (12)
- R2: (3 sc, inc) x 3 (15)
- R3-12: 15 sc (10 rows)
- R13: (3 sc, dec) x 3 (12) [Stuff this segment]
- R14: 6 dec (6)
- R15: 6 inc (12)
- R16: (3 sc, inc) x 3 (15)
- R17-24: 15 sc (8 rows)
- R25: (3 sc, dec) x 3 (12) [Stuff this segment]
- R26: 6 dec (6)
- R27: 6 inc (12)
- R28: (3 sc, inc) x 3 (15)
- R29-34: 15 sc (6 rows)
- R35: (3 sc, dec) x 3 (12) [Stuff this segment]
- Finishing: Tie off and cut the yarn. Repeat the entire pincer process for the second claw, then sew them together to form the complete pincer shape.
What it teaches: Creating segmented, jointed appendages and managing stuffing distribution across multiple distinct sections.
4. Chelicerae (Mouthparts)
These tiny little mouthparts sit right under the head. They are worked in two small, mirrored pieces and then attached directly to the body as you go.
First Chelicera:
- R1: Ch 18, join to form a ring. Skip 4 sts backwards and place a marker.
- R2: 5 sc; 4 sc (working on both sides) from the marker to the start of the row. (9)
- R3: (dec, 1 sc) x 3 (6)
- R4: 3 dec (3)
- Finishing: Close stitches and tie off.
Second Chelicera:
- Setup: Attach yarn to the 1st row (the chain ring).
- R2: 9 sc (9)
- R3: (dec, 1 sc) x 3 (6)
- R4: 3 dec (3)
- Finishing: Close stitches and tie off.
What it teaches: Working tiny, complex micro-pieces and preparing them for seamless integration into the main body.
5. Body & Thorax
Here is where the magic happens! We'll attach the chelicerae as we go, and then use a clever "folded ridge" technique to create the scorpion's segmented back. It might look a little unusual at first, but trust the process—that beautiful curved shape is going to emerge!
- R1: Ch 6. Starting in the 2nd ch from hook: 3 sc in one st; 3 sc; 3 sc in the last st; 3 sc down the other side. (12)
- R2: 3 inc; 3 sc; 3 inc; 3 sc (18)
- R3: (1 sc, inc) x 3; 3 sc; (1 sc, inc) x 3; 3 sc (24) [Note: Knit these together with the chelicerae from R1.]
- R4: 3 sc; 4 sc together with 1st chelicera; 8 sc; 4 sc together with 2nd chelicera; 5 sc (32)
- R5: (7 sc, inc) x 4 (36)
- R6: (5 sc, inc) x 6 (42)
- R7-8: 42 sc (2 rows)
- R9: (6 sc, inc) x 6 (48)
- Frame Prep: Cut a 30 cm piece of wire and twist it together with the pincer frames. Insert it into the body.
- R10-24: 48 sc (15 rows) [Make 3 shifted stitches during these rows to hide the seam. Gradually add stuffing.]
- Now, let's create the back ridges!
- R25: 14 sc, 20 BLO, 14 sc (48)
- R26-27: 48 sc (2 rows)
- R28: 14 sc, 20 sc (working together with the sts of R27 and the BLO of R24 to form a fold), 14 sc (48)
- R29: (dec, 6 sc) x 6 (42)
- [Editor’s Note: The original text had a typo stating "(24)" here, but mathematically it must be 42 to maintain the correct stitch count for the next rows.]
- R30: 42 sc (42)
- R31: 12 sc, 18 BLO of R30; 12 sc (42)
- R32-33: 42 sc (2 rows)
- R34: 12 sc, 18 sc (working together with the sts of R33 and the BLO of R30), 12 sc (42)
- R35: (dec, 5 sc) x 6 (36)
- R36: 36 sc (36)
- R37: 10 sc, 16 BLO; 10 sc (36)
- R38-39: 36 sc (2 rows)
- R40: 10 sc, 16 sc (working together with the sts of R39 and the BLO of R36), 10 sc (36)
- R41: (dec, 4 sc) x 6 (30)
- R42: 30 sc + 1 shifted st (30)
- R43: 9 sc, 12 BLO; 9 sc (30)
- R44-45: 30 sc (2 rows)
- R46: 9 sc, 12 sc (working together with the sts of R45 and the BLO of R42), 9 sc (30)
- R47: (dec, 3 sc) x 6 (24)
- R48: 24 sc (24)
- R49: 7 sc, 10 BLO; 7 sc (24)
- R50-51: 24 sc (2 rows)
- R52: 7 sc, 10 sc (working together with the sts of R51 and the BLO of R48), 7 sc (24)
- R53: 24 sc + 1 shifted st (24)
- R54: 9 sc, 6 BLO; 9 sc (24)
- R55-56: 24 sc (2 rows)
- R57: 9 sc, 6 sc (working together with the sts of R56 and the BLO of R53), 9 sc (24)
- R58: 24 sc (24)
- R59: 9 sc, 6 BLO; 9 sc (24)
- R60-61: 24 sc (2 rows)
- R62: 9 sc, 6 sc (working together with the sts of R61 and the BLO of R58), 9 sc (24)
- R63: 24 sc + 1 shifted st (24)
- R64: 9 sc, 6 BLO; 9 sc (24)
- R65: 24 sc (24)
- R66: 9 sc, 6 sc (working together with the sts of R65 and the BLO of R63), 9 sc (24)
- R67: (dec, 2 sc) x 6 (18)
- R68: 18 sc (18)
- R69: 9 dec (9)
- Finishing: Do not cut the yarn! We are going to transition directly into the tail.
What it teaches: Integrating wire frames into a spherical body, executing complex folded ridges for 3D texturing, and managing shifted stitches for invisible seams.
6. Tail
The tail is worked in a series of expanding and contracting rings to create that beautiful, curling scorpion posture. Keep your stuffing light and even so it holds its shape without becoming too rigid.
- R1: 9 inc (18)
- R2: (inc, 2 sc) x 6 (24)
- R3-9: 24 sc (7 rows)
- R10: (dec, 2 sc) x 6 (18)
- R11: 9 dec (9)
- R12: 9 inc (18)
- R13-20: 18 sc (8 rows)
- R21: 9 dec (9)
- R22: 9 inc (18)
- R23-28: 18 sc (6 rows)
- R29: (1 sc, dec) x 6 (12)
- R30: 6 dec (6)
- R31: 6 inc (12)
- R32: (3 sc, inc) x 3 (15)
- R33-36: 15 sc (4 rows)
- R37: (3 sc, dec) x 3 (12)
- R38: 6 dec (6)
- R39: 6 inc (12)
- R40: (1 sc, inc) x 6 (18)
- R41-46: 18 sc (6 rows)
- R47: (4 sc, dec) x 3 (15)
- R48: 15 sc (15)
- R49: (3 sc, dec) x 3 (12)
- R50: 12 sc (12)
- R51: (2 sc, dec) x 3 (9)
- R52: 9 sc (9)
- R53: (1 sc, dec) x 3 (6)
- R54: 3 dec (3)
- Finishing: Close the stitches, tie off, and hide the end.
What it teaches: Creating organic, curling shapes through strategic increase/decrease clustering and managing continuous spiral transitions.
7. Back Legs & Final Assembly
The legs are worked in long, segmented tubes and then joined together at the base. We'll use a central wire frame to give them that perfect, sprawling stance.
Leg Segments (Make 3, leaving yarn attached on the 3rd):
- Frame Prep: Cut 4 pieces of wire (36 cm each). Twist them together in the middle with electrical tape.
- R1: 5 sc in MR (5)
- R2: inc, 1 sc, 2 inc, 1 sc (8)
- R3-5: 8 sc (3 rows) [Add a tiny bit of stuffing at the very tip so the wire doesn't poke through later.]
- R6: 4 dec (4)
- R7: 4 inc (8)
- R8-12: 8 sc (5 rows)
- R13: 4 dec (4)
- R14: 4 inc (8)
- R15-21: 8 sc (7 rows)
- R22: 4 dec (4)
- R23: 4 inc (8)
- R24-30: 8 sc (7 rows)
- R31: 4 dec (4)
- R32: 4 inc (8)
- R33-39: 8 sc (7 rows)
- R40: 4 dec (4)
Joining the Legs:
- R41: 2 sc on 1st leg; 2 sc on 2nd leg; 2 sc on 3rd leg; 4 sc on 4th leg; 2 sc on 3rd leg; 2 sc on 2nd leg; 2 sc on 1st leg (16)
- R42-48: 16 sc (7 rows)
- Finishing: Tie off and cut. Knit one more identical set of joined legs. Insert the wire frame, sew the two leg sets together, and attach them to the body.
Final Touches:
- Embroider the pattern on the head using a tambour stitch (or your favorite decorative stitch).
- Glue the rhinestone eyes in place and add any final decorative touches!
What it teaches: Working multi-segmented tubular limbs, joining separate pieces seamlessly in the round, and integrating a complex central wire frame for full-body posability.
Final Section: Where to Go from Here
Wow, you did it! By completing this scorpion, you've tackled some seriously advanced amigurumi techniques: full-body wire framing, structural folded ridges, and multi-segmented jointed limbs. Your skills in reading complex structural patterns and managing tension across wire inserts are going to make future projects an absolute breeze. Next time, try experimenting with different colorways for a "dark forest" scorpion, or use the folded ridge technique to create a realistic caterpillar or centipede. Happy crocheting!