August 3, 2026
Burchak Doll & Mini Squirrel – Complete Amigurumi Crochet Pattern
Bring this charming, wire-posed doll to life with her custom sundress, pocket, and shoes, complete with a bonus mini squirrel friend that fits right in her pocket! Perfect for intermediate crocheters ready to master wire armatures, turned-row garments, and multi-part assembly.
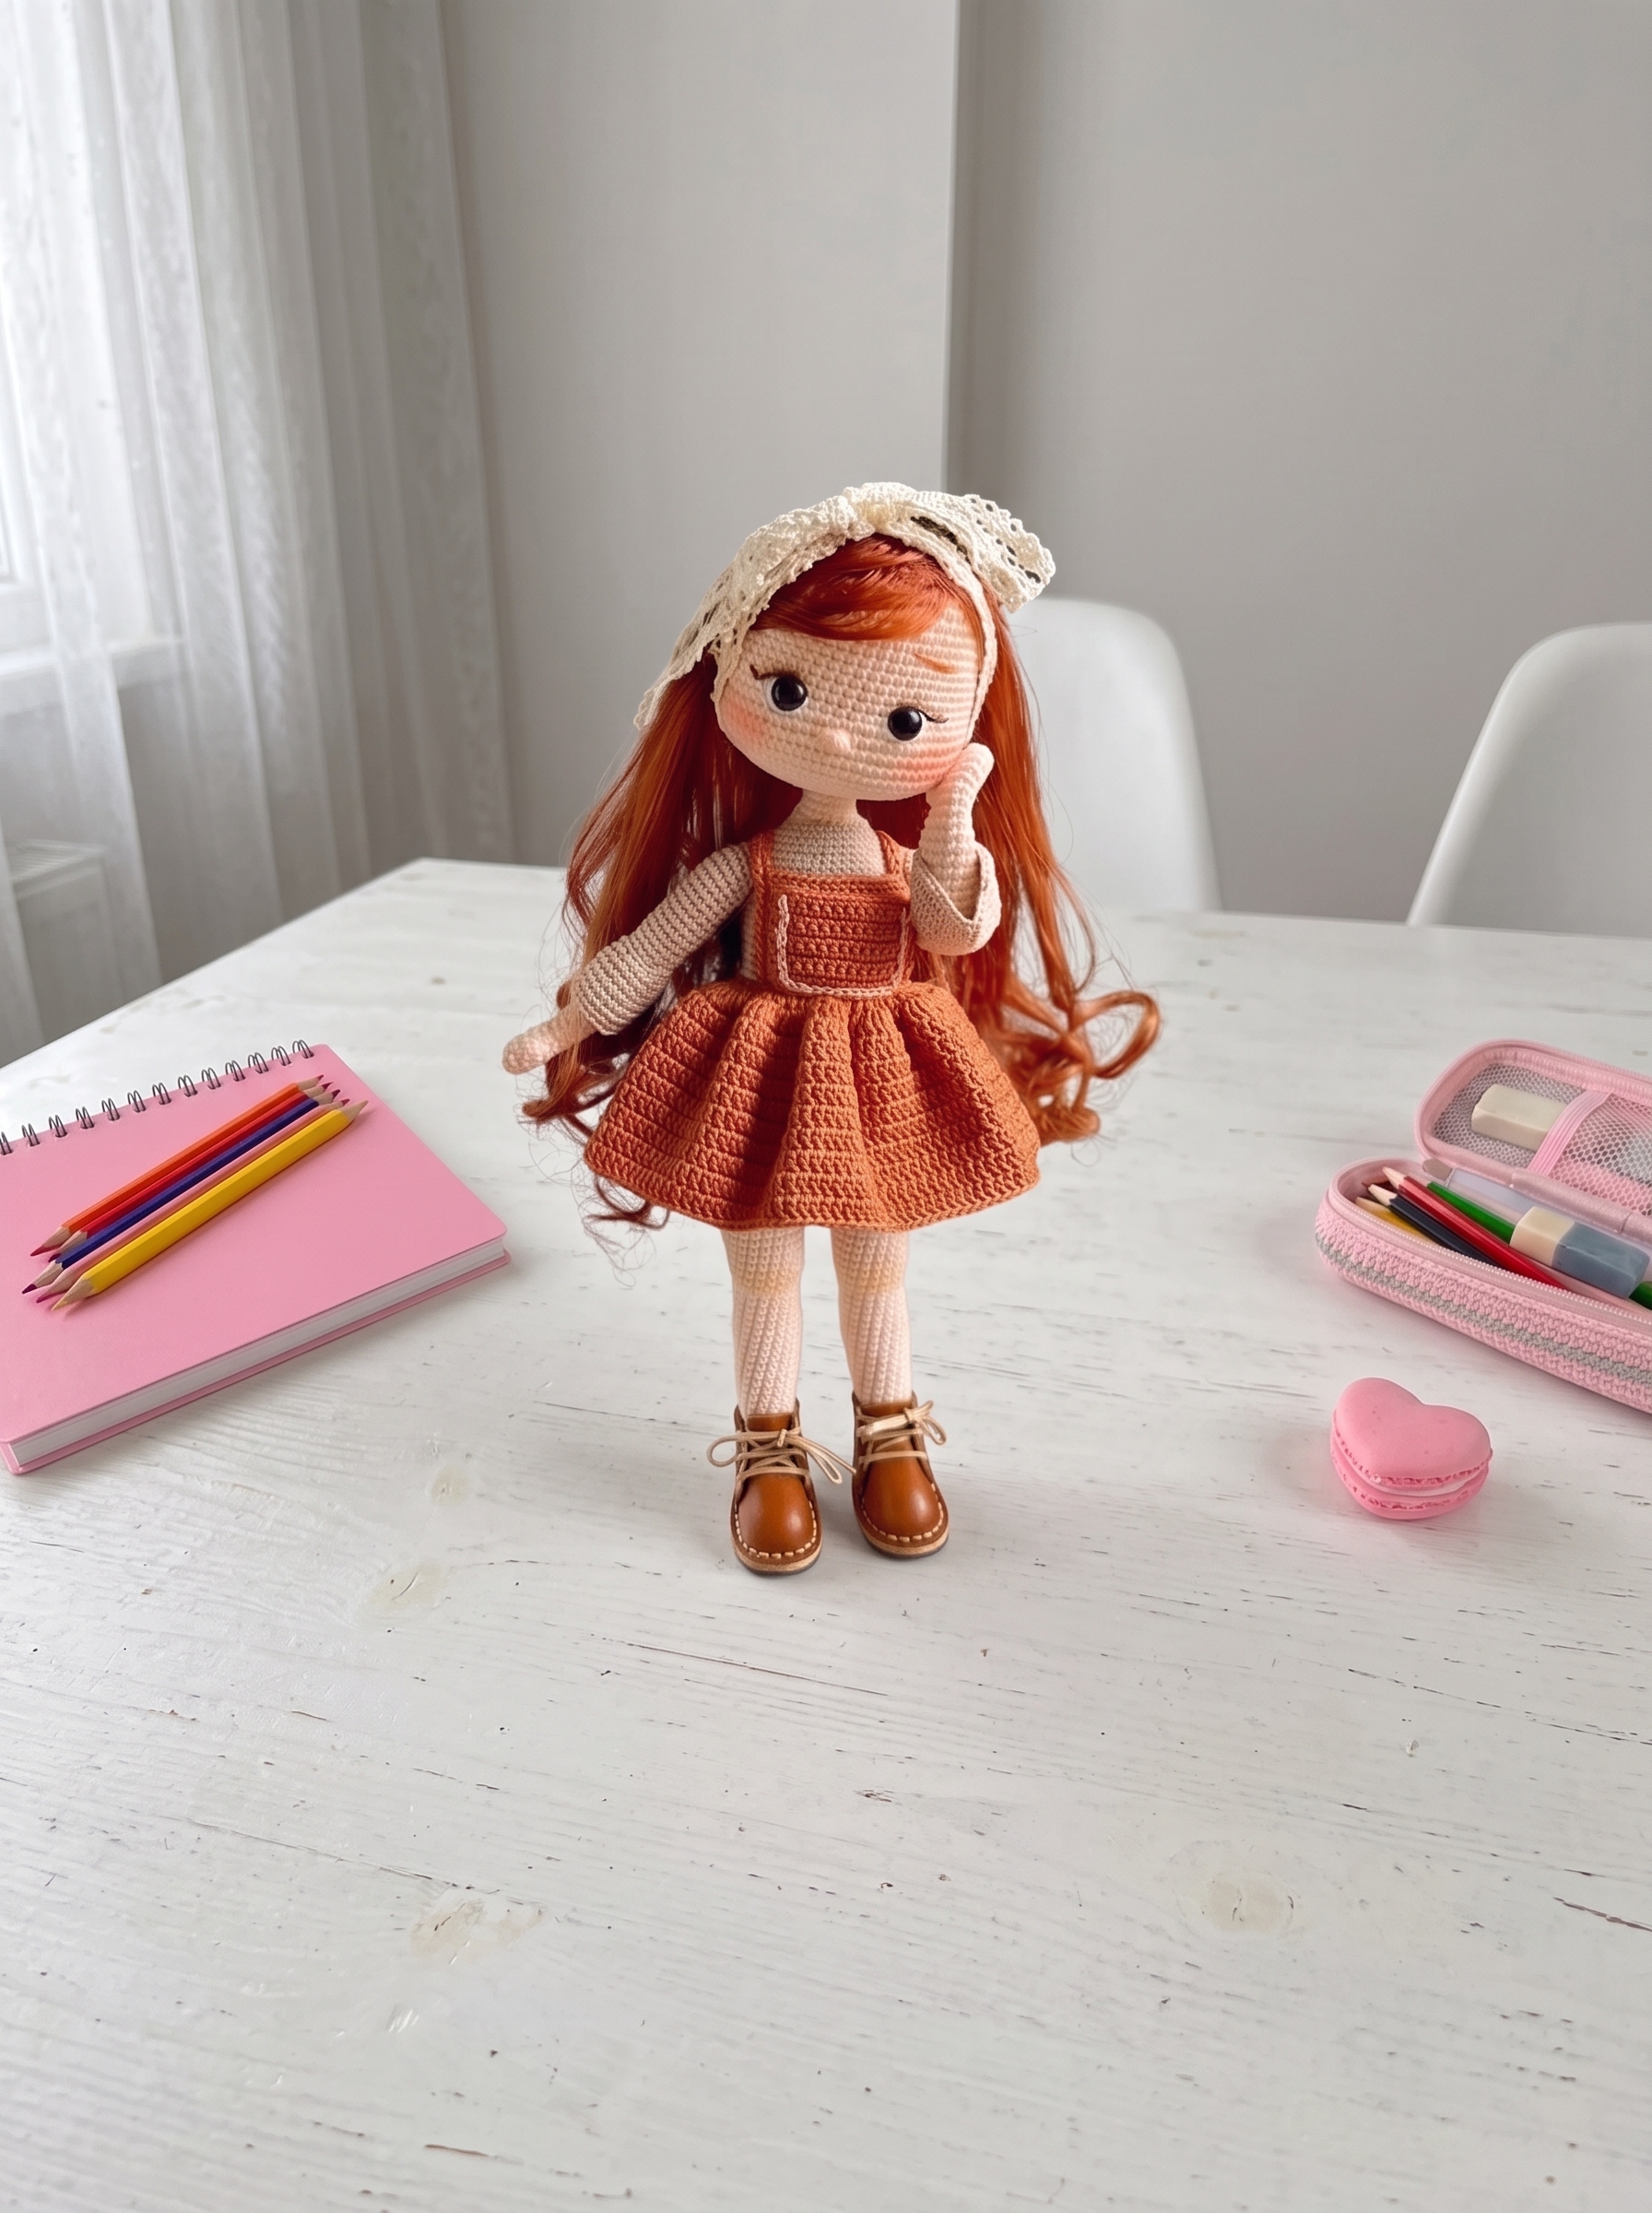
Burchak Doll & Mini Squirrel – Complete Step-by-Step Pattern
1. Materials & Abbreviations
This section covers everything you need to gather before beginning. Using the recommended materials ensures the correct gauge and a professional, durable finish.
- Yarn: Schachenmayr Catania (or similar cotton weight). Colors: Skin (263), Cream (130), Orange (426), Beige (436), Brown (438).
- Hook: 2.0 mm
- Notions: 10 mm safety eyes, 50 cm craft wire, brown and white embroidery thread, poly-fil stuffing, red synthetic doll hair (wefts), fabric glue, 30 cm cotton ribbon, 3 brown plastic buttons, 5 mm safety eyes (for the squirrel).
- Abbreviations:
- MR – magic ring
- ch – chain
- sc – single crochet
- hdc – half double crochet
- dc – double crochet
- sl st – slip stitch
- inc – increase (2 sc in one st)
- dec – decrease (2 sc crocheted together)
- 3 inc – triple increase (3 sc/dc in one st)
- 3 dec – triple decrease (3 sc/dc crocheted together)
- BLO – back loop only
- FLO – front loop only
What it teaches: Proper tool selection, gauge management, and familiarization with standard international crochet abbreviations and textured stitches.
2. Head
The head is worked in a continuous spiral starting from a magic ring, building up to a rounded shape, then decreased. Facial features are added during assembly.
- R1: 6 sc in MR (6)
- R2: 6 inc (12)
- R3: BLO: (1 sc, inc) x 6 (18)
- R4: (2 sc, inc) x 6 (24)
- R5: BLO: (3 sc, inc) x 6 (30)
- R6: (4 sc, inc) x 6 (36)
- R7: BLO: (5 sc, inc) x 6 (42)
- R8: (6 sc, inc) x 6 (48)
- R9: BLO: (7 sc, inc) x 6 (54)
- R10: Change to skin color. (8 sc, inc) x 6 (60)
- R11-20: 60 sc (60) [10 rows]
- R21: 26 sc, 1 ch, skip 1, 8 sc, 1 ch, skip 1, 24 sc (60) [Creates eye openings]
- R22: 18 sc, (sc, inc) x 6, 2 sc, (inc, sc) x 6, 16 sc (72)
- R23-26: 72 sc (72) [4 rows]
- R27: 18 sc, (sc, dec) x 6, 2 sc, (dec, sc) x 6, 16 sc (60)
- R28: (8 sc, dec) x 6 (54)
- R29: 3 sc, dec, (7 sc, dec) x 5, 4 sc (48)
- R30: (6 sc, dec) x 6 (42)
- R31: 2 sc, dec, (5 sc, dec) x 5, 3 sc (36)
- R32: (4 sc, dec) x 6 (30)
- R33: (3 sc, dec) x 6 (24)
- R34: (2 sc, dec) x 6 (18)
- Finishing: Fasten off. Insert 10 mm safety eyes. Embroider the nose 1 row below the eyes, spanning 3 stitches. Embroider the eye whites and eyelashes. Embroider the eyebrows 4 rows above the eyes using the base wig color.
What it teaches: Spiral increase sequences, creating intentional openings with chain spaces, and structured decreasing for spherical shaping.
3. Hair & Face Details
The hair is attached using synthetic wefts and fabric glue, secured in a spiral pattern along the unworked front loops.
- Attachment: Apply fabric glue to the head in the areas where you worked BLO (R3, R5, R7, R9). Press the synthetic hair wefts into the glue in a spiral pattern.
- Back Hair: Measure the width of the back of the head and divide the remaining hair evenly across the nape.
- Finishing: Once the hair is set, you can tone the doll's face with pastels if desired. Tie a cotton lace ribbon around the head to secure the hair.
What it teaches: Working with synthetic doll hair, utilizing unworked loops for structural attachment, and surface detailing.
4. Arms (Make 2)
The arms are built with an internal wire for posability and feature a delicate puff-stitch detail and a flared sleeve.
- R1: 6 sc in MR (6)
- R2: (1 sc, inc) x 3 (9)
- R3: (2 sc, inc) x 3 (12)
- R4-5: 12 sc (12) [2 rows]
- R6: 1 puff st, 11 sc (12)
- R7: 12 sc (12)
- R8: (dec, 2 sc) x 3 (9)
- R9: 9 sc (9)
- R10: (inc, 2 sc) x 3 (12)
- R11-20: 12 sc (12) [10 rows]
- R21: Change to beige. (2 sc, inc) x 4 (16)
- R22: BLO: 16 sc (16)
- R23-36: 16 sc (16) [14 rows]
- R37: (2 sc, dec) x 4 (12)
- Assembly: Bend a 25 cm piece of wire at the ends. Insert it inside the arm and stuff lightly.
- Sleeve: Attach beige yarn to the FLO of R22.
- R1: (3 sc, inc) x 4 (20)
- R2: (4 sc, inc) x 4 (24)
- R3-7: 24 sc (24) [5 rows]
- Finishing: Fasten off.
What it teaches: Working with internal armatures (wire), utilizing unworked loops for attached garments, and creating decorative puff stitches.
5. Legs (Make 2)
The legs feature a shaped foot sole and are joined together to form the base of the body.
- R1: 6 sc in MR (6)
- R2: 6 inc (12)
- R3: (3 sc, inc) x 3 (15)
- R4-7: 15 sc (15) [4 rows]
- R8: 1 ch, turn, 6 sc
- R9: 1 ch, turn, skip 1, 5 sc
- R10: 1 ch, turn, skip 1, 4 sc
- R11: 1 ch, turn, skip 1, 1 sc, 1 dec, 4 sc, 1 dec, 5 sc, 1 dec, 4 sc (17) [Editor's Note: The original pattern states a count of 17 sts here, though the instructions mathematically yield 20 sts. Proceed with the written instructions to maintain the intended shaping.]
- R12: (5 sc, dec) x 2, 3 sc (15)
- R13-16: 15 sc (15) [4 rows]
- R17: 1 sc, 1 inc, 13 sc (16)
- R18: 16 sc (16)
- R19: 2 sc, 1 inc, 13 sc (17)
- R20: 17 sc (17)
- R21: 3 sc, 1 inc, 13 sc (18)
- R22: 4 sc, 1 inc, 13 sc (19)
- R23-31: 19 sc (19) [9 rows]
- R32: 5 sc, 1 dec, 12 sc (18)
- R33: 13 sc, 3 inc, 2 sc (21)
- R34: 15 sc, 1 dec, 4 sc (20)
- R35: 20 sc (20)
- R36: 5 sc, 1 inc, 14 sc (21)
- R37: 21 sc (21)
- R38: 6 sc, 1 inc, 14 sc (22)
- R39: 22 sc (22)
- R40: 7 sc, 1 inc, 14 sc (23)
- R41: 23 sc (23)
- R42: 8 sc, 1 inc, 14 sc (24)
- R43-52: 24 sc (24) [10 rows]
- R53: For the second leg, work 5 sc in skin color, then switch to cream and work 13 sc. Chain 3 and join to the middle of the inner part of the first leg.
What it teaches: Oval foundation chaining, progressive limb decreasing, and seamless multi-piece joining with chain bridges.
6. Body
The body seamlessly joins the legs and integrates the arms mid-round.
- Setup: Attach cream yarn to the inner middle of the other leg.
- R1: 24 sc along 1st leg, 3 sc in ch, 24 sc along 2nd leg, 3 sc in ch, place marker at the back (54)
- R2-13: 54 sc (54) [12 rows]
- R14: (7 sc, dec) x 6 (48)
- R15: Change to beige. 48 sc (48)
- R16: (6 sc, dec) x 6 (42)
- R17-29: 42 sc (42) [13 rows]
- R30 (Attach Arms): 10 sc, work 6 sc together with the arm, 15 sc across the front, work 6 sc together with the arm, 5 sc (42)
- R31: 42 sc (42)
- R32: (5 sc, dec) x 6 (36)
- R33: 36 sc (36)
- R34: (4 sc, dec) x 6 (30)
- R35: 30 sc (30)
- R36: (3 sc, dec) x 6 (24)
- R37: Change to skin color. 24 sc (24)
- R38: (2 sc, dec) x 6 (18)
- R39-40: 18 sc (18) [2 rows]
- Finishing: Fasten off. Sew the head to the body.
What it teaches: Seamless multi-piece joining, mid-round limb attachment, and structured decreasing for the torso.
7. Sundress & Accessories
The dress features a flared skirt, a front pocket, and adjustable straps.
Sundress Skirt:
- R1: Ch 52, turn. Skip 8 ch for the buttonhole, 44 sc (44)
- R2: 1 ch, turn, 44 sc (44)
- R3: 2 ch, 44 triple dc increases, sl st (132)
- R4-12: 2 ch, 132 dc, sl st (132) [9 rows]
- Finishing: Fasten off. Sew a button on the belt opposite the buttonhole.
Front Pocket:
- R1: Count the 16 center stitches on the dress belt. Insert hook and work 16 sc.
- R2-11: 1 ch, turn, 16 sc (16) [10 rows]
Straps:
- R1: Ch 13. Starting in 2nd ch from hook: 12 sc (12)
- R2-9: 1 ch, turn, 12 sc (12) [8 rows]
- Assembly: Attach the pocket to the front of the dress using beige yarn and sl st. From the top corner of the bib, ch 32, turn, skip 6 ch for a buttonhole, 26 sc, then sl st down the side of the bib. Make 2 straps. Sew buttons to the skirt to fasten the straps.
What it teaches: Intarsia-style single-round color blocking, working flat panels for garment bodices, and adding functional hardware (buttons and straps).
8. Shoes (Make 2)
The shoes feature a structured sole and a decorative edge.
- R1: Ch 7. Starting in 2nd ch from hook: 1 inc, 4 sc, 3 inc, 5 sc (14)
- R2: 2 inc, 4 sc, 3 inc, 4 sc, 1 inc (20)
- R3: (1 sc, inc) x 2, 4 sc, (1 sc, inc) x 3, 4 sc, (1 sc, inc) (26)
- R4: (2 sc, inc) x 2, 4 sc, (2 sc, inc) x 3, 4 sc, (2 sc, inc) (32)
- R5: BLO: 32 sc (32)
- R6-7: 32 sc (32) [2 rows]
- R8: 13 sc, 6 dec, 7 sc (26)
- R9-13: 20 sc (20) [5 rows]
- Finishing: Fasten off. Go back to R5 and work FLO sl st around the entire row for a decorative edge.
What it teaches: Creating rigid soles, executing complex increase sequences for shoe shaping, and picking up stitches for decorative edging.
9. Bonus: Mini Squirrel
A tiny companion that fits perfectly in the doll's pocket!
Head (Brown):
- R1: 6 sc in MR (6)
- R2: 6 inc (12)
- R3: (1 sc, inc) x 6 (18)
- R4-8: 18 sc (18) [5 rows]
- R9: (1 sc, dec) x 6 (12)
- Assembly: Insert 5 mm safety eyes between R6 and R7, spaced 3 stitches apart.
- R10: 12 sc (12)
- R11: (1 sc, inc) x 6 (18)
- R12-14: 18 sc (18) [3 rows]
- R15: (1 sc, dec) x 6 (12)
- R16: 6 dec (6)
- Finishing: Fasten off and close.
Ears (Make 2):
- R1: Ch 4. Starting in 2nd ch from hook: 1 sc, 1 hdc, 1 sc. Fasten off.
Tail (Beige):
- R1: 2 ch in MR, 10 dc, sl st (10)
- R2-5: 2 ch, 10 dc, sl st (10) [4 rows]
- R6: 2 ch, 5 hdc dec, fasten off.
- Assembly: Stuff the body lightly so it fits in the pocket.
What it teaches: Micro-amigurumi techniques, rapid shaping for small companions, and working with mixed stitch heights.
Final Section: Where to Go from Here
Congratulations! By completing the Burchak doll and her mini squirrel, you have mastered a wide array of intermediate amigurumi techniques: wire armatures, turned-row garment construction, complex shoe shaping, and multi-part assembly. Use these skills to experiment with different yarn colorways for a custom "seasonal" doll collection, or try designing your own miniature clothing accessories to expand her wardrobe.