August 3, 2026
Doraemon in a Stitch Costume – Full Amigurumi Crochet Pattern (with Mini Rag Doll)
A big, huggable Doraemon dressed in a full Stitch-style hooded costume, complete with a tiny yarn rag-doll companion — a fun advanced project for crocheters comfortable with color changes and multi-piece assembly.
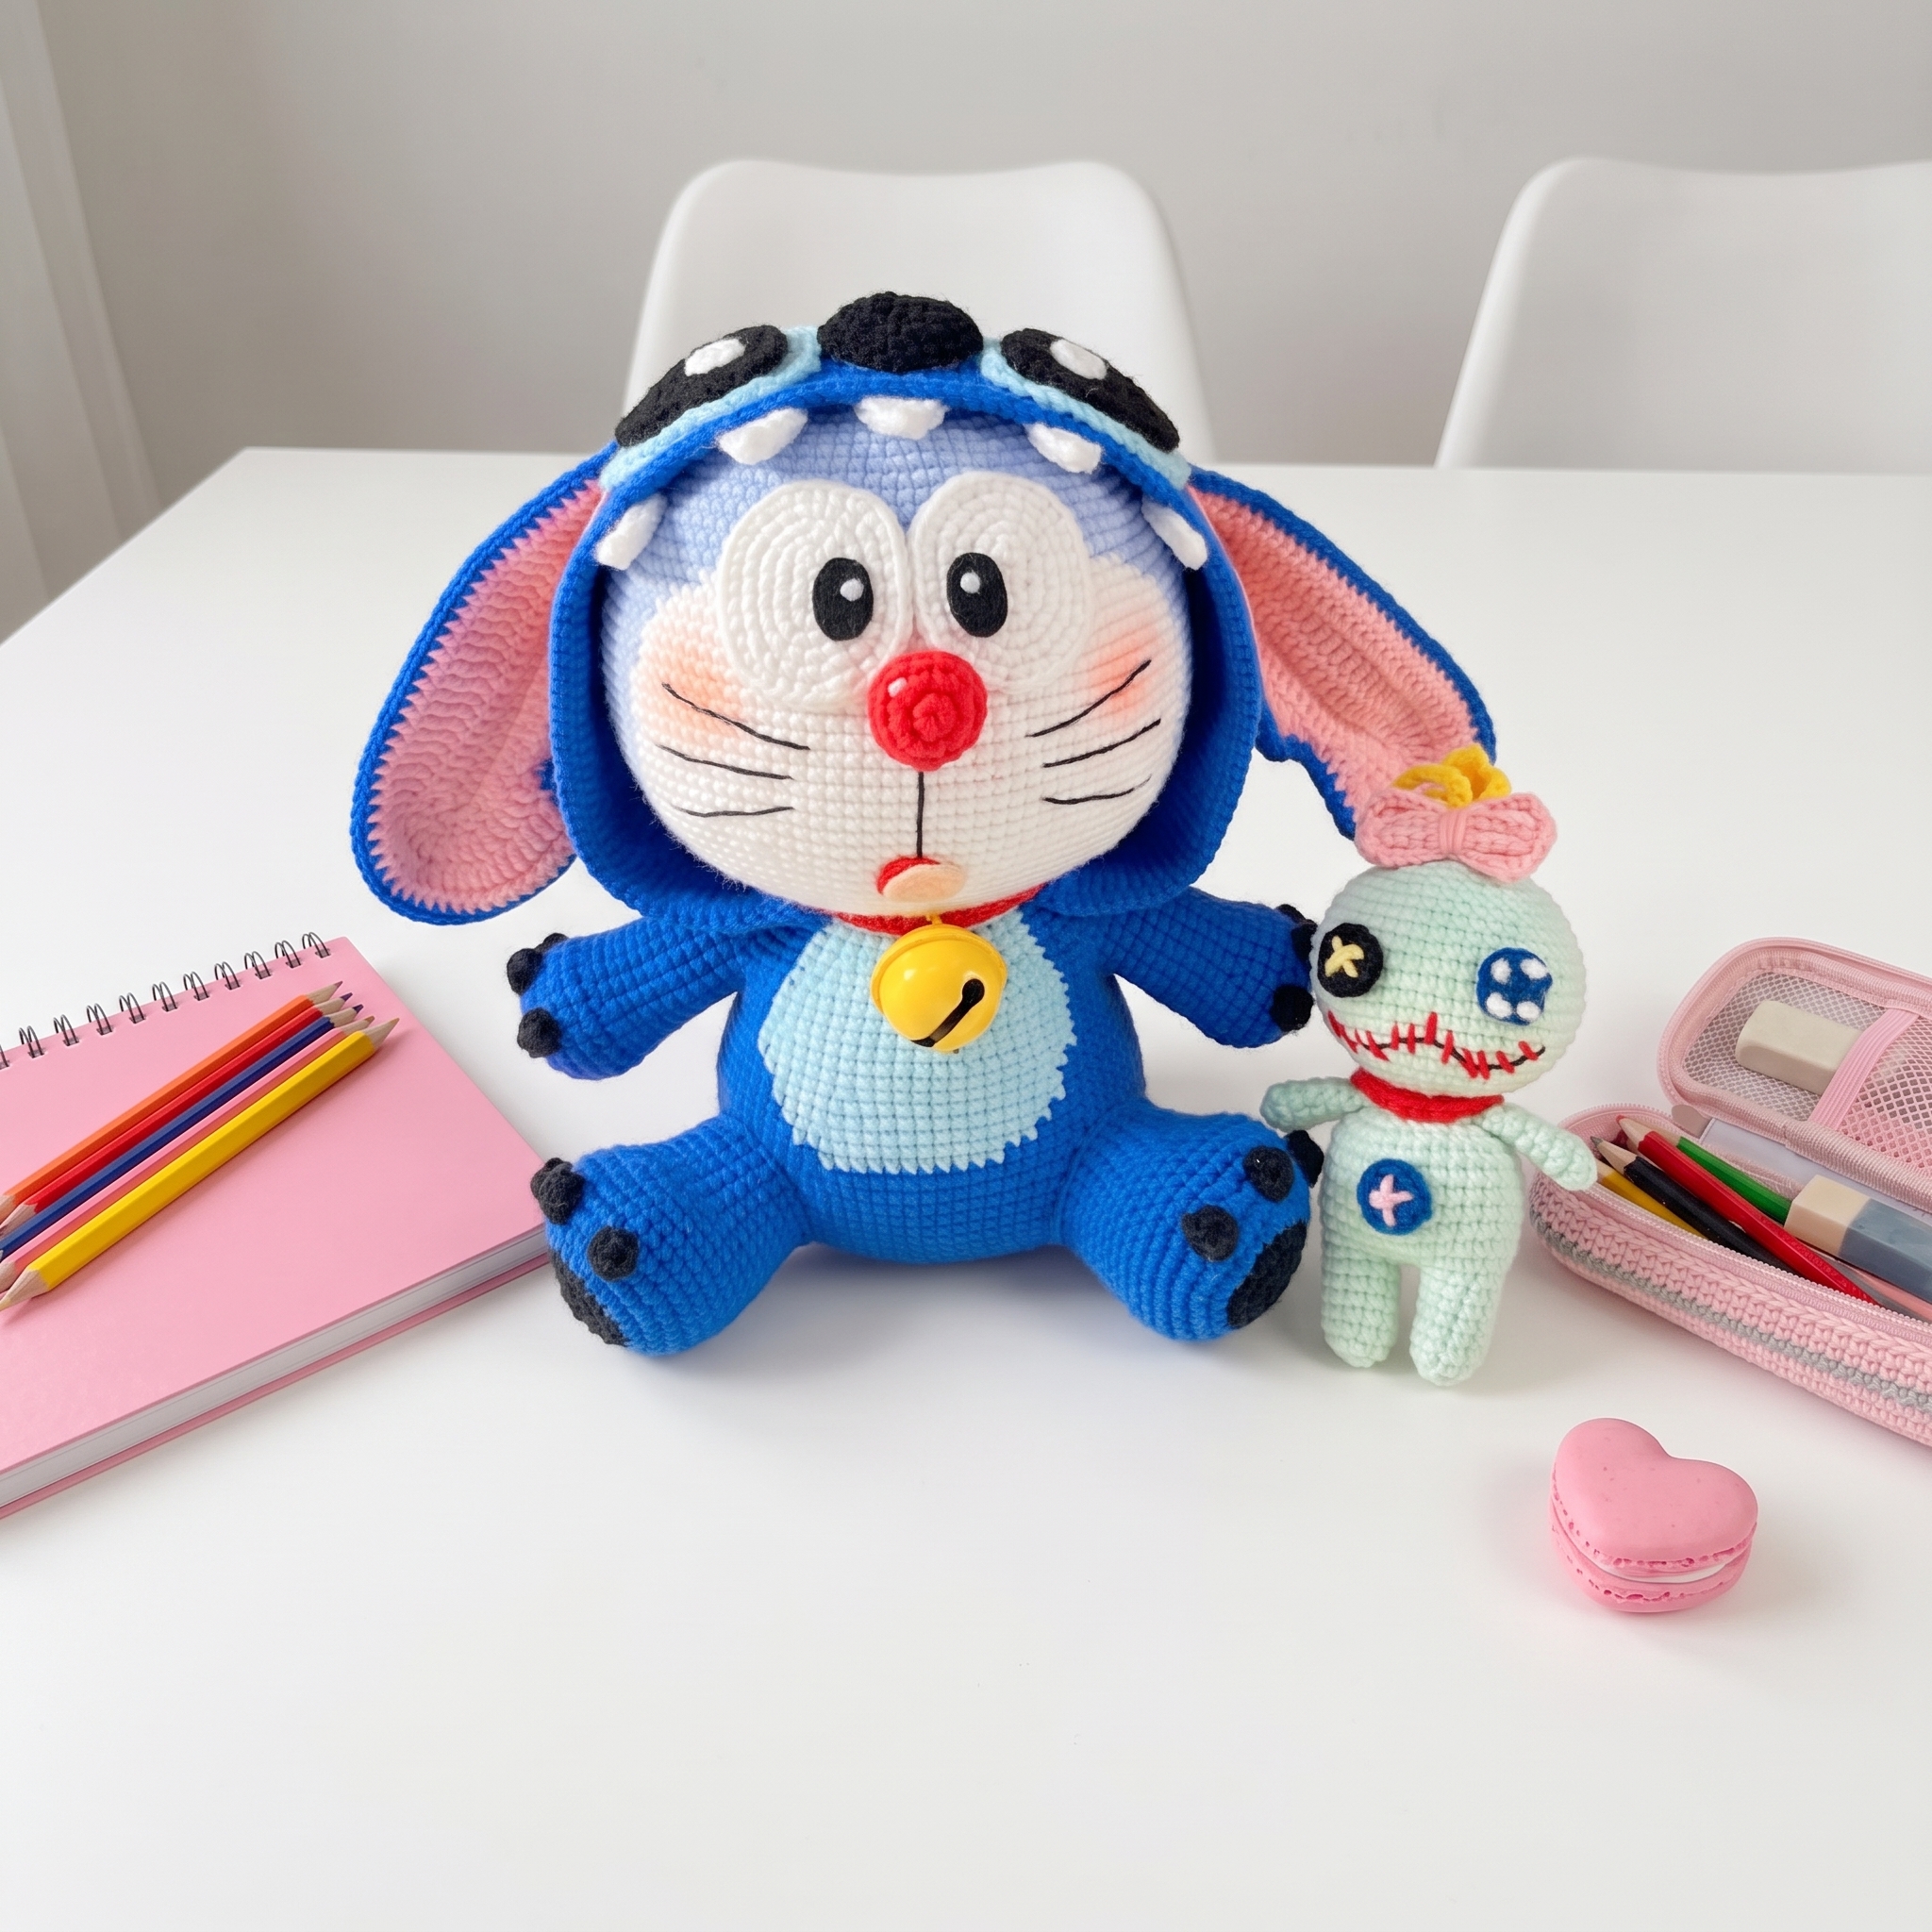
Doraemon in a Stitch Costume – Amigurumi Pattern
Materials
- Hook: 2.0 mm
- Non-woven craft bells, 22 mm
- Yarn: 4-ply combed milk cotton, held/worked as noted per piece. Colors used (by code): main blue (color group 2), water blue, sky blue, blue-green, white, dark pink, black, and a yellow ("chick yellow") for the rag doll's hair
- Stuffing (fiberfill)
- Sewing needle
Abbreviations
- ch – chain
- sc – single crochet
- inc – increase
- dec – decrease
- sl st – slip stitch
- inc3 / dec3 – 3-stitch increase or decrease worked into/over one stitch
- hdc – half double crochet
- dc – double crochet
- dc-increase – increase made of double crochets
- BLO – back loop only
- FLO – front loop only
- ( )×n – repeat the stitches in parentheses n times
Note on color: In the original pattern, certain rounds mix two yarn colors within the same round (e.g., blue with sky-blue sections). Where the source clearly marked this, it's noted in the instructions below as "(sky blue)."
1. Legs (make 2)
Worked with a black-yarn color change noted at the start.
- Rnd 1: 8 sc in magic ring (8)
- Rnd 2: 8 inc (16)
- Rnd 3: (sc, inc) × 8 (24)
- Rnd 4: switch to blue: (2 sc, inc) × 8 (32)
- Rnd 5: inc, 5 sc, (inc, 4 sc) × 3, sc, (inc, 4 sc) × 2 (38)
- Rnd 6: 11 sc, (5-stitch bobble, 3 sc) × 3, 15 sc (38)
- Rnds 7–9: sc around (38) — 3 rounds
- Rnd 10: 32 sc, dec, 2 sc, dec (36)
- Rnd 11: 11 sc, (sc, dec) × 4, 13 sc (32)
- Rnd 12: 10 sc, 4 dec, 14 sc (28)
- Rnds 13–18: sc around (28) — 6 rounds
Stuff, leave a long tail, and cut yarn.
What it teaches: color-change starts, textured bobble stitches, and long straight sections for stuffing.
2. Arms (make 2)
Also begins with a noted black-yarn color change.
- Rnd 1: 8 sc in magic ring (8)
- Rnd 2: 8 inc (16)
- Rnd 3: switch to blue: (sc, inc) × 8 (24)
- Rnd 4: 7 sc, (5-stitch bobble, 3 sc) × 3, 5 sc (24)
- Rnds 5–7: sc around (24) — 3 rounds
- Rnd 8: (2 sc, dec) × 6 (18)
- Rnd 9: sc around (18)
- Rnd 10: inc, 17 sc (19)
- Rnds 11–17: sc around (19) — 7 rounds
Cut yarn.
What it teaches: matching bobble-stitch placement between paired pieces and shaping a simple tapered limb.
3. Body (blue)
⚠️ From Round 16 onward, this section includes color-coded stitches for a sky-blue belly panel. The stitch counts below are transcribed exactly as written, but double-check the color placement against your printed photos as you work.
- Rnd 1: ch 15, starting from the 2nd ch from hook: 13 sc, 3 sc in the same stitch, 12 sc, inc (30)
- Rnd 2: sc, inc, 9 sc, (sc, inc) × 3, 9 sc, (sc, inc) × 2 (36)
- Rnd 3: inc, 11 sc, (inc, 2 sc) × 3, 9 sc, (inc, 2 sc) × 2 (42)
- Rnd 4: 3 sc, inc, 9 sc, (3 sc, inc) × 3, 9 sc, (3 sc, inc) × 2 (48)
- Rnd 5: inc, 13 sc, (inc, 4 sc) × 3, 9 sc, (inc, 4 sc) × 2 (54)
- Rnd 6: 5 sc, inc, 9 sc, (5 sc, inc) × 3, 9 sc, (5 sc, inc) × 2 (60)
- Rnd 7: inc, 15 sc, (inc, 6 sc) × 3, 9 sc, (inc, 6 sc) × 2 (66)
- Rnd 8: 7 sc, inc, 9 sc, (7 sc, inc) × 3, 9 sc, (7 sc, inc) × 2 (72)
- Rnd 9: inc, 17 sc, (inc, 8 sc) × 3, 9 sc, (inc, 8 sc) × 2 (78)
- Rnd 10: inc, 76 sc, inc (80)
- Rnds 11–14: sc around (80) — 4 rounds
- Rnd 15: 6 sc, dec, 23 sc, dec, 13 sc, dec, 13 sc, dec, 17 sc (76)
From here, switch in sky-blue yarn for the marked belly section:
- Rnd 16: 47 sc (blue), 11 sc (sky blue), 18 sc (blue) (76)
- Rnd 17: 45 sc (blue), 5 sc (sky blue), 16 sc (blue) (76)
- Rnd 18: 13 sc, dec, 15 sc, dec, 12 sc (blue), 13 sc (sky blue), dec, 2 sc, 13 sc (blue), dec (72)
- Rnds 19–20: 41 sc (blue), 8 sc (sky blue), 13 sc (blue) (72) — 2 rounds
- Rnd 21: 5 sc, dec, (10 sc, dec) × 2, 9 sc, sc, dec, 10 sc (sky blue), dec, 5 sc, 5 sc, dec, 5 sc (66)
- Rnds 22–23: 36 sc (blue), 20 sc (sky blue), 10 sc (blue) (66) — 2 rounds
- Rnd 24: (9 sc, dec) × 3, 3 sc, 6 sc, dec, 9 sc, dec, sc, 8 sc, dec (60)
- Rnd 25: 24 sc, 6 sc (attach Arm 1 here), 3 sc, 18 sc, 3 sc, 6 sc (attach Arm 2 here) (60)
- Rnd 26: 24 sc, 13 sc (worked across the arm), 3 sc, 18 sc, 3 sc, 13 sc (worked across the arm) (74)
- Rnd 27: 30 sc, dec, 8 sc, 18 sc, 8 sc, dec, 6 sc (72)
- Rnd 28: 5 sc, dec, (10 sc, dec) × 2, 8 sc, 2 sc, dec, 10 sc, dec, 2 sc, 8 sc, dec, 5 sc (66)
- Rnd 29: (9 sc, dec) × 3, 3 sc, 6 sc, dec, 8 sc, 3 sc, dec, 7 sc, dec (60)
- Rnd 30: 4 sc, dec, (8 sc, dec) × 2, 7 sc, sc, dec, 8 sc, dec, 2 sc, 7 sc, dec, 3 sc (54)
- Rnd 31: (7 sc, dec) × 3, 3 sc, 4 sc, dec, 7 sc, 3 sc, dec, 4 sc, dec (48)
- Rnd 32: 27 sc, 12 sc, 9 sc, worked in back loops only (48)
Leave a long tail and cut yarn.
What it teaches: intarsia-style single-round color blocking, attaching limbs mid-round, and reading long compound stitch sequences.
4. Eyes – white base (make 2)
- Rnd 1: ch 5, starting from the 2nd ch from hook: 3 sc, 3 inc, 2 sc, inc (10)
- Rnd 2: inc, 2 sc, 3 inc, 2 sc, 2 inc (16)
- Rnd 3: sc, inc, 2 sc, (sc, inc) × 3, 2 sc, (sc, inc) × 2 (22)
- Rnd 4: inc, 2 sc, 2 sc, (inc, 2 sc) × 3, 2 sc, (inc, 2 sc) × 2 (28)
Leave a long tail and cut yarn.
What it teaches: oval-shaped flat panels using a chain-start technique, useful for layered facial details.
5. Nose base (red)
- Rnd 1: 6 sc in magic ring (6)
(The original pattern refers to accompanying photos for shaping this piece; no further written rounds were given in the source. The photo shows two small white petal-shaped pieces worked separately — likely used as eyelid or cheek accents — but the source text doesn't include written instructions for them.)
6. Hood (blue)
- Rnd 1: 7 sc in magic ring (7)
- Rnd 2: 7 inc (14)
- Rnd 3: (sc, inc) × 7 (21)
- Rnd 4: (2 sc, inc) × 7 (28)
- Rnd 5: (3 sc, inc) × 7 (35)
- Rnd 6: (4 sc, inc) × 7 (42)
- Rnd 7: (5 sc, inc) × 7 (49)
- Rnd 8: (6 sc, inc) × 7 (56)
- Rnd 9: (7 sc, inc) × 7 (63)
- Rnd 10: (8 sc, inc) × 7 (70)
- Rnd 11: (9 sc, inc) × 7 (77)
- Rnd 12: (10 sc, inc) × 7 (84)
- Rnd 13: (11 sc, inc) × 7 (91)
- Rnd 14: sc around (91)
- Rnd 15: (12 sc, inc) × 7 (98)
- Rnd 16: sc around (98)
- Rnd 17: (13 sc, inc) × 7 (105)
- Rnd 18: sc around (105)
- Rnd 19: (14 sc, inc) × 7 (112)
- Rnd 20: sc around (112)
- Rnd 21: (15 sc, inc) × 7 (119)
- Rnd 22: sc around (119)
- Rnd 23: (16 sc, inc) × 7 (126)
- Rnd 24: sc around (126)
- Rnd 25: sc around, working only 116 stitches (116)
Turn
- Rnds 26–39: skip 10 sc, then sc around the remaining 116 stitches (116) — 14 rows, worked back and forth to shape the hood opening
Turn
- Rnd 40: single crochet evenly around the entire outer edge of the hood (sew the hood onto the head first, then close up the opening)
What it teaches: building a large rounded panel with steadily spaced increases, then working turned rows to shape an opening — great practice for hats, hoods, and other wearable amigurumi accessories.
7. Blue Hair (antenna tufts)
- Rnd 1: (ch 12, starting from the 2nd ch from hook: 10 sc, sl st) × 3
Leave a long tail for sewing.
What it teaches: making small textured chain-loops for hair or fur accents.
8. Head (light/sky blue)
⚠️ Like the Body section, rounds 17 onward include a color change (marked in red text in the original, indicating white yarn for the muzzle) that's difficult to place with full certainty from text alone. Cross-check these rounds against your reference photos as you go.
- Rnd 1: ch 9, starting from the 2nd ch from hook: 7 sc, inc3, 6 sc, inc (18)
- Rnd 2: inc, 6 sc, 3 inc, 6 sc, 2 inc (24)
- Rnd 3: sc, inc, 6 sc, (sc, inc) × 3, 6 sc, (sc, inc) × 2 (30)
- Rnd 4: inc, 2 sc, 6 sc, (inc, 2 sc) × 3, 6 sc, (inc, 2 sc) × 2 (36)
- Rnd 5: 3 sc, inc, 6 sc, (3 sc, inc) × 3, 6 sc, (3 sc, inc) × 2 (42)
- Rnd 6: inc, 4 sc, 6 sc, (inc, 4 sc) × 3, 6 sc, (inc, 4 sc) × 2 (48)
- Rnd 7: 5 sc, inc, 6 sc, (5 sc, inc) × 3, 6 sc, (5 sc, inc) × 2 (54)
- Rnd 8: (4 sc, inc, 4 sc) × 6 (60)
- Rnd 9: (9 sc, inc) × 6 (66)
- Rnd 10: (5 sc, inc, 5 sc) × 6 (72)
- Rnd 11: (11 sc, inc) × 6 (78)
- Rnd 12: (6 sc, inc, 6 sc) × 6 (84)
- Rnd 13: sc around (84)
- Rnd 14: (13 sc, inc) × 6 (90)
- Rnd 15: sc around (90)
- Rnd 16: (7 sc, inc, 7 sc) × 6 (96)
Switch to white yarn for the marked sections from here:
- Rnd 17: 53 sc (blue), 22 sc (white), 21 sc (blue) (96)
- Rnd 18: (15 sc, inc) × 3, 3 sc, 12 sc, inc, 13 sc, 2 sc, inc, 15 sc, inc (102)
- Rnd 19: 52 sc, 31 sc (white), 19 sc (102)
- Rnd 20: 8 sc, inc, (16 sc, inc) × 2, 8 sc, inc, 16 sc, inc, 7 sc, 9 sc, inc, 8 sc (108)
- Rnds 21–23: 53 sc, 37 sc (white), 18 sc (108) — 3 rounds
- Rnds 24–33: 52 sc, 39 sc (white), 17 sc (108) — 10 rounds
- Rnd 34: 8 sc, dec, (16 sc, dec) × 2, 6 sc, 10 sc, dec, 16 sc, dec, 9 sc, 7 sc, dec, 8 sc (102)
- Rnd 35: 49 sc, 37 sc (white), 16 sc (102)
- Rnd 36: (15 sc, dec) × 2, 15 sc, 2 sc, dec, 13 sc, dec, 14 sc, dec, 2 sc, 14 sc (96)
- Rnd 37: 47 sc, 34 sc (white), 15 sc (96)
- Rnd 38: 7 sc, dec, (14 sc, dec) × 2, 6 sc, 8 sc, dec, 14 sc, dec, 8 sc, 6 sc, dec, 7 sc (90)
- Rnd 39: (13 sc, dec) × 2, 10 sc, dec, 2 sc, 14 sc, dec, 12 sc, dec, 2 sc, 12 sc, dec (84)
- Rnd 40: (5 sc, dec) × 5, 2 sc, dec, 6 sc, dec, (5 sc, dec) × 2, 4 sc, dec, 2 sc, 4 sc, dec, 5 sc, dec (72)
- Rnd 41: 7 sc, dec, 16 sc, dec, 4 sc, dec, 2 sc, 8 sc, dec, 16 sc, 2 sc, dec, 5 sc, dec (66)
- Rnd 42: dec, 15 sc, dec, 6 sc, dec, 5 sc, 2 sc, dec, 14 sc, dec, 5 sc, 2 sc, dec, 5 sc (60)
- Rnd 43: 5 sc, dec, 14 sc, dec, 2 sc, dec, 2 sc, 6 sc, dec, 15 sc, 2 sc, dec, 2 sc, dec (54)
- Rnd 44: dec, 13 sc, dec, 4 sc, dec, 3 sc, 2 sc, dec, 12 sc, dec, 4 sc, 2 sc, dec, 2 sc (48)
- Rnd 45: 23 sc, 20 sc (white), 5 sc (48)
Stuff firmly and leave a long tail for sewing on.
What it teaches: large-scale color-block shaping across dozens of rounds, and reading long, densely packed decrease sequences.
9. Tail (blue)
- Rnd 1: 6 sc in magic ring — (matches the arm/leg starting count; source: 8 sc in magic ring) (8)
- Rnd 2: 8 inc (16)
- Rnd 3: (sc, inc) × 8 (24)
- Rnds 4–8: sc around (24) — 5 rounds
Stuff and leave a long tail.
What it teaches: a simple tapered cylinder — good practice piece for beginners.
10. Left Ear (make 2: 1 pink piece + 1 blue piece per ear)
- Row 1: ch 32, starting from the 2nd ch from hook: 30 sc, 4-sc increase, 30 sc, turn
- Row 2: 30 dc, 3 dc-increases, 30 dc, turn
- Row 3: 23 dc, 3 sl st, 4 sc, 6 dc-increases, 30 sc, turn
- Row 4: 30 sc, (sl st, dc-increase) × 6, 3 sc, turn
- Row 5: 50 sc, 14 sc, 22 dc, turn
- Row 6: 22 sc
(The pattern marks a pink dashed line and a blue solid line on the diagram to show the shaping — refer to your photo reference.)
Place the pink ear piece over the blue ear piece, join the two layers, and single crochet evenly around the edge. Fold and sew across the bottom edge of the ear, leaving a long tail.
11. Right Ear (make 2: 1 pink piece + 1 blue piece per ear)
- Row 1: ch 32, starting from the 2nd ch from hook: 30 sc, 4-sc increase, 30 sc, turn
- Row 2: 30 sc, 3 dc-increases, 30 dc, turn
- Row 3: 30 dc, 6 dc-increases, 4 sc, 3 sl st, 23 dc, turn
- Row 4: 22 dc, turn
- Row 5: 22 sc, 14 sc, 30 sc, (dc, dc-increase) × 6, 3 dc, turn
- Row 6: 50 sc
Place the pink ear piece over the blue ear piece, join the two layers, and single crochet evenly around the edge. Fold and sew across the bottom edge of the ear, leaving a long tail.
12. Nose (black)
- Rnd 1: ch 5, starting from the 2nd ch from hook: 3 sc, inc3, 2 sc, inc (10)
- Rnd 2: inc, 2 sc, 3 inc, 2 sc, 2 inc (16)
- Rnd 3: sc, inc, 2 sc, (sc, inc) × 3, 2 sc, (sc, inc) × 2 (22)
- Rnd 4: inc, 2 sc, 2 sc, (inc, 2 sc) × 3, dec3, (inc, 2 sc) × 2 (27)
What it teaches: small-scale increase/decrease shaping for a rounded, raised nose piece.
13. Eye – outer black rim (make 2)
- Rnd 1: ch 8, starting from the 2nd ch from hook: 3 sc, 3 hdc, 3-dc increase, 3 dc, 3 sc
- Rnd 2: 3 sc, 3 hdc, 3 dc-increases, 3 dc, 3 sc
- Rnd 3: sc, inc, sc, hdc, hdc-increase, hdc, 6 dc-increases, hdc, hdc-increase, hdc, sc, inc
What it teaches: mixed-stitch-height rounds (sc/hdc/dc combined) to build a flat, expressive eye shape.
14. Iris (sky blue, make 2)
- Rnd 1: ch 8, starting from the 2nd ch from hook: 3 sc, 3 hdc, 3-dc increase, 3 dc, 3 sc
- Rnd 2: 3 sc, 3 hdc, 3 dc-increases, 3 dc, 3 sc
- Rnd 3: sc, inc, sc, hdc, hdc-increase, hdc, 6 dc-increases, hdc, hdc-increase, hdc, sc, inc, sc
- Rnd 4: 4 sc, 4 hdc, (dc, dc-increase) × 6, 4 hdc, 4 sc
15. Eyeball (white, make 2)
- 6 sc in magic ring, pull closed tightly
16. Mini Rag Doll (Scrump-style companion)
A small extra project worked in a separate color, with pink bow, red scarf, and yellow yarn hair.
Arms (make 2)
- Rnd 1: 6 sc (6)
- Rnd 2: (sc, inc) × 3 (9)
- Rnd 3: sc around (9)
- Rnd 4: (sc, dec) × 3 (6)
- Rnds 5–6: sc around (6) — 2 rounds
- Rnd 7: fold flat and work 3 sc through both layers to close
Legs (make 2, then joined into the body)
- Rnd 1: 6 sc (6)
- Rnd 2: (sc, inc) × 3 (9)
- Rnds 3–6: sc around (9) — 4 rounds
- Rnd 7: ch 3 to join both legs, then: 9 sc, 3 sc, 9 sc, 3 sc (24)
- Rnd 8: (3 sc, inc) × 6 (30)
- Rnds 9–14: sc around (30) — 6 rounds
- Rnd 15: (3 sc, dec) × 6 (24)
- Rnd 16: (2 sc, dec) × 6 (18)
- Rnd 17: (sc, dec) × 6 (12) (attach the arms here, one on each side)
- Rnd 18: sc around (12)
- Rnd 19: (sc, inc) × 6 (18)
- Rnd 20: (2 sc, inc) × 6 (24)
- Rnd 21: (3 sc, inc) × 6 (30)
- Rnd 22: (4 sc, inc) × 6 (36)
- Rnd 23: (5 sc, inc) × 6 (42)
- Rnd 24: sc around (42)
- Rnd 25: 7 sc, (sc, inc) × 3, 9 sc, (inc, sc) × 3, 14 sc (48)
- Rnds 26–28: sc around (48) — 3 rounds
- Rnd 29: 7 sc, (sc, dec) × 3, 9 sc, (dec, sc) × 3, 14 sc (42)
- Rnds 30–32: sc around (42) — 3 rounds
- Rnd 33: (5 sc, dec) × 6 (36)
- Rnd 34: (4 sc, dec) × 6 (30)
- Rnd 35: (3 sc, dec) × 6 (24)
- Rnd 36: (2 sc, dec) × 6 (18)
- Rnd 37: (sc, dec) × 6 (12)
- Rnd 38: 6 dec (6)
Close the opening and weave in the end.
Bow (pink)
- Row 1: ch 11, starting from the 2nd ch from hook: 10 sc worked in back loops only, turn
- Rows 2–8: 10 sc in turned rows
- Edging: single crochet evenly around the entire edge
Scarf (red)
- Row 1: ch 13, starting from the 2nd ch from hook: 12 sc
Finish off (adjust the length as needed).
Hair (yellow)
- Row 1: (ch 15, starting from the 2nd ch from hook: 14 sl st) × 5
Leave a long tail.
Buttons Make 1 black and 2 blue small button pieces, worked in the round and closed.
What it teaches: a fun bonus mini-project that reinforces everything from the main doll — joined limbs, flat panel pieces, and simple accessories — at a much smaller, faster scale.
Final Section: Where to Go from Here
This is a genuinely advanced amigurumi project — multi-piece heads, in-round color changes, turned-row hood shaping, and a bonus companion doll all in one pattern. Once you've completed it, you'll be ready to tackle almost any complex character amigurumi, especially ones involving wearable costume pieces, layered ears, and detailed multi-part faces. Next steps might include designing your own costume variations or experimenting with surface embroidery for facial details like whiskers and blush.