August 3, 2026
Katrina Carmela Doll – Detailed Amigurumi Crochet Pattern with Dress & Accessories
Bring this beautifully detailed doll to life with a multi-colored ruffled dress, wire-posed limbs, and intricate hair styling. Perfect for advanced crocheters ready to master complex color changes, split clusters, and structural assembly.
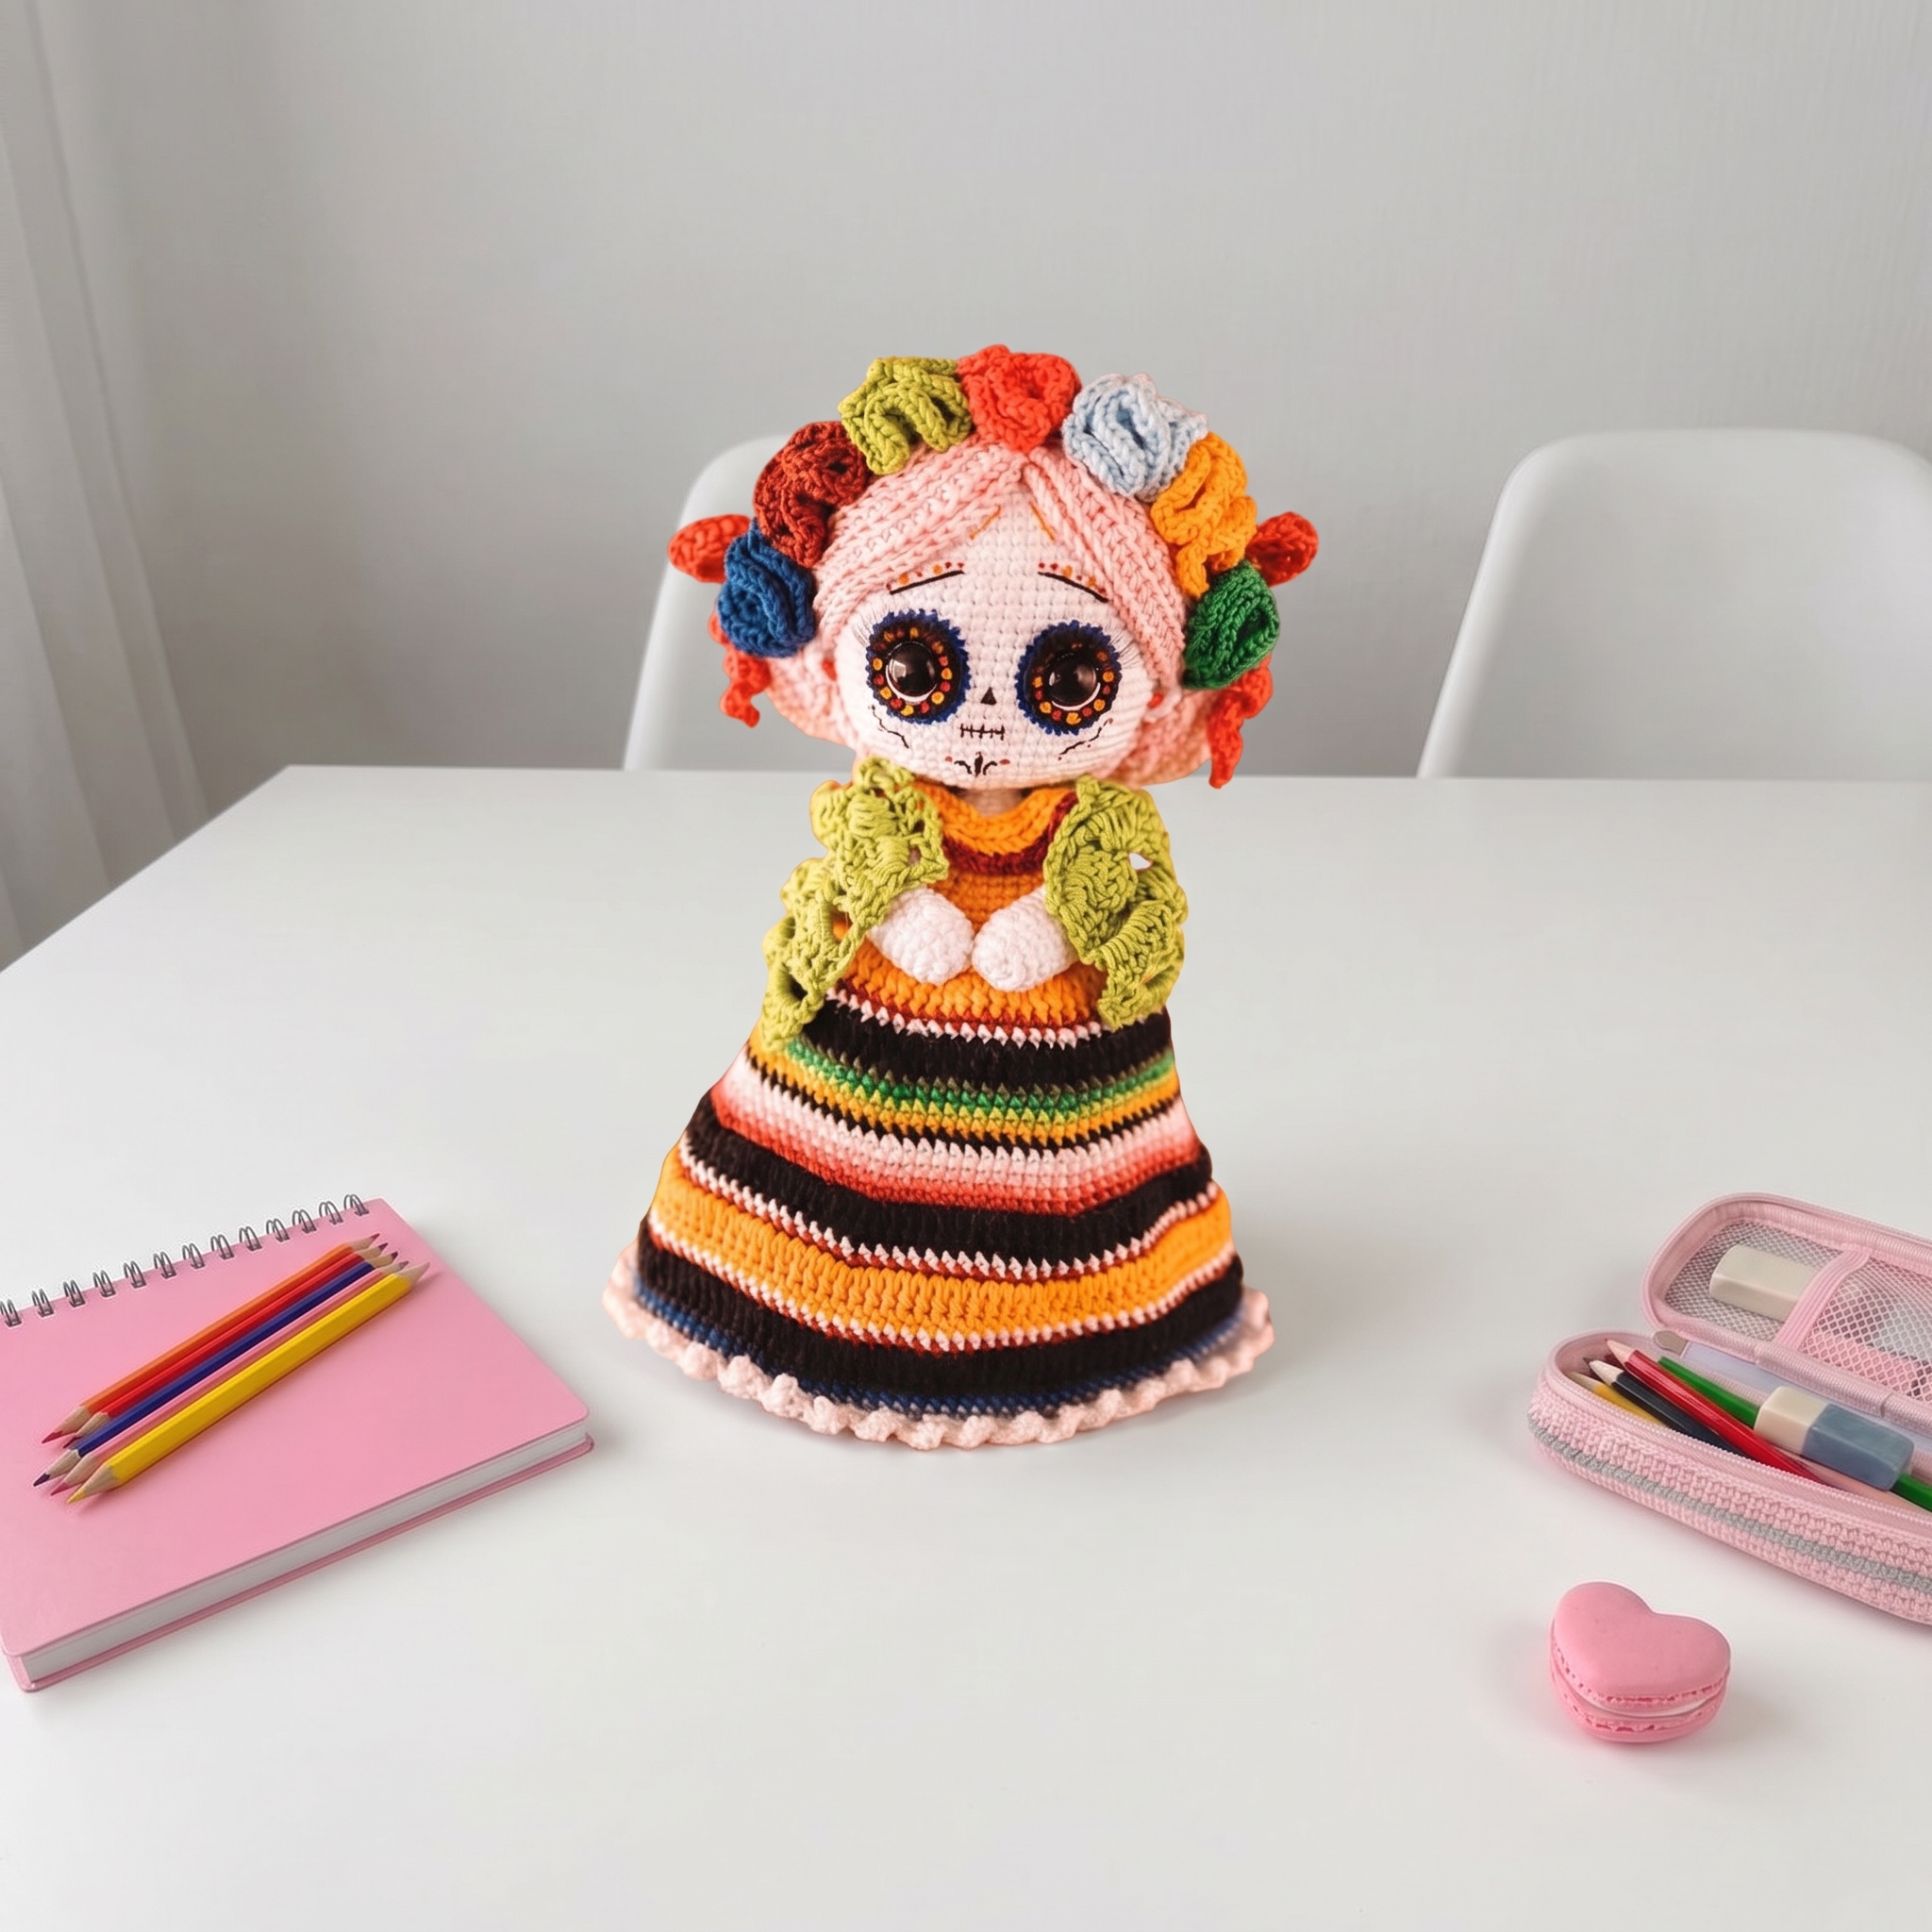
Katrina Carmela Doll – Complete Step-by-Step Pattern
1. Materials & Abbreviations
This section covers everything you need to gather before beginning. Using the recommended materials ensures the correct gauge and a professional, durable finish.
- Hooks: 2.5 mm, 2.75 mm, 3 mm, and 4 mm (Note: The body base must be worked with a 2.5 mm hook. Change hooks for other pieces only where explicitly specified).
- Yarn (Amigurumi Círculo): Lightweight, 100% mercerized cotton, 125g, 200m (rec. 3 mm hook). Colors: White, Black, Egg Yolk, Forest Green, Flag Green, Verdor Green, Quartz, Bubblegum, Tulip, Marsala, Rich Indigo, Bic Blue, Pastel Blue.
- Yarn (La Perla Omega): Very thin, 100% mercerized cotton, 50g, 254m (rec. 1.5 mm hook). Colors: White, Black.
- Notions: Synthetic stuffing, one pair of 14 mm safety eyes, 2 mm galvanized wire, silicone glue, scissors, ruler, stitch markers, pins, yarn needle, acetate sheet, wire cutters, pliers, acrylic or fabric paints (royal blue, strawberry pink, orange, black), fine metal tools or very thin stiff brushes, false eyelashes.
- Abbreviations:
- MR – magic ring
- ch – chain
- sl st – slip stitch
- sc – single crochet
- hdc – half double crochet
- dc – double crochet
- tr – treble crochet
- inc – increase (2 sc in one st)
- inc hdc – 2 hdc in one st
- inc dc – 2 dc in one st
- inc tr – 2 tr in one st
- 3 sc in one st – 3 sc in one st
- 3 hdc in one st – 3 hdc in one st
- 3 dc in one st – 3 dc in one st
- 3 tr in one st – 3 tr in one st
- dec – decrease
- dec hdc – hdc decrease
- dec dc – dc decrease
- BLO – back loop only
- FLO – front loop only
- FPR sc – front post single crochet
- BPR sc – back post single crochet
- FPR dc – front post double crochet
- BPR dc – back post double crochet
- puff st – puff stitch
- 3 sc dec – 3 sc crocheted together
- picot – 3 ch and 1 sl st in first ch
- 4-dc puff st – 4 unfinished dc crocheted together
- split cluster – split cluster (detailed in Dress section)
- dc together – dc crocheted together
What it teaches: Proper tool selection, gauge management, and familiarization with advanced international crochet abbreviations and textured stitches.
2. Head
The head is worked in a continuous spiral starting from a magic ring, building up to a rounded shape, then decreased. Facial features are added during assembly.
- R1: 6 sc in MR (6)
- R2: 6 inc (12)
- R3: (1 sc, inc) x 6 (18)
- R4: 1 sc, inc, (3 sc, inc) x 5, 1 sc (24) [Editor’s Note: Corrected from original text which mathematically yielded 19 stitches, to achieve the stated 24.]
- R5: (3 sc, inc) x 6 (30)
- R6: 2 sc, inc, (5 sc, inc) x 5, 2 sc (36) [Editor’s Note: Corrected from original text which mathematically yielded 31 stitches, to achieve the stated 36.]
- R7: (5 sc, inc) x 6 (42)
- R8: 3 sc, inc, (7 sc, inc) x 5, 3 sc (48) [Editor’s Note: Corrected from original text which mathematically yielded 43 stitches, to achieve the stated 48.]
- R9: (7 sc, inc) x 6 (54)
- R10: 4 sc, inc, (9 sc, inc) x 5, 4 sc (60) [Editor’s Note: Corrected from original text which mathematically yielded 55 stitches, to achieve the stated 60.]
- R11: (14 sc, inc) x 4 (64)
- R12-27: 64 sc (64) [16 rows]
- R28: (14 sc, dec) x 4 (60) [Note: Decreases must align vertically with the increases in R11.]
- R29: 4 sc, dec, (8 sc, dec) x 5, 4 sc (54)
- R30: (7 sc, dec) x 6 (48)
- R31: 3 sc, dec, (6 sc, dec) x 5, 3 sc (42)
- R32: (5 sc, dec) x 6 (36)
- R33: (2 sc, dec) x 9 (27)
- R34: 1 sc, dec, (2 sc, dec) x 6 (20)
- R35: (2 sc, dec) x 5 (15)
- Finishing: Cut yarn, leaving a long tail for sewing the head to the body.
What it teaches: Spiral increase sequences, staggered shaping for spherical forms, and precise decrease alignment.
3. Eye Sockets & Ears
These small facial components add depth and character to the doll.
Eye Sockets (Black, Amigurumi yarn, 2.5 mm hook, spiral, make 2):
- R1: 6 sc in MR (6)
- R2: 6 inc (12)
- R3: (1 sc, inc) x 6 (18)
- Finishing: Work 2 additional sl st to avoid a visible step between the last stitch and the beginning of the round. Cut yarn and hide the tail.
Ears (White, Amigurumi yarn, 2.5 mm hook, turned rows, make 2):
- Row 1: Ch 2. Starting in 2nd ch from hook: 6 sc.
- Row 2: Turn, ch 1, 6 sc.
- Finishing: Cut yarn, leaving a long tail.
Assembly: Insert a 14 mm safety eye into the center of each black eye socket. Apply a drop of silicone glue between the finished eye and the crocheted piece. Embroider the white of the eye using La Perla white yarn. Insert the completed eyes into the head between R21 and R22, spaced 10 stitches apart. Apply silicone glue between the eye socket and the head. Sew the ears to the head between R22 and R25, ensuring there are 10 stitches between the eye and the ear attachment point.
What it teaches: Multi-step facial assembly, utilizing silicone glue for security, and precise placement mapping.
4. Arms
The arms are built with an internal wire for posability and feature a delicate puff-stitch detail.
- R1: 7 sc in MR (7)
- R2: 7 inc (14)
- R3-4: 14 sc (14) [2 rows]
- R5: 3 sc, 4-dc puff st, 10 sc (14)
- R6-22: 14 sc (14) [17 rows]
- Assembly: Insert the wire as shown in reference photos. Lightly stuff the arm; it should remain slightly flat, not fully tubular. Add more stuffing to the lower part (hand) than the upper part. Before the last row, flatten the piece and crochet through both sides to close the opening.
- R23: 6 sc (6)
- Finishing: Leave a long tail. Sew arms to the body between R48 and R49. Ensure the thumbs face forward. If a color change is present, position it on the inner side to remain hidden.
What it teaches: Working with internal armatures (wire), partial stuffing for natural drape, and flattening techniques for seamless closures.
5. Legs & Body Base
The legs are shaped with a structured sole and joined seamlessly to form the torso, which is reinforced with a wire frame.
Legs (White, Amigurumi yarn, 2.5 mm hook, spiral):
- R1: Ch 5, turn. Starting in 2nd ch from hook: inc, 2 sc, inc; down the opposite side of the chain: inc, 2 sc, inc (12)
- R2: inc, 3 sc, 2 inc, 5 sc, inc (16)
- R3: inc, 5 sc, 3 inc, 5 sc, 2 inc (22)
- R4: BLO: 22 sc (22)
- R5-7: 22 sc (22) [3 rows]
- Assembly: Cut a piece of acetate to the size of the sole and insert it before continuing to close the piece for stability.
- R8: 8 sc, 2 dec, 10 sc (20)
- R9: 6 sc, 3 dec, 8 sc (17)
- R10-16: 17 sc (17) [7 rows]
- Note: Position the hook at the center back of the leg before the next row so the knee-forming stitches end up in the middle front.
- R17: 6 sc, 4 inc, 7 sc (21)
- R18: 7 sc, 2 (3 sc dec), 8 sc (17)
- R19: 4 sc, inc, 6 sc, inc, 4 sc, inc (20)
- R20-25: 20 sc (20) [6 rows]
Joining the Legs: Make the right leg identically. After completing R25 of the second leg, do not cut yarn. Crochet the necessary sc to reach the center back of the leg. This is where R26 begins.
- R26: 5 sc on right leg, 2 ch, 20 sc on left leg (first leg made, ensuring the first stitch is centered on the inner side), 2 sc on the front side of the ch chain, 15 sc on the right leg (44)
- Note: Position the hook at the center back again. Start the next row from this point.
- R27: (10 sc, inc) x 4 (48)
- R28: (7 sc, inc) x 6 (54)
- R29-32: 54 sc (54) [4 rows]
- Assembly: Pause to make the frame and stuff. Use 2 mm galvanized wire. Join 2 wire pieces and twist them together (do not wrap one around the other, or the straight part will move vertically). The center part should reach the neck continuation. Tape the wire ends. Insert the frame, bending the wire at the feet into an L-shape to fix it securely. Stuff gradually.
- R33: (7 sc, dec) x 6 (48)
- Change to Egg Yolk color.
- R34-36: 48 sc (48) [3 rows]
- R37: 9 sc, dec, 11 sc, dec, 10 sc, dec, 10 sc, dec (44)
- R38-39: 44 sc (44) [2 rows]
- R40: dec, 6 sc, dec, 10 sc, dec, 8 sc, dec, 12 sc (40)
- R41-42: 40 sc (40) [2 rows]
- R43: (8 sc, dec) x 4 (36)
- R44-47: 36 sc (36) [4 rows]
- Change to White.
- R48: (4 sc, dec) x 6 (30)
- R49: (3 sc, dec) x 6 (24)
- R50: 12 dec (12)
- R51-52: 12 sc (12) [2 rows]
- Change to Black.
- R53: BLO: 12 sc (12)
- R54: 12 sc (12)
- R55: BLO: 12 sc (12)
- R56-67: 12 sc (12) [12 rows]
- R68: 6 dec (6)
- Finishing: Cut yarn and hide. Insert the neck continuation into the head. Sew the head to the neck area using the free front loops left in R55.
What it teaches: Oval foundation chaining, progressive limb decreasing, seamless multi-piece joining with chain bridges, and internal structural framing.
6. Shoes
The shoes are worked separately and slipped over the doll's feet for a polished look.
Shoes (Bubblegum color, Amigurumi yarn, 2.5 mm hook, spiral, make 2):
- R1: Ch 5, turn. Starting in 2nd ch from hook: inc, 2 sc, inc; down the opposite side: inc, 2 sc, inc (12)
- R2: inc, 3 sc, 2 inc, 5 sc, inc (16)
- R3: inc, 5 sc, 3 inc, 5 sc, 2 inc (22)
- R4: inc, 4 sc, inc, 3 sc, 2 inc, 4 sc, inc, 5 sc, inc (28)
- R5: BLO: 28 sc (28)
- R6-8: 28 sc (28) [3 rows]
- Assembly: Cut a piece of acetate to the size of the sole and insert it for stability.
- R9: 9 sc, 4 dec, 11 sc (24)
- R10: 9 sc, 2 dec, 11 sc (22)
- Finishing: Cut yarn and hide.
What it teaches: Creating removable accessories and reinforcing soles for standing stability.
7. Dress & Bodice
The dress features intricate color changes, textured split clusters, and a ruffled hem.
Skirt (Egg Yolk color, Amigurumi yarn, 2.5 mm hook, joined rounds):
- Note: Leave a long tail at the start for sewing later. Ch 42, join with 1 sl st. Ch 1 and work the first stitch in the same place as the sl st. (For dc rows, ch 3; for sc rows, ch 1).
- R1: (1 sc, inc) x 21 (63)
- Split Cluster Technique: Insert hook in first st as for dc, yarn over and pull up a loop (do not close dc). Insert hook in next st, repeat (do not close). When 5 loops are on hook, yarn over and pull through 3 loops. Yarn over and pull through remaining 3 loops. For the next element, always start the first unfinished dc in the same stitch where the second unfinished dc of the previous element was made.
- R2: 63 split clusters (63)
- Change to Marsala.
- R3: 63 sc (63)
- Change to White.
- R4: (8 sc, inc) x 7 (70)
- Change to Black.
- R5: 70 split clusters (70)
- Change to Forest Green.
- R6: 70 sc (70)
- Change to Flag Green.
- R7: (9 sc, inc) x 7 (77)
- Change to Verdor Green.
- R8: 77 sc (77)
- Change to Egg Yolk.
- R9: 77 sc (77)
- Change to Black.
- R10: 77 sc (77)
- Change to White.
- R11: (10 sc, inc) x 7 (84)
- Change to Quartz.
- R12: 84 sc (84)
- Change to Bubblegum.
- R13: 84 sc (84)
- Change to Tulip.
- R14: 84 sc (84)
- Change to Marsala.
- R15: (11 sc, inc) x 7 (91)
- Change to Black.
- R16: 91 split clusters (91)
- Change to White.
- R17: 91 sc (91)
- Change to Marsala.
- R18: (12 sc, inc) x 7 (98)
- Change to Egg Yolk.
- R19: 98 split clusters (98)
- R20: 98 sc (98)
- Change to White.
- R21: 98 sc (98)
- Change to Marsala.
- R22: (13 sc, inc) x 7 (105)
- Change to Black.
- R23: 105 split clusters (105)
- Change to Rich Indigo.
- R24: 105 sc (105)
- Change to Bic Blue.
- R25: (14 sc, inc) x 7 (112)
- Change to Aquarium/Pastel Blue.
- R26: 112 sc (112)
- Change to Pastel Blue.
- R27: 112 sc (112)
- Change to White.
- R28: Ch 2 (counts as 1 hdc). FLO: [(2 hdc, picot over 2nd hdc, 1 hdc) in one st, 1 ch, skip 2 sts] x 37, (2 hdc, picot over 2nd hdc, 1 hdc) in one st, 1 sl st in first st to close.
- Finishing: Cut yarn and hide. Sew skirt to the body between R38 and R39.
Dress Bodice (Egg Yolk color, Amigurumi yarn, 2.5 mm hook, turned rows):
- Note: Leave a long tail for sewing.
- Row 1: Ch 45, turn. Starting in 2nd ch from hook: 44 sc (44)
- Row 2: FLO: (10 sc, inc) x 4 (48)
- Change to Marsala.
- Row 3: BLO: 48 inc (96)
- Finishing: Cut yarn and hide. Place on the doll and sew at the back. Add a small amount of silicone glue to the chest, back, and arms to help the bodice hold its shape.
What it teaches: Intarsia-style single-round color blocking, executing complex split clusters, and working flat panels for garment bodices.
8. Hair & Accessories
The hair is built in layers with long, flowing strands, finished with braided buns and floral accents.
Hair Base & Strands (Quartz color, Amigurumi yarn, 3 mm hook):
- R1: 6 sc in MR (6)
- R2: 6 inc (12)
- R3: (1 sc, inc) x 6 (18)
- R4: (2 sc, inc) x 6 (24)
- Strands: After each strand, work 1 sl st in the next MR stitch (BLO, FLO, or skipping 1 st as specified).
- Strands 1-6 (Front): Ch 26, turn. Starting in 2nd ch from hook: 25 hdc, 1 sl st in BLO of next MR st (25). [6 strands total]
- Strand 7: Ch 26, turn. Starting in 2nd ch from hook: 25 hdc, skip 1 st, 1 sl st in BLO of next MR st (25).
- Strands 8-12 (Side): Ch 26, turn. Starting in 2nd ch from hook: 25 hdc, 1 sl st in BLO of next MR st (25). [5 strands total]
- Strands 13-17 (Back): Ch 21, turn. Starting in 2nd ch from hook: 20 hdc, 1 sl st in BLO of next MR st (20). [5 strands total]
- Strand 18: Ch 21, turn. Starting in 2nd ch from hook: 20 hdc, skip 1 st, 1 sl st in BLO of next MR st (20).
- Strands 19-22 (Side): Ch 21, turn. Starting in 2nd ch from hook: 20 hdc, 1 sl st in BLO of next MR st (20). [4 strands total]
- Finishing: Cut yarn and hide. Glue strands to the head per reference photos.
Second Layer of Hair (Quartz color, Amigurumi yarn, 3 mm hook):
- Ch 10, turn. Starting in 2nd ch from hook: 1 sc.
- Strands 1-4: Ch 25, turn. Starting in 2nd ch from hook: 24 hdc, skip 1 base chain st, 1 sl st in next st to attach strand (24). [4 strands total]
- Finishing: Glue strands per photos. Repeat for the second layer on the opposite side.
Buns (Quartz color, Amigurumi yarn, 2.75 mm hook, spiral, make 2):
- R1: 6 sc in MR (6)
- R2: 6 inc (12)
- R3: (1 sc, inc) x 6 (18)
- R4: (2 sc, inc) x 6 (24)
- R5: (3 sc, inc) x 6 (30)
- R6: 2 sc, inc, (5 sc, inc) x 5, 2 sc (36) [Editor’s Note: Corrected from original text which mathematically yielded 31 stitches, to achieve the stated 36.]
- R7-9: 36 sc (36) [3 rows]
- R10: 2 sc, dec, (4 sc, dec) x 5, 2 sc (30)
- Finishing: Cut yarn, leave long tail. Pin to head to find position. Sew 3/4 of the bun, stuff, and finish sewing.
Braids (Quartz color, Amigurumi yarn, 2.75 mm hook, make 2 braids):
- Ch 45, leaving small tails on both ends. Make 3 such pieces total per braid.
- Tie them together at one end with a knot, braid, and secure the other end. Trim excess yarn.
- Assembly: Glue one end of the braid to the back of the bun, wrap around the base, and glue the other end next to the first. Repeat for the second bun.
Flowers (Verdor Green, Amigurumi yarn, 2.5 mm hook, spiral):
- R1: 10 sc in MR (10)
- R2: 10 hdc inc (30)
- R3: 30 hdc inc (90)
- Finishing: Cut yarn and hide. Pull MR tight to shape. Bend fabric by hand. Make 7 flowers total in different colors: Tulip, Egg Yolk, Flag Green, Verdor, Bic Blue, Marsala, Pastel Blue. Pin to head, then glue.
Bows (Tulip color, Amigurumi yarn, 2.5 mm hook, turned rows, make 2):
- Row 1: Ch 105, turn. Starting in 2nd ch from hook: 3 sl st, 30 sc, 4 hdc, 4 dc, 3 tr, 4 dc, 8 hdc, 4 dc, 3 tr, 4 dc, 4 hdc, 30 sc, 3 sl st (104)
- Finishing: Cut yarn and hide. Shape bow from the strip per photos. Glue bows over buns. Curl the remaining fabric into spirals.
What it teaches: Radial expansion with double crochets, chaining long textured strands, and creating dimensional fabric accessories.
9. Shawl & Makeup
Shawl (Verdor Green, Amigurumi yarn, 4 mm hook, turned rows):
- Row 1: Ch 50, turn. In 7th and 11th ch from hook, work 2 dc together. 3 ch. Grab 12th and 16th ch, work 2 dc together. 7 ch. Grab 18th and 22nd ch, work 2 dc together. 3 ch. Grab 23rd and 27th ch, work 2 dc together. 7 ch. Grab 29th and 33rd ch, work 2 dc together. 3 ch. Grab 34th and 38th ch, work 2 dc together. 7 ch. Grab 40th and 44th ch, work 2 dc together. 3 ch. Grab 45th and 49th ch, work 2 dc together. 3 ch, and work 1 dc in the last free ch (50th).
- Row 2: Ch 3. 6 dc in the first 3-ch arch, 5-dc puff st in the next 3-ch arch, 13 dc in the next 7-ch arch, 5-dc puff st in the next 3-ch arch, 13 dc in the next 7-ch arch, 5-dc puff st in the next 3-ch arch, 13 dc in the next 7-ch arch, 5-dc puff st in the next 3-ch arch, 7 dc in the final 6-ch arch (formed by the last two 3-ch spaces).
- Row 3: Ch 6. 2 dc together in the 2nd and 7th dc of the dc sequence from the previous row, 3 ch, 2 dc together in the 1st and 6th dc of the dc sequence, 7 ch, 2 dc together in the 8th and 13th dc of the dc sequence, 3 ch, 2 dc together in the 1st and 6th dc of the dc sequence, 7 ch, 2 dc together in the 8th and 13th dc of the dc sequence, 3 ch, 2 dc together in the 1st and 6th dc of the dc sequence, 7 ch, 2 dc together in the 8th and 13th dc of the dc sequence, 3 ch, 2 dc together in the 1st and 6th dc of the dc sequence, 3 ch, and 1 dc in the 3rd ch made when transitioning from R1 to R2.
- Finishing: Repeat R2 and R3 until 6 rows are completed in total. Cut yarn and hide. Drape over the doll's arms. Sew or glue to the arms to prevent slipping.
Makeup:
- Embroider eyebrows with La Perla black yarn.
- Use fine metal tools or thin stiff brushes with acrylic/fabric paint (royal blue, strawberry pink, orange, black) for precise face painting.
- Glue false eyelashes. Cut one lash to size for both eyes. Short lashes point toward the nose, long lashes toward the ear. Use the existing adhesive on the lash; no extra silicone glue is needed. Place along the edge of the safety eye. (Note: Do this only after the doll is fully complete to avoid damage).
What it teaches: Advanced lace-like arch construction, puff stitch placement, and delicate surface detailing for realistic doll finishing.
Final Section: Where to Go from Here
Congratulations! By completing the Katrina Carmela doll, you have mastered a wide array of advanced amigurumi techniques: complex multi-color round transitions, split cluster stitches, internal wire framing, and intricate hair texturing. Use these skills to experiment with different yarn colorways for a custom "seasonal" doll collection, or try designing your own miniature clothing accessories to expand her wardrobe. Happy crocheting!