August 3, 2026
Kiwi Girl Doll – Sweet Amigurumi Crochet Pattern with Skirt & Braided Hair
Bring this charming kiwi-themed doll to life with this detailed pattern, featuring a cute ruffled skirt, wire-posed arms, and adorable braided hair. Perfect for intermediate crocheters ready to master color changes, garment joining, and textured hair strands.
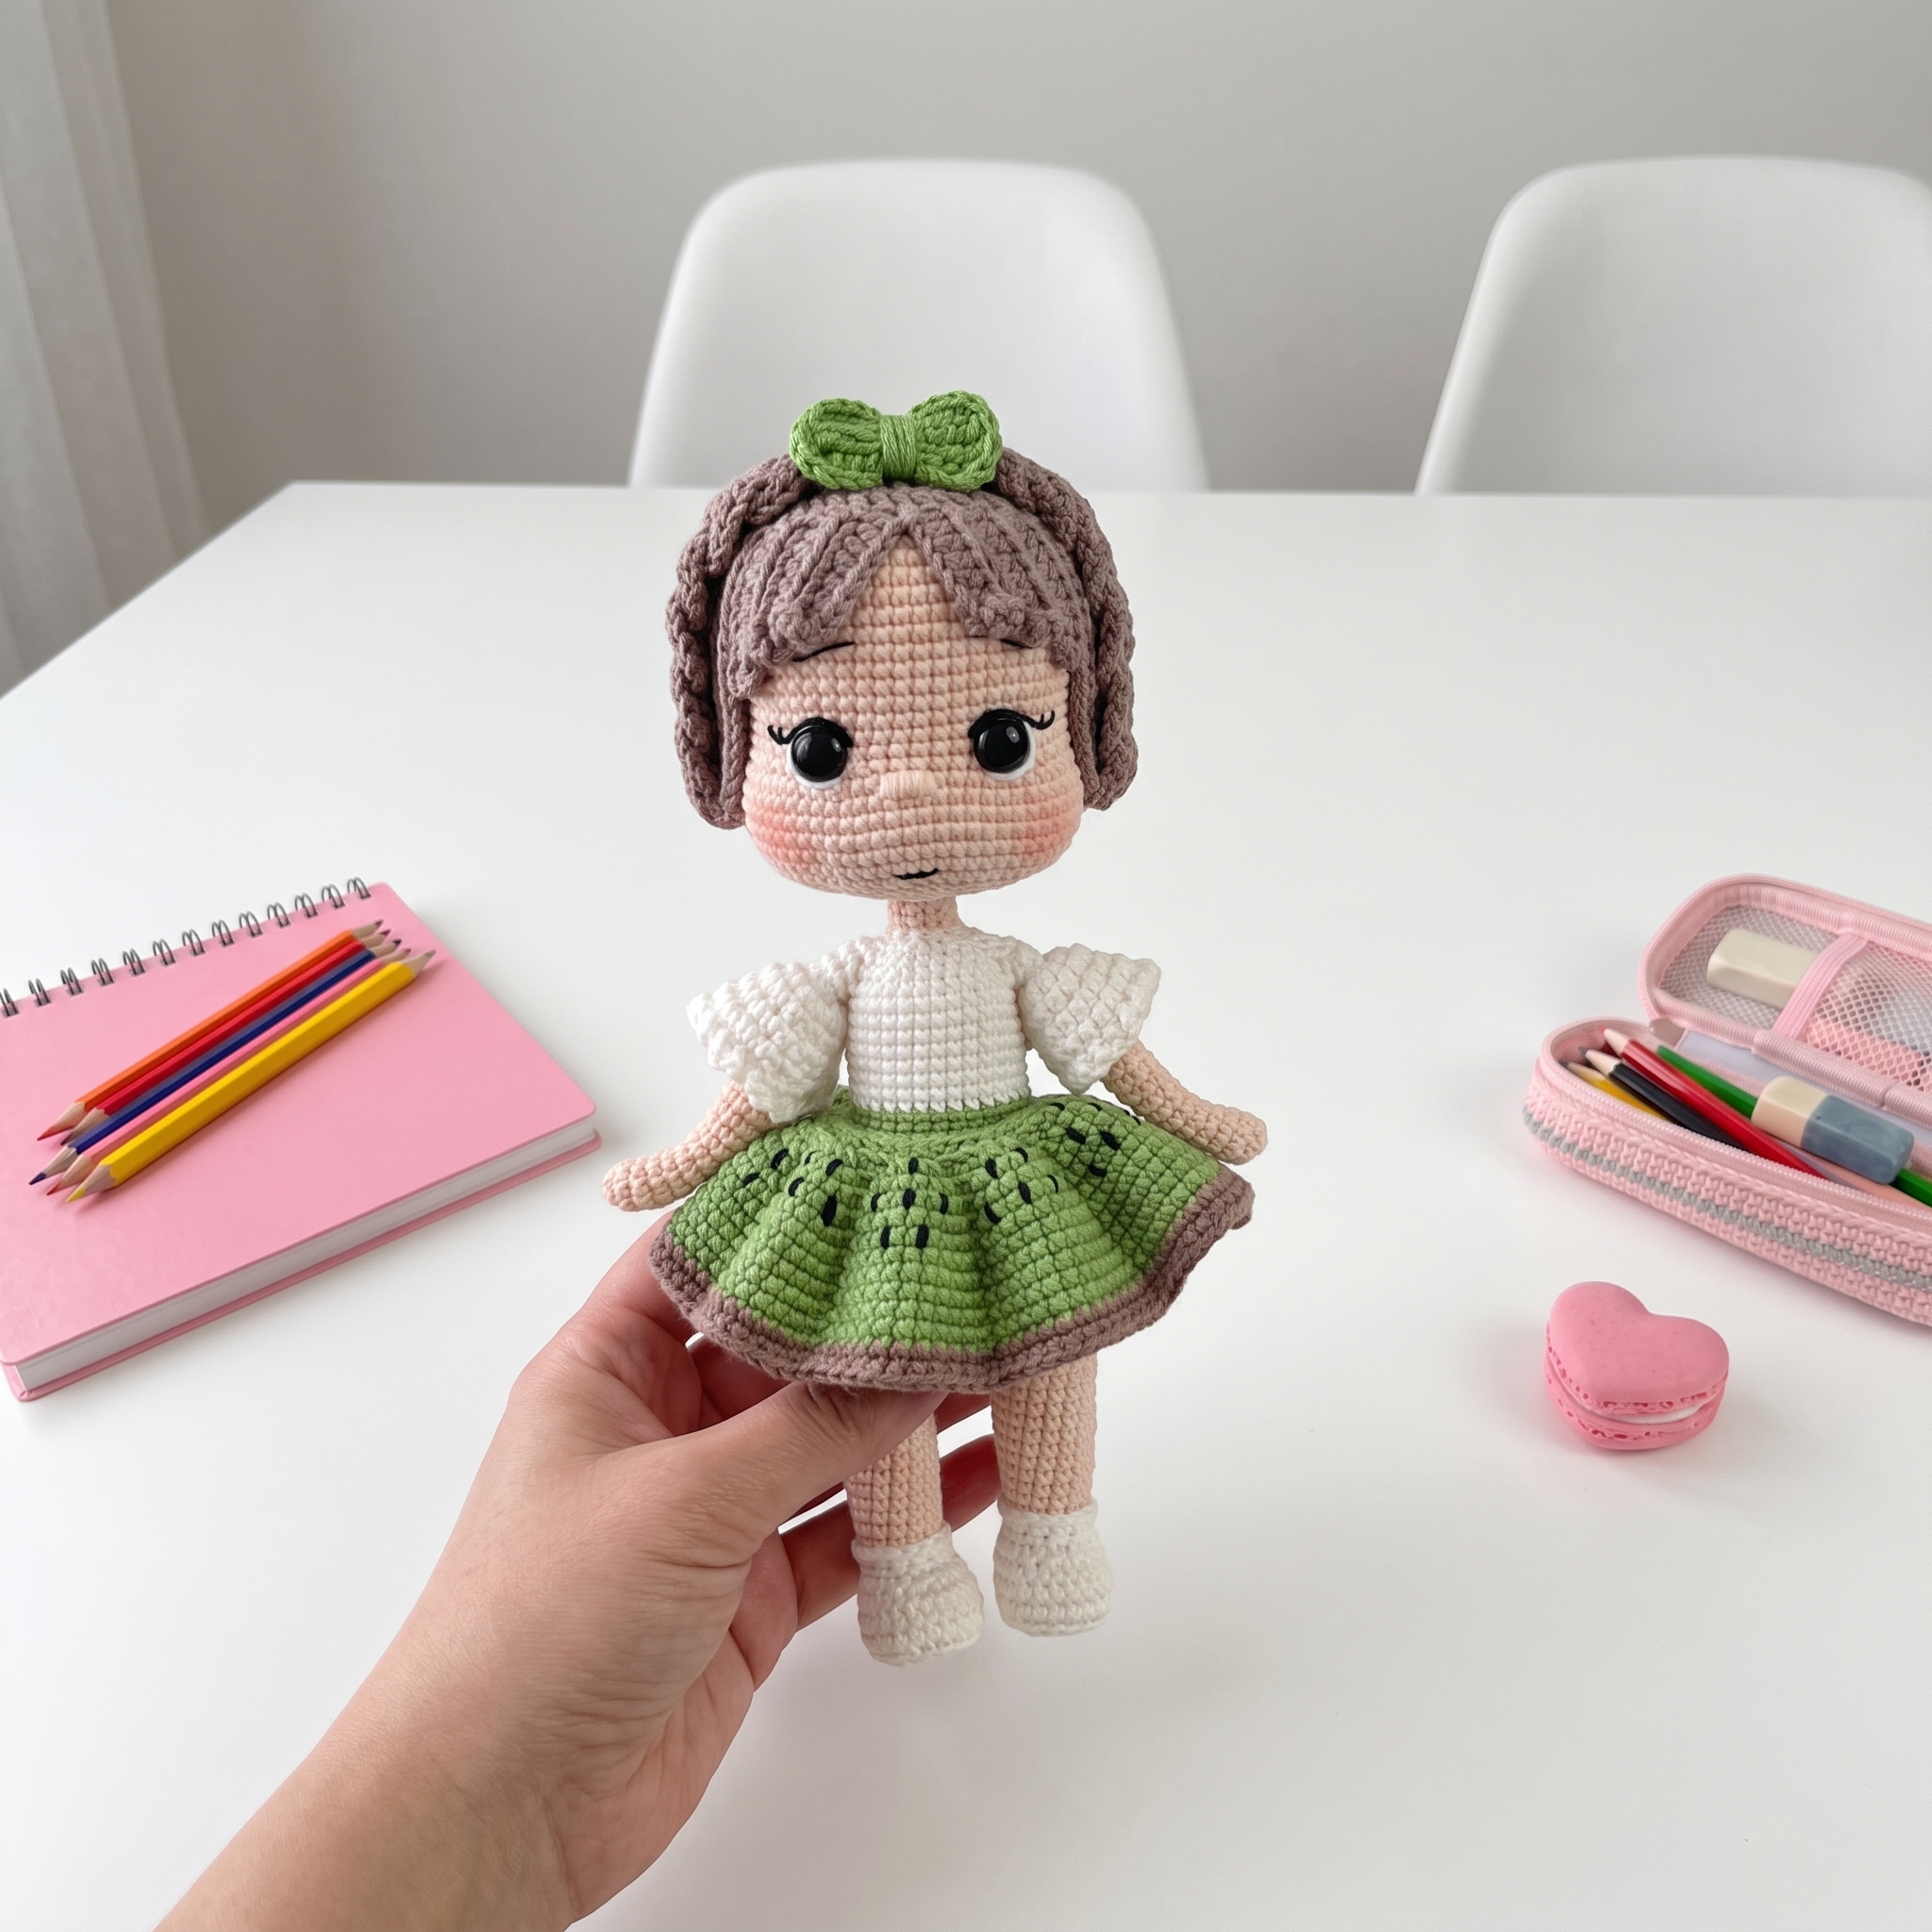
Kiwi Girl Doll – Complete Step-by-Step Pattern
1. Materials & Abbreviations
This section covers everything you need to gather before beginning. Using the recommended materials ensures the correct gauge and a professional, durable finish.
- Yarn: Gazzal Baby Cotton (Color 3469 for skin, 3434 for brown, 3448 for green, 3410 for white)
- Hook: 2.00 mm (or size appropriate to achieve a tight, stuff-proof gauge)
- Notions: 15 cm craft wire (2 pieces), poly-fil stuffing, sewing needle, scissors, 10 mm safety eyes, stitch marker
- Abbreviations:
- MR – magic ring
- ch – chain
- sc – single crochet
- hdc – half double crochet
- dc – double crochet
- tr – treble crochet
- inc – increase
- dec – decrease
- sl st – slip stitch
- FLO – front loop only
- BLO – back loop only
- ( )×n – repeat the stitches in parentheses n times
What it teaches: Proper tool selection, gauge management, and familiarization with standard international crochet abbreviations.
2. Head
The head is worked in a continuous spiral starting from a magic ring, building up to a rounded shape, then decreased and stuffed. Facial features are embroidered at the end.
- R1: 8 sc in MR (8)
- R2: 8 inc (16)
- R3: (1 sc, inc) × 8 (24)
- R4: (2 sc, inc) × 8 (32) [Editor’s Note: Corrected from original garbled text to mathematically achieve the stated 32-stitch count.]
- R5: (3 sc, inc) × 8 (40)
- R6: (4 sc, inc) × 8 (48) [Editor’s Note: Corrected from original text which mathematically yielded 40 stitches, to achieve the stated 48.]
- R7: (8 sc, inc) × 6 (54) [Editor’s Note: Corrected from "(7 sc, inc) × 6" which yields 48, to achieve the stated 54.]
- R8: (9 sc, inc) × 6 (60) [Editor’s Note: Corrected from original text which yielded 54, to achieve the stated 60.]
- R9-17: 60 sc (60) [9 rows]
- R18: 4 sc, dec, (8 sc, dec) × 5, 4 sc (54)
- R19: 21 sc, 2 ch, skip 2 sts, 7 sc, 2 ch, skip 2 sts, 22 sc (54) [Creates eye openings]
- R20: 17 sc, 4 inc, 2 sc in each ch space (2 inc total on chains), 7 sc, 2 sc in each ch space (2 inc total on chains), 4 inc, 18 sc (66)
- R21-26: 66 sc (66) [6 rows]
- R27: (9 sc, dec) × 6 (60)
- R28: 4 sc, dec, (8 sc, dec) × 5, 4 sc (54)
- R29: (7 sc, dec) × 6 (48)
- R30: 2 sc, dec, (4 sc, dec) × 7, 2 sc (40)
- R31: (3 sc, dec) × 8 (32)
- R32: 1 sc, dec, (2 sc, dec) × 7, 1 sc (24)
- R33: (2 sc, dec) × 6 (18)
- R34: (1 sc, dec) × 6 (12)
- Finishing: Sl st into the next stitch, cut yarn, and leave a long tail for sewing. Insert 10 mm safety eyes before R27 decreases. Stuff the head firmly. Embroider the nose between R21 and R22.
What it teaches: Spiral increase sequences, creating intentional openings with chain spaces, and structured decreasing for spherical shaping.
3. Arms (Make 2)
The arms are built with an internal wire for posability and feature a delicate, scalloped sleeve detail worked into the back loops.
- R1-17 (Beige): 5 sc in MR (5), 5 inc (10), 10 sc for 15 rows (10)
- Change to White:
- R18: 10 sc (10)
- R19: 10 sc in BLO (10)
- R20: 10 sc (10)
- Finishing: Cut yarn. Bend the ends of the 15 cm wire. Insert the wire inside the arm. Do not stuff the arms.
- Sleeve (attach white yarn to the unworked FLO of R19, holding the arm downwards):
- R1: 2 ch, (1 hdc, 1 hdc-inc) × 5, sl st (15)
- R2: 2 ch, 15 hdc, sl st (15)
- R3: 2 ch, (2 hdc, 1 hdc-inc) × 5, sl st (20)
- R4: 2 ch, 20 hdc, sl st (20)
- R5: (2 ch, 1 sl st) × 20 (creates a picot/scalloped edge). Cut yarn.
What it teaches: Working with internal armatures (wire), utilizing unworked loops for attached garments, and creating decorative picot edging.
4. Legs (Left & Right)
The legs feature a shaped foot sole and are joined together to form the base of the body.
Left Leg (White, then Skin Color):
- R1: Ch 6. Starting in 2nd ch from hook: inc, 3 sc, 4 sc in the last chain, 3 sc down the opposite side, inc (14)
- R2: inc, 4 sc, 4 inc, 4 sc, inc (20)
- R3: 1 sc, inc, 5 sc, (inc, 1 sc) × 4, 4 sc, inc (26)
- R4: 26 sc in BLO (26)
- R5-6: 26 sc (26) [2 rows]
- Insert plastic foot sole detail.
- R7: 7 sc, 6 dec, 7 sc (20)
- R8: 4 sc, 6 dec, 4 sc (14)
- Change to Skin Color:
- R9: 14 sc in BLO (14)
- R10-11: 14 sc (14) [2 rows]
- R12: 3 sc, inc, 6 sc, inc, 3 sc (16)
- R13-14: 16 sc (16) [2 rows]
- R15: 3 sc, inc, 7 sc, inc, 4 sc (18)
- R16-24: 18 sc (18) [9 rows]
- Change to White:
- R25: 18 sc (18)
- R26: 16 sc (row ends in the middle when viewed from the side to prepare for joining)
Right Leg:
- Work identically to the Left Leg through R25.
- R26: 18 sc (18). Do not cut yarn.
Joining the Legs:
- R27: 6 sc on right leg, 3 ch, 18 sc on left leg, 3 ch, 12 sc on remaining right leg (42). Place a stitch marker. [Editor’s Note: Corrected from original garbled text to mathematically achieve the stated 42-stitch count for joining.]
- R28-35: 42 sc (42) [8 rows]
- R36: (5 sc, dec) × 6 (36)
- R37: 2 sc, dec, (4 sc, dec) × 5, 2 sc (30)
What it teaches: Oval foundation chaining, progressive limb decreasing, and seamless multi-piece joining with chain bridges.
5. Body & Skirt Assembly
The skirt is worked first, then seamlessly joined to the body as the torso is crocheted upward, integrating the arms along the way.
Skirt (Green, then Brown):
- Foundation: Ch 30, sl st to form a ring.
- R1: 30 sc (30)
- R2: (inc, 2 sc in BLO) × 10 (40)
- R3: (2 inc, 2 sc in BLO) × 10 (60)
- R4: (inc, 2 sc, inc, 2 sc in BLO) × 10 (80)
- R5: (6 sc, 2 sc in BLO) × 10 (80)
- R6: (inc, 4 sc, inc, 2 sc in BLO) × 10 (100)
- R7: (8 sc, 2 sc in BLO) × 10 (100)
- R8: (inc, 6 sc, inc, 2 sc in BLO) × 10 (120)
- R9-12: (10 sc, 2 sc in BLO) × 10 (120) [4 rows]
- Change to Brown:
- R13-14: (10 sc, 2 sc in BLO) × 10 (120) [2 rows]. Cut yarn. Embroider black "kiwi seeds" onto the green section.
Body Integration:
- R38 (Green): 30 sc, working through both the body and the top edge of the skirt simultaneously (30)
- R39: 30 sc (30)
- Change to White:
- R40: 30 sc in BLO (30)
- R41-47: 30 sc (30) [7 rows]
- R48 (Join Arms): 5 sc body, 5 sc (working through arm and body together), 10 sc body, 5 sc (arm and body together), 5 sc body (30)
- R49: 5 sc body, 5 sc arm only, 10 sc body, 5 sc arm only, 5 sc body (30)
- Shape Shoulders: Twist the remaining wire into a shoulder shape and secure with paper tape inside the body.
- R50: (3 sc, dec) × 6 (24)
- R51: (2 sc, dec) × 6 (18)
- R52: (1 sc, dec) × 6 (12)
- Change to Skin Color:
- R53: 12 sc in BLO (12)
- R54-56: 12 sc (12) [3 rows]. Cut yarn, leaving a tail for sewing the head.
What it teaches: Ruffled garment construction, BLO texturing, and mid-round limb attachment for seamless doll assembly.
6. Hair & Bow
The hair is worked directly onto a flat circular base, creating long, flowing strands that are later braided for a charming finish.
Hair Base & Strands (Brown):
- R1: 8 sc in MR, sl st (8)
- R2: 2 ch, 8 dc-inc, sl st (16)
- R3: 2 ch, 16 dc-inc, sl st (32)
- R4: 2 ch, (1 dc, 1 dc-inc) × 16, sl st (48). Do not cut yarn.
- Front Strands: (Ch 10, starting in 3rd ch from hook: 8 hdc, skip 1 st on base, sl st to base) × 6
- Side Strands: (Ch 50, starting in 3rd ch from hook: 48 hdc, skip 1 st on base, sl st to base) × 3
- Back Strands: (Ch 18, starting in 3rd ch from hook: 16 hdc, skip 1 st on base, sl st to base) × 12
- Side Strands: (Ch 50, starting in 3rd ch from hook: 48 hdc, skip 1 st on base, sl st to base) × 3
- Finishing: Cut yarn, leaving a long tail. Braid the long side strands and sew them to the top of the head as desired.
Bow:
- Instructions: In MR: 5 ch, 5 dc, 5 ch, 1 sl st, 5 ch, 5 sc, 5 ch, 1 sl st.
- Finishing: Cut yarn, leaving a tail. Wrap yarn several times around the center of the bow to cinch it, then sew securely to the hair.
What it teaches: Radial expansion with double crochets, chaining long textured strands, and creating dimensional fabric accessories.
Final Section: Where to Go from Here
Congratulations! By completing the Kiwi Girl doll, you have mastered a wide array of intermediate amigurumi techniques: spiral shaping, intentional stitch skipping for facial features, internal wire armatures, seamless garment joining, and complex hair texturing. Use these skills to experiment with different yarn colors for a custom "fruit-themed" doll collection, or try designing your own miniature clothing accessories to expand her wardrobe. Happy crocheting!