August 3, 2026
Liva Amigurumi Doll – Detailed Crochet Pattern with Two Dress Variations
Bring this beautifully detailed, poseable amigurumi doll to life with this comprehensive pattern. Featuring wire-reinforced limbs, intricate facial features, and two stunning dress variations (a classic blue with a ruffled hem and an elegant emerald/plum two-piece set), it is the perfect project for advanced crocheters ready to master complex garment construction and structural assembly.
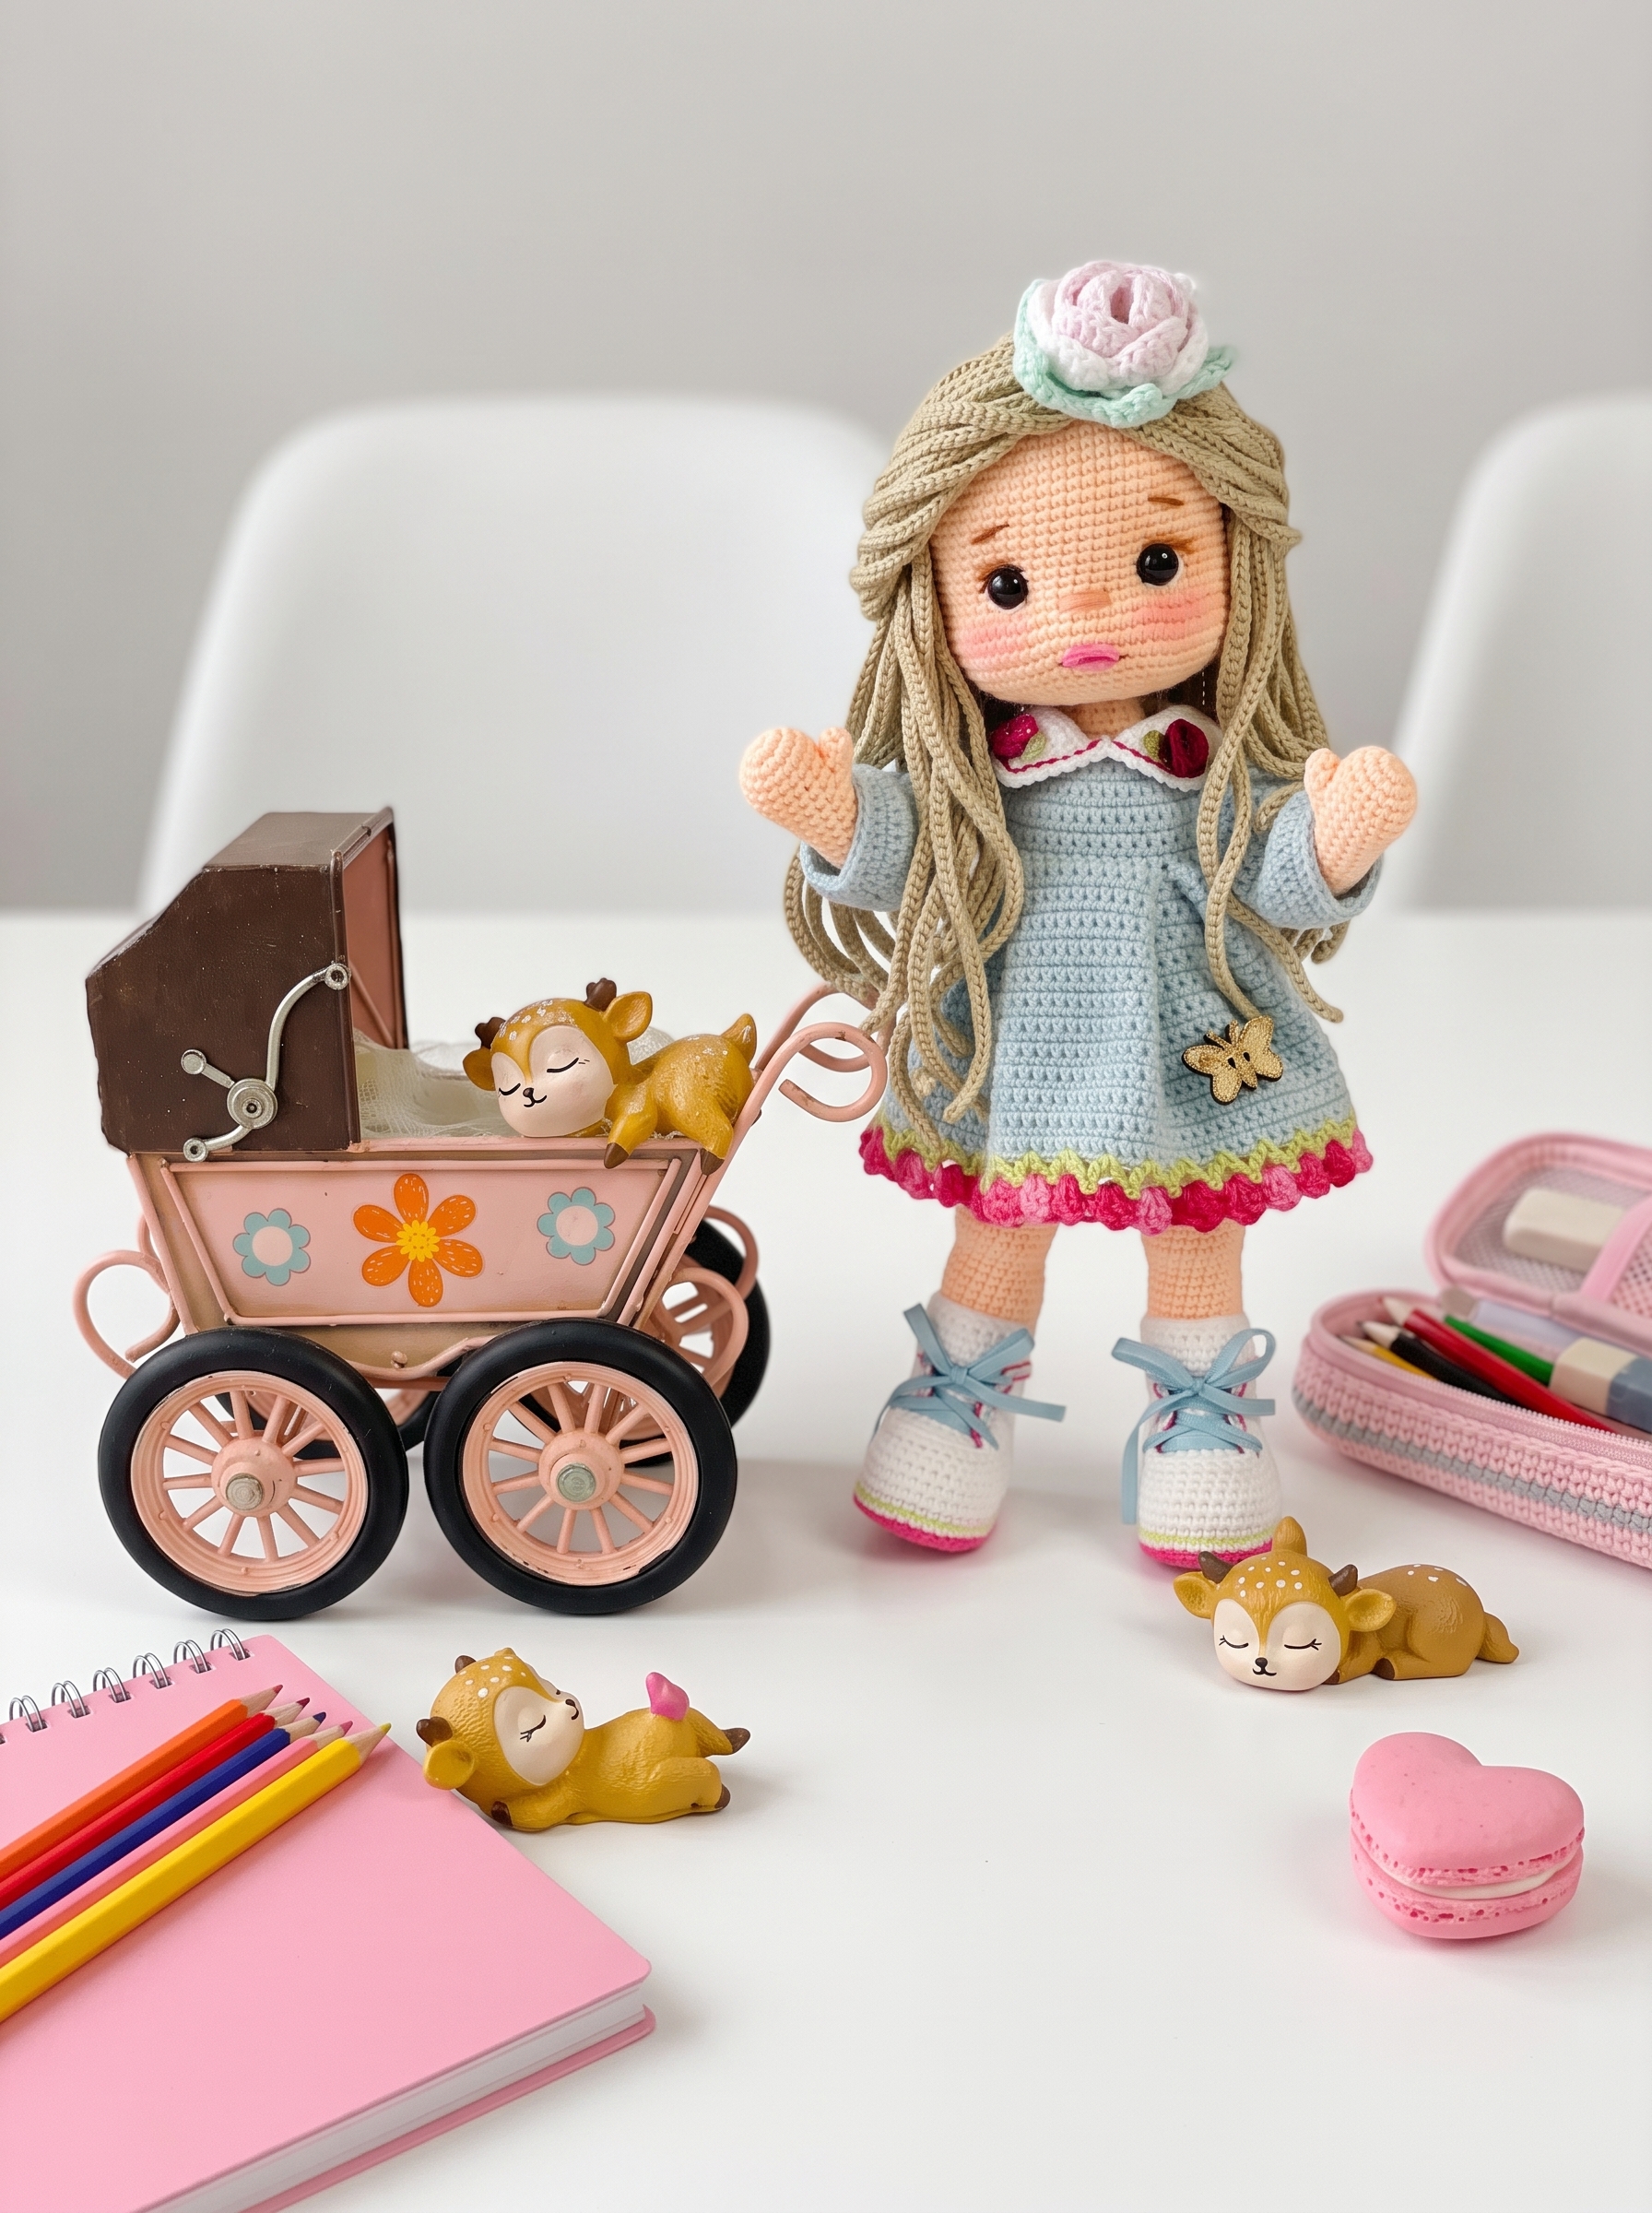
Liva Amigurumi Doll – Complete Step-by-Step Pattern
1. Materials & Abbreviations
This section covers everything you need to gather before beginning. Using the recommended materials ensures the correct gauge and a professional, durable finish.
- Yarn (Nako Cotonella): Skin (2746), White (208), Blue (10471 - for Dress 1), Green (6778), Fuchsia (Catania 00030 or Regia 19).
- Yarn (Alize Diva): Hair (368).
- Yarn (Nako Cotonella for Dress 2): Emerald (6965), Plum (10639).
- Hooks: 1.75 mm, 2.0 mm, 2.2 mm.
- Notions: 10 mm black safety eyes, 3 buttons (for dress backs), 1 wooden decorative button, 1m silk ribbon (4mm wide), 1 ready-made crocheted rose, 50cm green tulle ribbon, 1m copper wire (1.5mm thick), is tape, acetate sheet for soles, poly-fil stuffing.
- Abbreviations:
- MR – magic ring
- ch – chain
- sl st – slip stitch
- sc – single crochet
- hdc – half double crochet
- dc – double crochet
- inc – increase (2 sc in one st)
- dec – decrease (2 sc crocheted together)
- BLO – back loop only
- FLO – front loop only
- ( )×n – repeat the stitches in parentheses n times
What it teaches: Proper tool selection, gauge management, and familiarization with standard international crochet abbreviations and textured stitches.
2. Head
The head is worked in a continuous spiral starting from a magic ring, building up to a rounded shape, then decreased. Facial features are added during assembly.
- R1: 6 sc in MR (6)
- R2: 6 inc (12)
- R3: (1 sc, inc) x 6 (18)
- R4: 1 sc, inc, (2 sc, inc) x 5, 1 sc (24)
- R5: (3 sc, inc) x 6 (30)
- R6: 2 sc, inc, (4 sc, inc) x 5, 2 sc (36)
- R7: (5 sc, inc) x 6 (42)
- R8: 3 sc, inc, (6 sc, inc) x 5, 3 sc (48)
- R9: (7 sc, inc) x 6 (54)
- R10-11: 54 sc (54) [2 rows]
- R12: 4 sc, inc, (8 sc, inc) x 5, 4 sc (60)
- R13-20: 60 sc (60) [8 rows]
- R21: 23 sc, ch 2, skip 2 sc, 9 sc, ch 2, skip 2 sc, 24 sc (60) [Creates eye openings]
- R22: 23 sc, 1 sc in each ch space (2), 9 sc, 1 sc in each ch space (2), 24 sc (60)
- R23: 18 sc, (1 sc, inc) x 4, 7 sc, (1 sc, inc) x 4, 19 sc (68)
- R24: 21 sc, inc, 3 sc, inc, 16 sc, inc, 3 sc, inc, 21 sc (72)
- R25-27: 72 sc (72) [3 rows]
- R28: (7 sc, dec) x 8 (64)
- R29: 3 sc, dec, (6 sc, dec) x 7, 3 sc (56)
- R30: (5 sc, dec) x 8 (48)
- R31: 48 sc (48)
- R32: 2 sc, dec, (4 sc, dec) x 7, 2 sc (40)
- R33: (3 sc, dec) x 8 (32)
- R34: 32 sc (32)
- R35: 1 sc, (1 sc, dec) x 10, 1 sc (22)
- R36: 2 dec, 18 sc (20)
- R37: 20 sc (20)
- R38-42: 20 sc (20) [5 rows]
- Finishing: The last 5 rows are stuffed into the head. At R37, the head is sewn to the body using the free front loops.
What it teaches: Spiral increase sequences, creating intentional openings with chain spaces, and structured decreasing for spherical shaping.
3. Arms (Make 2)
The arms are built with a unique shoulder shaping technique and left partially empty for natural articulation.
- R1: Ch 4. Starting in 2nd ch from hook: 2 sc, 3 sc in next st, 1 sc, inc (8)
- R2: inc, 1 sc, 3 inc, 1 sc, 2 inc (14)
- R3: 1 sc, inc, 3 sc, inc, 1 sc, inc, 3 sc, inc, 2 sc (18)
- R4-7: 18 sc (18) [4 rows]
- R8: 3 dc in one st (with common top), 17 sc (18)
- R9: 18 sc (18)
- R10: (dec, 3 sc) x 3, dec, 1 sc (14)
- R11: (dec, 5 sc) x 2 (12)
- R12: (inc, 5 sc) x 2 (14)
- Important detail: Slightly stuff the hand. Leave the last 4 rows completely empty!
- R13-34: 14 sc (14) [22 rows]
- Finishing: Cut yarn, leaving a long tail for sewing.
What it teaches: Creating 3D shoulder caps, partial stuffing for joint articulation, and working with common-top clusters.
4. Legs (Make 2)
The legs feature a structured acetate sole for standing stability and complex shaping for the calves and knees.
- R1: Ch 7. Starting in 2nd ch from hook: inc, 4 sc, 5 sc in last ch, 4 sc, inc (17)
- R2: 2 inc, 4 sc, 5 inc, 4 sc, 2 inc (26)
- R3: 1 sc, inc, 6 sc, (1 sc, inc) x 5, 6 sc, inc, 1 sc (33)
- R4: 12 sc, inc, 3 sc, inc, 3 sc, inc, 12 sc (36)
- Important detail: Cut an acetate piece to the size of the sole and insert it.
- R5: 36 sc (36)
- R6-8: 36 sc (36) [3 rows]
- R9: 7 sc, (dec, 1 sc) x 2, 2 dec, 2 sc, 2 dec, (1 sc, dec) x 2, 7 sc (28)
- R10: 7 sc, dec, 1 sc, 2 dec, 1 sc, 2 dec, 1 sc, dec, 6 sc (22)
- Important detail: Insert the plastic/acetate sole. Stuff firmly.
- R11: 10 sc, dec, 10 sc (21)
- R12: 9 sc, dec, 10 sc (20)
- R13: dec, 18 sc (19)
- R14: 9 sc, dec, 8 sc (18)
- R15: 18 sc (18)
- R16: inc, 17 sc (19)
- R17: 1 hdc, inc, 17 hdc (20)
- R18: 2 hdc, inc, 17 hdc (21)
- R19: 3 hdc, inc, 17 hdc (22)
- R20: 4 sc, inc, 17 sc (23)
- R21-27: 23 sc (23) [7 rows]
- R28: 4 sc, dec, 17 sc (22)
- R29: 3 sc, dec, 17 sc (21)
- R30: 2 sc, dec, 9 sc, 4 inc, 4 sc (24)
- R31: dec, 5 inc, dec, 15 sc (22)
- R32: 22 sc (22)
- R33: dec, 1 sc, inc, 1 sc, dec, 15 sc (21)
- R34: 21 sc (21)
- R35: inc, 4 sc, inc, 15 sc (23)
- R36: 23 sc (23)
- R37: 1 sc, inc, 5 sc, inc, 15 sc (25)
- R38: 25 sc (25)
- R39: 2 sc, inc, 6 sc, inc, 15 sc (27)
- R40-46: 27 sc (27) [7 rows]
- R47: 3 sc. Cut yarn.
- Note: Work the second leg identically, but after R47, work 15 sc and continue directly into the Body joining round.
What it teaches: Oval foundation chaining, inserting rigid soles, and progressive calf shaping.
5. Body
The body seamlessly joins the legs, incorporates the wire frame for posing, and integrates the arms mid-round.
- Setup: Attach white yarn. Join both legs in the inner central part so the flat side faces you.
- R1: Ch 3, 27 sc along 1st leg, 3 sc in ch, 27 sc along 2nd leg, 3 sc in ch, place marker at the back (60)
- R2: (9 sc, inc) x 6 (66)
- R3-6: 66 sc (66) [4 rows]
- R7: (9 sc, dec) x 6 (60)
- R8-9: 60 sc (60) [2 rows]
- R10: (8 sc, dec) x 6 (54)
- R11: Move white yarn to the front; change to skin color. BLO: 54 sc (work the 54 sc with white yarn behind, then cut white yarn) (54)
- R12: (7 sc, dec) x 6 (48)
- R13-26: 48 sc (48) [14 rows]
- R27 (Attach Arms): 11 sc, work 7 sc together with the arm, 17 sc across the front, work 7 sc together with the arm, 6 sc (48)
- R28: (6 sc, dec) x 6 (42)
- R29: (5 sc, dec) x 6 (36)
- Important detail: Make 4 layers of 60cm wire, tape the ends, and insert into the body for posing.
- R30: (4 sc, dec) x 6 (30)
- R31: (3 sc, dec) x 6 (24)
- R32: (4 sc, dec) x 4 (20)
- R33-36: 20 sc (20) [4 rows]
- Finishing: Leave a long tail, cut yarn.
What it teaches: Seamless multi-piece joining, mid-round limb attachment, and internal wire framing for posability.
6. Shoes (Make 2)
The shoes feature a double-layered acetate sole for maximum stability and a complex short-row shaping for the boot upper.
Soles (Make 4 total: 2 Pink, 2 White):
- R1: Ch 7. Starting in 2nd ch from hook: inc, 4 sc, 5 sc in last ch, 4 sc, inc (17)
- R2: 2 inc, 4 sc, 5 inc, 4 sc, 2 inc (26)
- R3: 1 sc, inc, 6 sc, (1 sc, inc) x 5, 6 sc, inc, 1 sc (33)
- R4: 12 sc, inc, 3 sc, inc, 3 sc, inc, 12 sc (36)
- R5: 36 sc, +1 sc in the back middle to finish. Cut yarn.
- Assembly: Cut acetate pieces. Place between the pink and white soles. Stack them and join with green yarn (36 sl st).
Boot Upper (White):
- R1: Starting from the middle back, BLO with green yarn: 36 sc (36)
- R2-4: 36 sc (36) [3 rows]
- R5: 11 sc, (dec, 1 sc) x 2, 2 sc, (1 sc, dec) x 2, 11 sc (32)
- R6: 32 sc (32)
- Short Row Shaping:
- R7: 11 sc, turn (11)
- R8: Ch 1, 22 sc, turn (22)
- R9-15: Ch 1, skip 1, work to the end decreasing by 1 sc each row, turn. (21, 20, 19, 18, 17, 16, 15)
- R16: 8 sc from edge to front, FLO 10 sc, 8 sc from edge, 15 sc from back. Cut yarn.
- Detail: Attach pink yarn to the last row of the back inside, sl st to create a sports stripe.
Tongue (White):
- Pick up 10 sc in FLO from R16, turn.
- R2-10: Ch 1, 10 sc, turn.
- R11: Ch 1, skip 1, 8 sc, skip 1, 1 sc (9). Cut.
- Laces: Ch 100 or use thin ribbon.
What it teaches: Creating rigid double-layered soles, executing short-row shaping for 3D boot uppers, and picking up stitches for attached components.
7. Hair & Rose
The hair is built in a radial cap with long, flowing strands, finished with a delicate multi-colored crocheted rose.
Hair Base & Strands (Alize Diva 368, Hook 1.75mm):
- R1: 6 sc in MR (6)
- R2: Ch 3, ch 1, 6 inc, sl st (12)
- R3: Ch 3, ch 2, 12 dc inc, sl st (24)
- R4: Ch 3, ch 2, (1 dc, 1 dc inc) x 12, sl st (36)
- R5: Ch 3, ch 2, (2 dc, 1 dc inc) x 12 (48)
- Strands (Switch to Hook 2.2mm):
- R6: (Ch 70, starting in 2nd ch from hook: 69 sl st, 1 sl st in the 5th row of the base) x 48.
- R7: Tie the strands in rows of the 6th, 7th, and 8th rounds with an interval of 3 sc.
Rose (Hook 2.2mm, Pink, White, Green):
- R1 (Pink): Ch 50. Starting in 3rd ch from hook: (1 dc, ch 2, 1 dc, skip 2), (2 dc, ch 2, 2 dc, skip 2) x 4. Do not cut pink.
- Attach White: (Skip 2, 2 dc, ch 2, 2 dc) x 5. Leave white.
- Attach Green: (Skip 2, 2 dc, ch 2, 2 dc) x 6. Turn.
- R2: Ch 2. In the ch-2 spaces from below: (3 dc, ch 2, sl st, 3 dc), join 1 dc with the row below, switch to the next ch-2 space) x 6.
- Switch to White: In the ch-2 spaces: (6 dc, sl st together, move to next ch-2 space) x 5.
- Switch to Pink: In the ch-2 spaces: (6 dc, sl st together, move to next ch-2 space) x 5, ch 2, sl st.
- Finishing: Roll into a rose shape and sew.
What it teaches: Radial expansion with double crochets, chaining long textured strands, and creating dimensional fabric accessories.
8. Dress 1 (Blue)
A classic dress featuring a complex folded pleat, buttonholes, and a ruffled hem.
Main Body (Blue, Hook 2mm):
- R1: Ch 31. Starting in 2nd ch from hook: 30 sc, turn (30)
- R2: (2 sc, inc) x 10, turn (40)
- R3: Ch 1, 40 sc, turn (40)
- R4: Ch 1, (inc, 3 sc) x 10, turn (50)
- R5-8: Ch 1, 50 sc, turn [4 rows]
- R9: Ch 1, 8 sc, ch 9, skip 9 sc, 16 sc, ch 9, skip 9 sc, 8 sc, turn
- R10: Ch 1, 8 sc, 9 sc in ch, 16 sc, 9 sc in ch, 8 sc, turn (50)
- R11 (Pleat Fold): Ch 1, 15 sc, work removing 5 sc, turn (BLO), 5 sc, turn 1 inc, 4 sc, continue BLO 5 sc, turn 1 inc, 4 sc, turn, 10 sc from the lower row, turn, BLO 5 sc, turn 1 inc, 4 sc, continue BLO 5 sc, turn 1 inc, 4 sc, turn, 5 sc from the lower row, align the remaining 15 sc as usual, turn (94)
- R12: Ch 1, 1 sc in each st, turn (94)
- R13-35: Ch 1, 1 sc in each st, turn [23 rows]
- Buttonholes & Neckline: Continue without cutting yarn. Attach yarn at the back, ch to the neckline, make 3 buttonholes (ch 5), leaving 5 sc between them. Neckline: 30 sc. Go down the other side of the slit. Cut blue yarn. Sew 3 buttons.
- R36 (Hem Ruffle): Attach green yarn to the hem. Ch 3, (1 dc, ch 2, 1 dc, skip 2) x 32. Cut green.
- R37: Attach pink yarn. Ch 3, (5 dc in the ch-2 space below, drop hook, insert in 1st st and pull, ch 3) x repeat.
Sleeve:
- Attach yarn at the bottom center of the armhole. (2 dc, inc) x 7 = 28 sc, sl st, turn.
- R2-21: Ch 1, 28 sc, sl st, turn.
- R22: Ch 1, (2 sc, dec) x 7, sl st (21)
- R23: 21 sc.
Collar (White):
- Pick up sc in FLO, 30 sc, turn.
- R2-5: Ch 1, 14 sc, turn.
- R6: Ch 1, 12 sc, skip 1, 1 sc, turn (13)
- R7: Ch 1, skip 1, 12 sc, cut.
- Part 2: White yarn. Leave 2 sts unworked, 14 sc, turn.
- R2-4: Ch 1, 14 sc, turn.
- R5: Ch 1, skip 1, 13 sc, turn (13)
- R6: Ch 1, 11 sc, skip 1, 1 sc, cut.
- Join: Ch 1, sc around collar: 6 sc, inc in corner, 10 sc, inc in corner, 5 sc, 2 sl st in center, 5 sc, inc in corner, 10 sc, inc in corner, 6 sc, turn.
- R2: (Ch 1, 1 sl st) x around. Cut.
- Attach pink yarn, sl st around the collar.
- Mini-Rose: Pink, 6 sc in MR (6), 6 sc (6).
What it teaches: Intarsia-style single-round color blocking, executing complex split clusters, and working flat panels for garment bodices.
9. Dress 2 (Emerald & Plum)
An elegant two-piece set featuring a ruffled lower dress and a lace-trimmed upper bodice.
Lower Dress (Emerald, Hook 2mm):
- R1: Ch 31. Starting in 2nd ch from hook: 30 sc, turn (30)
- R2: Ch 1, (2 sc, inc) x 10, turn (40)
- R3-5: Ch 1, 40 sc, turn [3 rows]
- R6: Ch 1, (inc, 3 sc) x 10, turn (50)
- R7-10: Ch 1, 50 sc, turn [4 rows]
- R11: Ch 1, 8 sc, ch 9, skip 9 sc, 16 sc, ch 9, skip 9 sc, 8 sc, turn
- R12: Ch 1, 8 sc, 9 sc in ch, 16 sc, 9 sc in ch, 8 sc, turn (50)
- R13: Ch 2, 8 dc inc, 9 dc (sleeve), 16 dc inc, 9 dc (sleeve), 8 dc inc, turn (82)
- R14-24: Ch 2, 82 dc, turn [11 rows]
- R25: (Skip 1, 5 dc in one st, skip 1, sl st) x repeat.
- R26: Continue, sc from back to neckline, make 3 buttonholes (ch 5). Make sc to the hem, cut.
- Attach plum yarn to the hem, sl st around.
Sleeve (Emerald):
- Ch 21, sl st.
- R2-17: Ch 1, 21 sc, sl st.
- R18: Ch 1, (2 sc, inc) x 7, sl st (28)
- R19-20: Ch 1, 28 sc, sl st.
- R21: Ch 1, (2 sc, dec) x 7, sl st (21)
- R22: 21 sc.
Upper Dress (Plum, Hook 2mm):
- R1: Ch 69. Starting in 2nd ch from hook: 8 sc, ch 2, 18 sc, ch 2, 16 sc, ch 2, 18 sc, ch 2, 8 sc, turn (68)
- R2: Ch 1, 8 sc, 1 sc in ch-2, ch 10 skip 18, 1 sc in ch-2, 16 sc, 1 sc in ch-2, ch 10 skip 18, 1 sc in ch-2, 8 sc, turn.
- R3: Ch 2, 9 dc inc, 10 ch, 18 dc inc, 10 ch, 9 dc inc, turn (92)
- R4-12: Ch 2, 92 dc, turn [9 rows]
- R13: (Skip 1, 5 dc in one st, skip 1, sl st) x repeat.
- Strap on Sleeve: Attach dress color to the shoulder. 18 sc, turn.
- R2: (Skip dc, 1 sc, skip 1 sc) x 6. Cut.
- Back Lacing: Ch 50, sl st to the back.
White Pockets (Make 2):
- R1: Ch 6 with white yarn. Starting in 2nd ch from hook: 4 sc, 4 sc in last ch, 4 sc, turn.
- R2: Ch 1, 4 sc, 4 inc, 4 sc, turn.
- R3: Ch 1, 4 sc, (1 sc, inc) x 4, 4 sc, turn.
- R4: Ch 1, 4 sc, (2 sc, inc) x 4, 4 sc, continue without turning, 8 sc instead of the top flat part, (ch 1, 1 sl st) around the perimeter. Cut.
- Mini-Rose on Pocket: Pink, 6 sc in MR, 6 sc.
What it teaches: Creating lace-like arches, working multi-layered garments, and adding functional hardware (lacing and pockets).
10. Scarf (Red & Green)
A cozy, textured scarf featuring a ruffled edge and a braided tassel finish.
Scarf Base (Red, Hook 1.75mm):
- R1: 6 sc in MR (6)
- R2: 6 inc (12)
- R3: (1 sc, inc) x 6 (18)
- R4: 1 sc, inc, (2 sc, inc) x 5, 1 sc (24)
- R5: (3 sc, inc) x 6 (30)
- R6: BLO: 30 sc (30)
- R7-10: 30 sc (30) [4 rows]
- R11: (8 sc, dec) x 3 (27)
- R12: (7 sc, dec) x 3 (24)
- R13-16: 24 sc (24) [4 rows]
- R17: BLO: (3 sc, inc) x 6 (30)
- R18: 2 sc, inc, (4 sc, inc) x 5, 2 sc (36)
- R19: (5 sc, inc) x 6 (42)
- R20: 3 sc, inc, (6 sc, inc) x 5, 3 sc (48)
- R21: 48 sc (48)
- Ribbon Detail: Ch 25 with green yarn, attach to R17. Slightly stuff.
- Red Detail:
- R1: 6 sc in MR (6)
- R2: 6 inc (12)
- R3: (1 sc, inc) x 6 (18)
- R4: (2 sc, inc) x 6 (24)
- Finishing: Sew to the lower part of the scarf.
Scarf Tassel (Green, Hook 2mm):
- 4 dc in MR. Work in a spiral sc until the scarf reaches the desired length. Pull 4 sts at once at the end to close.
What it teaches: Advanced lace-like arch construction, puff stitch placement, and delicate surface detailing for realistic doll finishing.
Final Section: Where to Go from Here
Congratulations! By completing the Liva doll, you have mastered a wide array of advanced amigurumi techniques: complex multi-color round transitions, internal wire framing, intricate hair texturing, and detailed garment construction with pleats and lace. Use these skills to experiment with different yarn colorways for a custom "seasonal" doll collection, or try designing your own miniature clothing accessories to expand her wardrobe. Happy crocheting!