August 14, 2026
Meet Caramel: The Sweetest Amigurumi Doll You'll Ever Crochet!
Get ready to fall in love with Caramel, an adorable amigurumi doll complete with a trendy outfit, a cute bunny friend, and a giant candy! This pattern is perfect for intermediate crocheters looking to master doll construction, clothing design, and fun accessories.
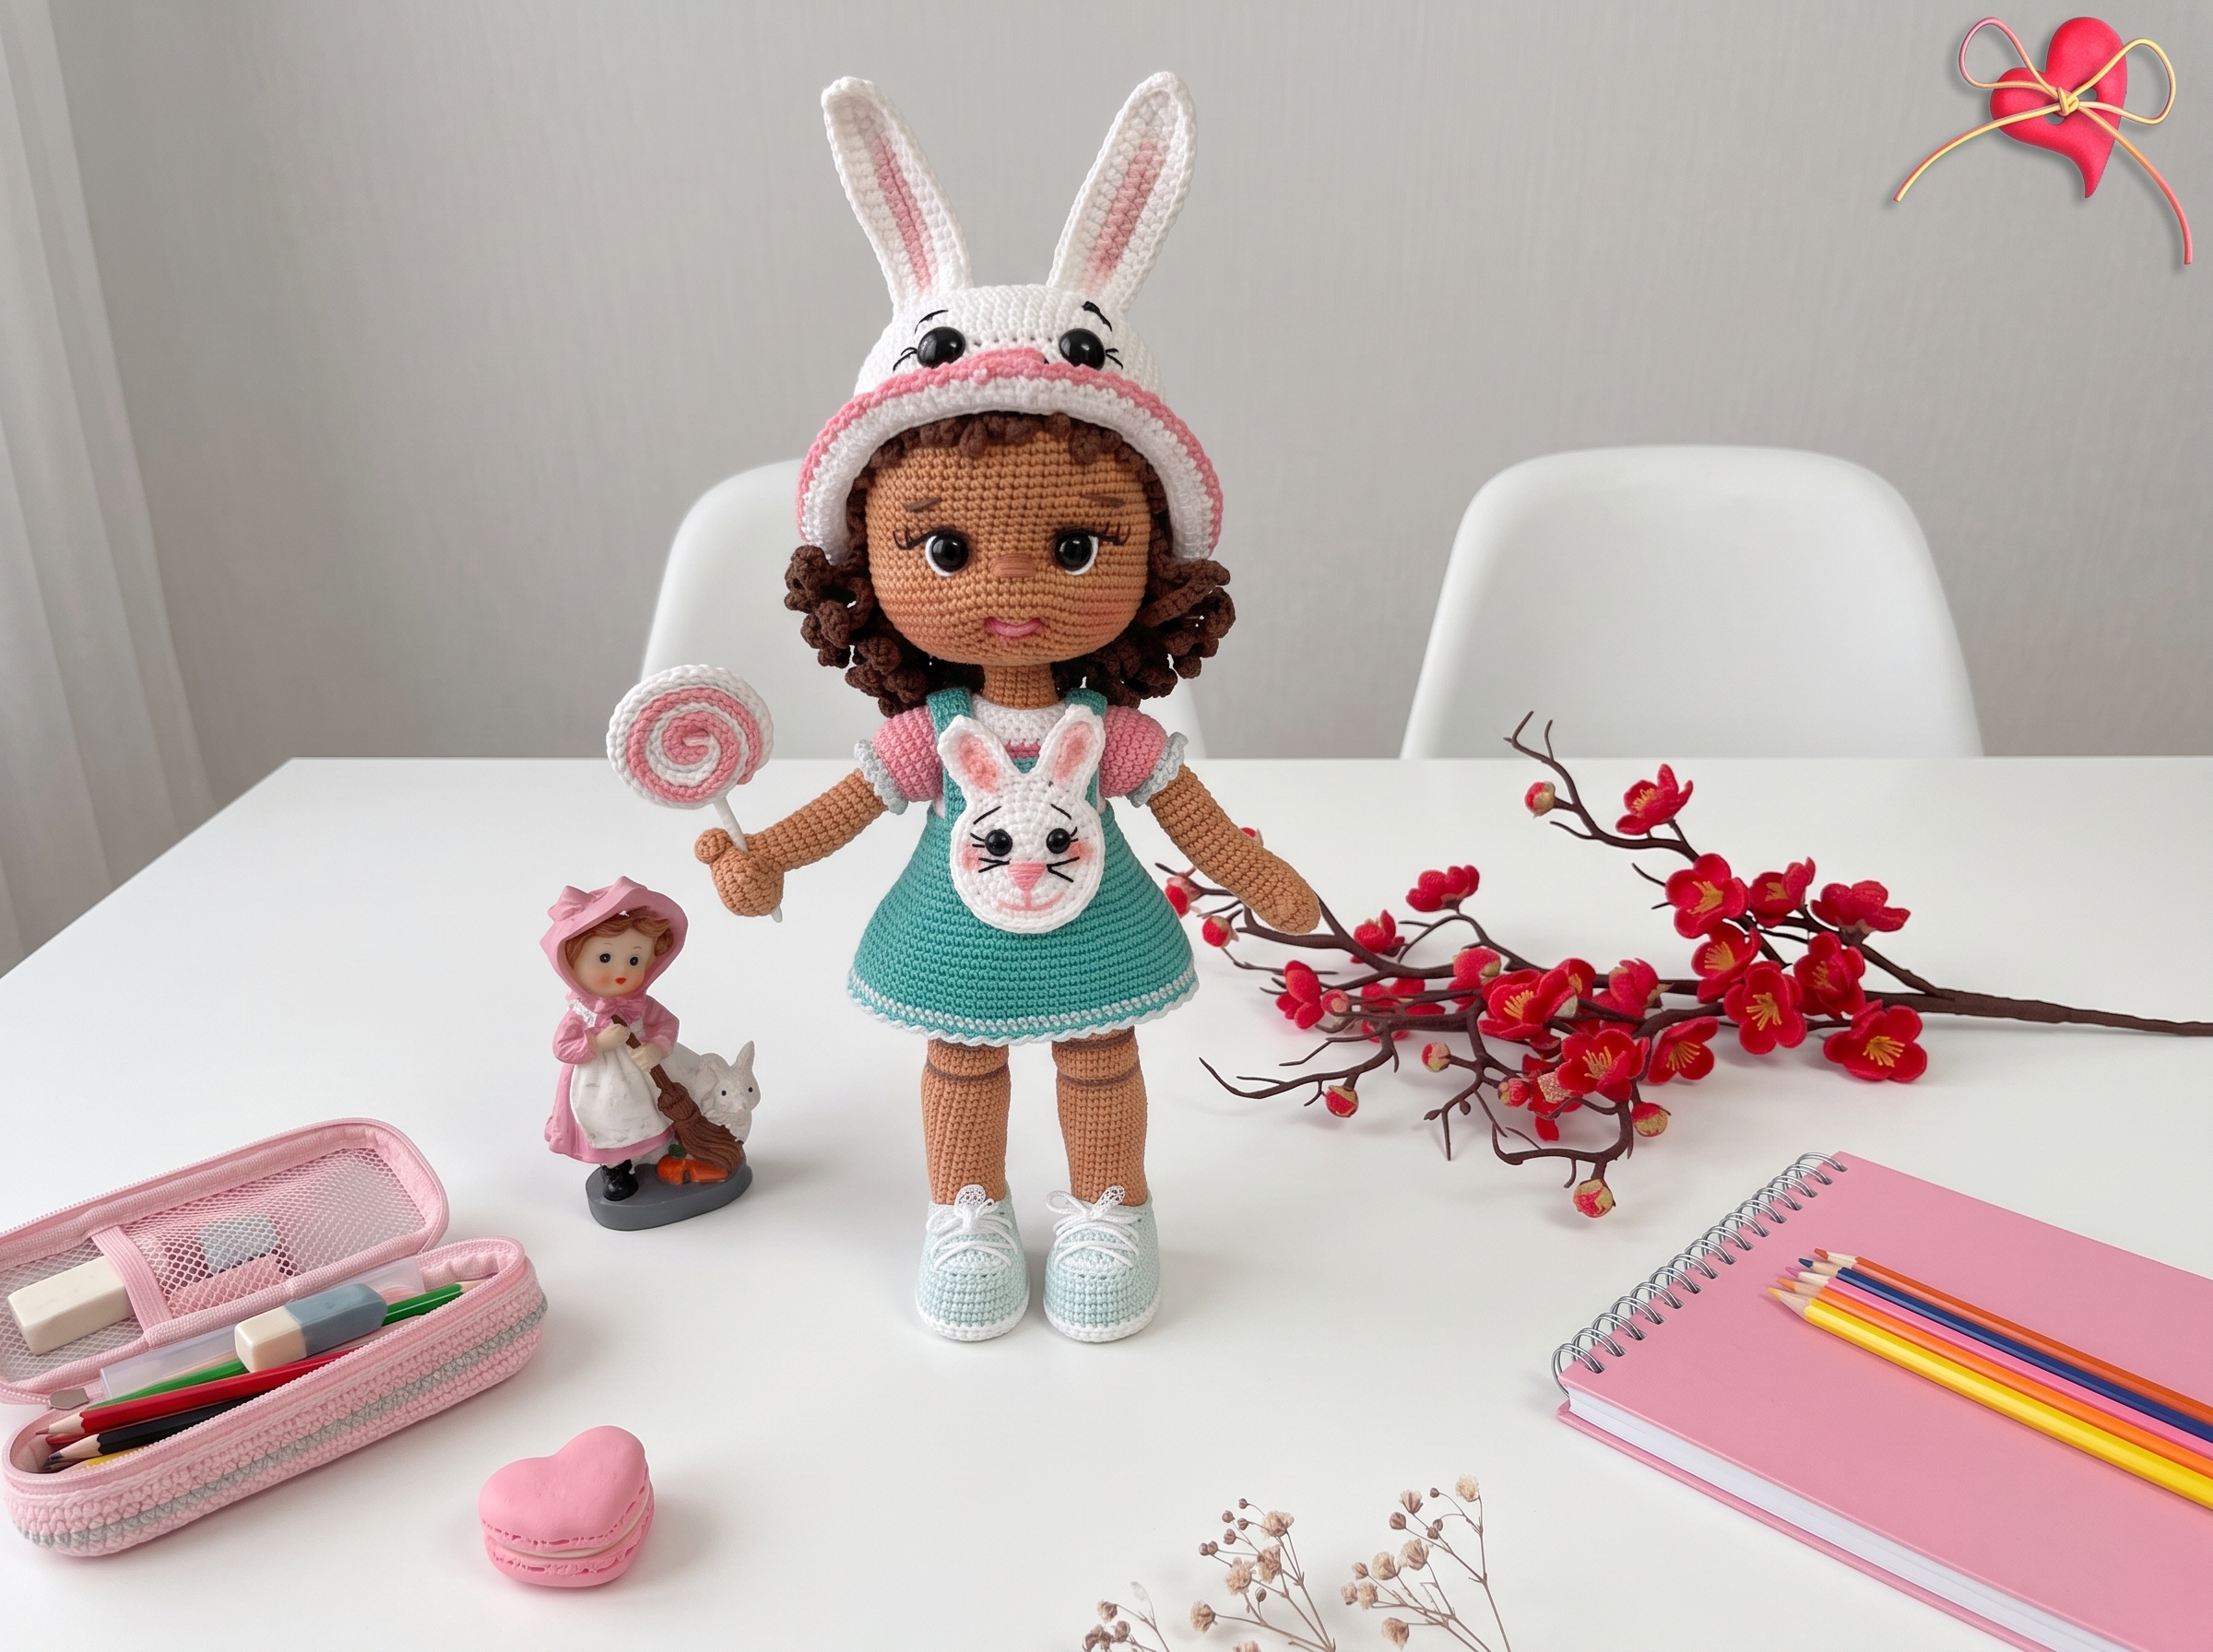
Meet Caramel: The Sweetest Amigurumi Doll You'll Ever Crochet!
1. Materials & Abbreviations
Grab your favorite yarns and let's get started! Caramel requires a few different colors for her gorgeous outfit and accessories, so this is a great stash-busting project.
- Yarn: Snowball Am Gurum (various colors for skin, hair, and clothes) and H Malaya Delux Bamboo.
- Hook: Appropriate size for your chosen yarn (typically 2.0 mm - 2.5 mm).
- Notions: 12 mm and 14 mm safety eyes, 4 buttons, 1.5 meters of 2.5 mm craft wire (for a poseable frame), poly-fil stuffing, sewing needle, and scissors.
- Special Stitches:
- w – triple increase (3 sc in one stitch)
- m – triple decrease (3 sc crocheted together)
What it teaches: Working with multiple yarn colors, creating poseable wire frames, and mastering specialized increase/decrease stitches.
2. Arms (Make 2)
These little arms feature a cute little thumb and are designed to hold onto her giant candy later on!
- R1: Ch 8. Starting in the 2nd ch from hook: 6 sc, 3 sc in the next st, 6 sc (15)
- R2-4: 15 sc (15) [3 rows]
- R5 (Thumb): 4 dc in one stitch (with a common top), 14 sc (15)
- R6-7: 15 sc (15) [2 rows]
- R8: (4 sc, dec) x 2, 3 sc (13)
- R9-29: 13 sc (13) [21 rows]
- Finishing: Stuff lightly and leave a long tail for sewing.
What it teaches: Creating anatomical details like thumbs and working long, tubular limbs.
3. Shoes & Legs
We're starting from the feet up! The shoes feature a white sole and a cute green upper, giving her a sporty, stylish look.
Soles (Make 2, White Yarn):
- R1: Ch 7. Starting in the 2nd ch from hook: inc, 4 sc, 6 sc in the last ch, 4 sc, inc (24)
- R2: 2 inc, 4 sc, 6 inc, 4 sc, 2 inc (28)
- R3: inc, 7 sc, (sc, inc) x 6, 7 sc, inc (36)
- R4: 36 sc (36)
- Assembly: Cut out a plastic insole to match the size. Sandwich the plastic between two crocheted soles and join them with sl st.
Shoe Uppers & Legs (Green Yarn):
- R5-9: 36 sc (36) [5 rows]
- R10: Center the front of the shoe: 8 sc, skip 1 st, sl st to the side, turn (8)
- R11-18: 8 sc, sl st to the side, turn [8 rows]
- R19: 19 sc around the entire perimeter (19)
- R20 (Skin Color): BLO: 19 sc (19)
- R21-52: Work in sc, increasing strategically to shape the leg and ankle (ending with 24 sc).
- Note: Insert the craft wire into the legs for poseability. Repeat for the second leg, but do not cut the yarn on the second leg.
What it teaches: Creating structured soles with plastic inserts, working shoe uppers, and integrating wire armatures.
4. Body
The body is worked seamlessly from the legs up, creating a sturdy core for the doll.
- R1 (Joining Legs): 24 sc on the 1st leg, 2 sc in the chain space, 24 sc on the 2nd leg, 2 sc in the chain space (52)
- R2-12: 52 sc (52) [11 rows]
- R13: (10 sc, dec) x 4, 4 sc (48)
- R14-15: 48 sc (48) [2 rows]
- R16: (6 sc, dec) x 6 (42)
- R17-18: 42 sc (42) [2 rows]
- R19: (5 sc, dec) x 6 (36)
- R20-27: 36 sc (36) [8 rows]
- R28 (Attach Arms): 7 sc, 5 sc (working through arm and body), 14 sc, 5 sc (arm and body), 5 sc (42)
- R29-30: 42 sc (42) [2 rows]
- R31: (7 sc, dec) x 2 (28)
- R32: 28 sc (28)
- R33: dec, (5 sc, 4 dec) x 2 (19)
- R34-40: 19 sc (19) [7 rows]
- Finishing: Stuff firmly and leave a long tail for attaching the head.
What it teaches: Seamless leg joining, mid-round arm attachment, and structured torso decreasing.
5. Head & Face Details
The head is worked in a continuous spiral, with special chain spaces created for the eyes.
- R1: 8 sc in MR (8)
- R2: 8 inc (16)
- R3: (sc, inc) x 8 (24)
- R4: (2 sc, inc) x 8 (32)
- R5: (3 sc, inc) x 8 (40)
- R6: (4 sc, inc) x 8 (48)
- R7: (5 sc, inc) x 8 (56)
- R8: (6 sc, inc) x 8 (64)
- R9-21: 64 sc (64) [13 rows]
- R22: 26 sc, 1 ch, skip 1 st, 9 sc, 1 ch, skip 1 st, 27 sc (64)
- R23: 64 sc (insert safety eyes into the chain spaces) (64)
- R24: 19 sc, (inc, sc) x 5, 7 sc, (sc, inc) x 5, 15 sc (74)
- R25-28: 74 sc (74) [4 rows]
- R29: (8 sc, dec) x 7, 4 sc (67)
- R30: (7 sc, dec) x 7, 4 sc (60)
- R31: (6 sc, dec) x 7, 4 sc (53)
- R32: (5 sc, dec) x 7, 4 sc (46)
- R33: (4 sc, dec) x 7, 4 sc (39)
- R34: (3 sc, dec) x 7, 4 sc (32)
- R35: (2 sc, dec) x 8, 1 sc (25)
- R36: (sc, dec) x 8, 1 sc (17)
- Finishing: Stuff firmly. Close the hole.
Face Embroidery:
- Pull the eye threads to the back of the head to secure them.
- Embroider the nose between R24 and R25 (4 sts wide).
- Make a small pull at the corners of the mouth, then embroider the smile.
- Embroider the eye whites from the bottom center to the outer top corner. Add two little eyelashes.
- Embroider the eyebrows 3 rows above the eyes (4 sts wide, diagonal).
What it teaches: Creating intentional eye openings with chains, facial embroidery, and yarn sculpting for expressive features.
6. Hair & Hat
Caramel gets a gorgeous wig and a cozy, stylish hat to complete her look!
Wig Base:
- R1: 10 sc in MR (10)
- R2: 10 dc inc (20)
- R3: (dc, dc inc) x 10 (30)
- R4: (2 dc, dc inc) x 10 (40)
- R5: (2 dc, dc inc) x 13, 1 dc (53)
- R6: (3 dc, dc inc) x 13, 1 dc (66)
- R7: 66 dc (66)
- R8: BLO: 66 dc (66)
Bangs:
- Make 11 strands: Ch 12, starting in the 2nd ch: 11 sc. Attach to the wig base, skipping 1 st between each strand.
Hat:
- R1: 10 sc in MR (10)
- R2: 10 dc inc (20)
- R3: (dc, dc inc) x 10 (30)
- R4: (2 dc, dc inc) x 10 (40)
- R5: (3 dc, dc inc) x 10 (50)
- R6: (4 dc, dc inc) x 10 (60)
- R7: (5 dc, dc inc) x 10 (70)
- R8-13: 70 dc (70) [6 rows]
- R14: FLO: 140 dc (working 2 dc in each st) (140)
- R15 (Pink): Work "crab step" (sc, skip 1 st) around the entire edge.
Hat Ears (Make 2):
- R1: Ch 15. Starting in the 2nd ch: 13 sc, 3 sc in the last ch, 13 sc down the other side, 2 ch, turn (29)
- R2: 13 sc, 6 inc, 13 sc, 2 ch, turn (35)
- R3: 13 sc, (sc, inc) x 6, 13 sc (41)
- Finishing: Sew onto the hat.
What it teaches: Creating a radial wig base, attaching hair strands, and working a flared hat brim.
7. Outfit: T-shirt & Sundress
Let's dress her up! We're working the clothes directly onto the doll or sewing them on for a perfect fit.
T-shirt:
- R1: Ch 36. Starting in the 7th ch: (2 sc, inc) x 10 (40)
- R2: 40 sc (40)
- R3: (3 sc, inc) x 10 (50)
- R4-5: 50 sc (50) [2 rows]
- R6: 9 sc, ch 10, skip 10 sc, 17 sc, ch 10, skip 10 sc, 9 sc (53)
- R7-13: 53 sc (53) [7 rows, changing colors as desired]
Sleeves (Make 2):
- R1: Attach yarn to the armhole: (2 sc, inc) x 6, 1 inc (26)
- R2-6: 26 sc (26) [5 rows]
- R7: 13 dec (13)
- R8-9: 13 sc (13) [2 rows]
Sundress:
- R1: Ch 60. Starting in the 7th ch: 54 sc (54)
- R2-6: 54 sc (54) [5 rows]
- R7: (5 sc, inc) x 9, join with sl st (63)
- R8-10: 63 sc (63) [3 rows]
- R11: (4 sc, inc) x 12, 3 sc, join (75)
- R12-14: 75 sc (75) [3 rows]
- R15: (10 sc, inc) x 6, 9 sc, join (81)
- R16-20: 81 sc (81) [5 rows, changing colors]
- Finishing: Edge with "crab step".
Straps (Make 2):
- Ch 7, sc in each ch. Sew to the sundress and t-shirt.
What it teaches: Crocheting custom-fit garments, creating armholes, and working color-blocked clothing.
8. Bonus Accessories: Bunny & Candy
No doll is complete without her favorite toys!
Bunny:
- Body: 8 sc in MR, increase to 28 sc. Stuff and close.
- Ears: Ch 3, sc in the 2nd ch, 3 sc in the next st, sc, 2 ch, turn. Repeat for the second ear.
- Assembly: Sew ears to the head. Embroider a cute face.
Giant Candy:
- Wrapper: Ch 28 in white, pink, and green yarns (3 separate pieces).
- Assembly: Stack the three pieces, roll them up tightly like a candy wrapper, and sew or glue them in place.
- Stick: Wrap craft wire with yarn to create a lollipop stick, and glue the candy to it.
What it teaches: Micro-amigurumi techniques, rolling and shaping flat crochet pieces into 3D objects, and wire wrapping.
Final Section: Where to Go from Here
Wow, you did it! Caramel is officially ready for her big day out. By completing this pattern, you've tackled advanced doll construction, custom clothing design, and intricate accessory making. You are now a true amigurumi master!
Take a moment to admire your handiwork, and don't forget to snap some photos. From here, try experimenting with different yarn textures to give Caramel a whole new wardrobe, or use the clothing techniques you learned here to design outfits for other dolls in your collection. Happy crocheting!