August 12, 2026
Rapunzel Amigurumi Doll – Complete Pattern with Dress, Hair & Pascal
Bring this enchanting Disney-inspired doll to life with this comprehensive pattern! Featuring a detailed corset, a flowing skirt, 25 individual hair curls, and a bonus Pascal the chameleon companion, this project is perfect for intermediate crocheters ready to master multi-part assembly, intricate surface details, and wearable doll accessories.
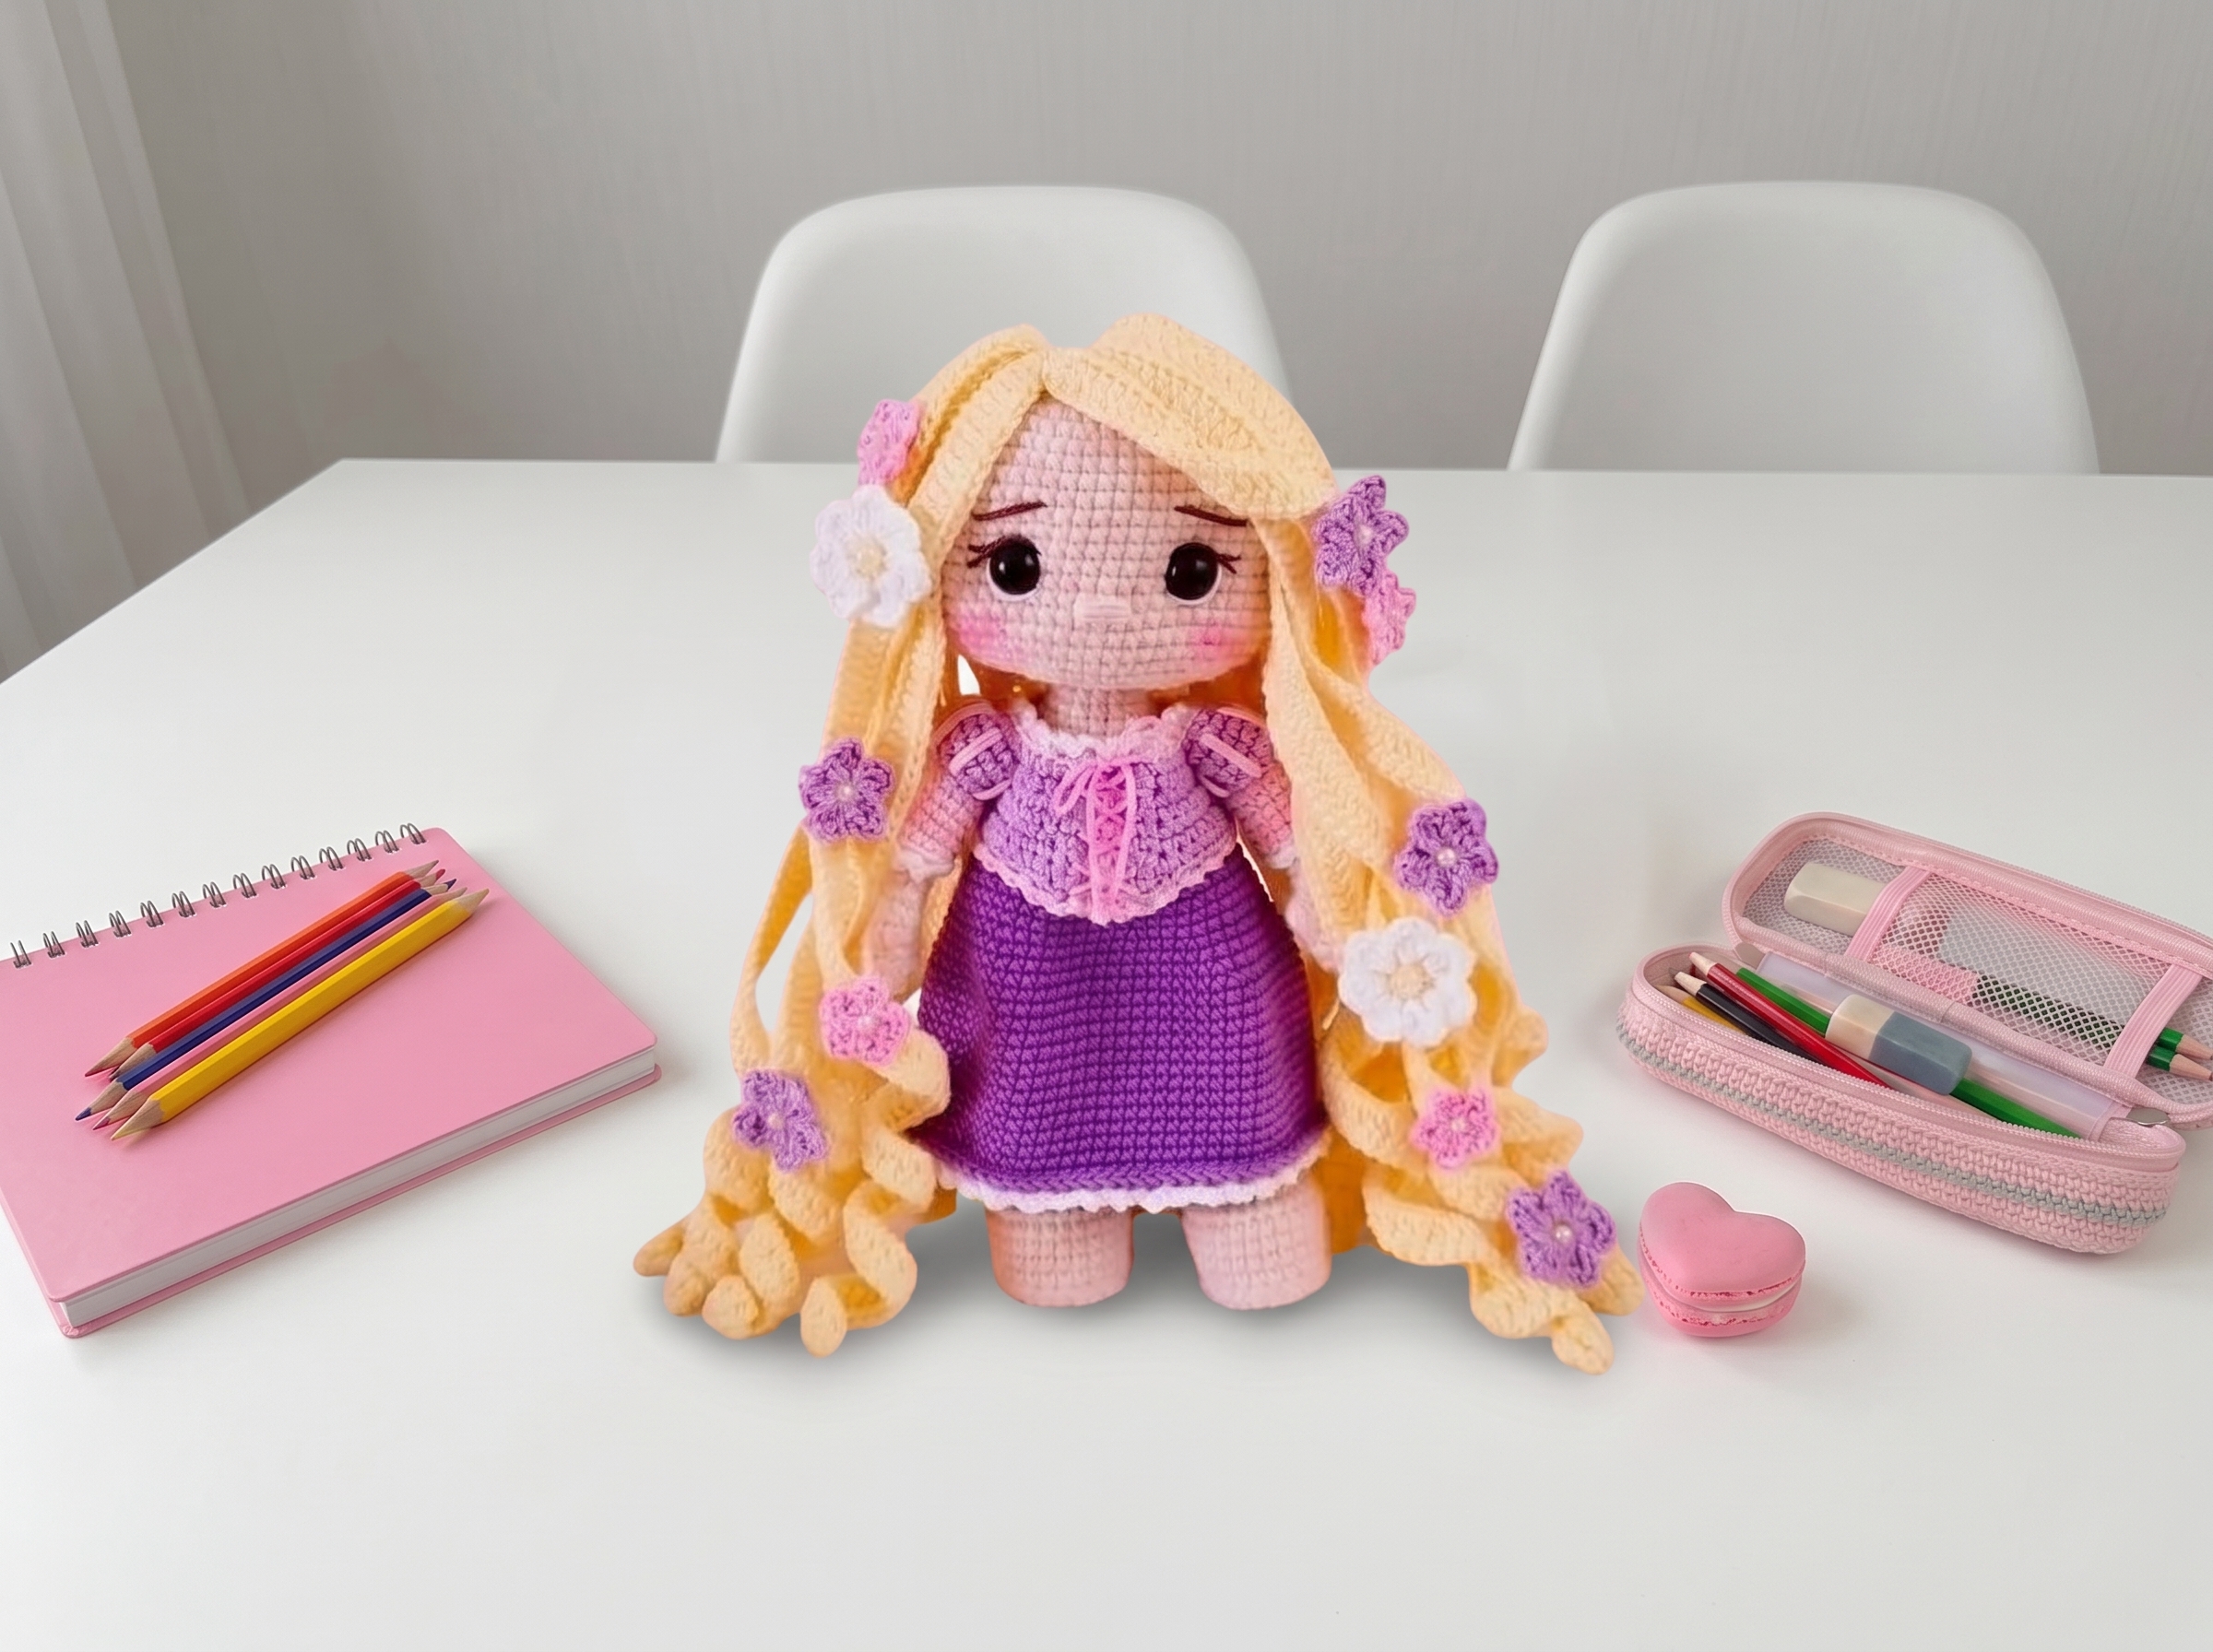
Rapunzel Amigurumi Doll – Complete Step-by-Step Pattern
1. Materials & Abbreviations
Gather your supplies before we begin. Using the recommended materials will ensure your doll has that perfect, professional finish.
- Yarn: Cotton blend yarn (e.g., YarnArt Jeans, 160m/50g). Colors: Skin tone, Cream/White, Lilac, Pink, Purple, Yellow, and Green (for Pascal).
- Hook: 2.0 mm (or size needed to achieve a tight, stuff-proof gauge).
- Notions: 11 mm safety eyes (without backings, to be sewn/glued), 5 mm pearl half-beads, poly-fil stuffing, plastic or cardboard for shoe soles, fabric glue, sewing needle, brown and white embroidery floss, scissors, and pins.
- Abbreviations:
- MR – magic ring
- ch – chain
- sc – single crochet
- hdc – half double crochet
- dc – double crochet
- sl st – slip stitch
- inc – increase (2 sc in one stitch)
- dec – decrease (2 sc crocheted together)
- BLO – back loop only
- FLO – front loop only
What it teaches: Proper tool selection for fine cotton yarns, gauge management, and familiarization with standard international crochet abbreviations.
2. Head
The head is worked in a continuous spiral to build a perfectly round, plush foundation for our doll's sweet face.
- R1: 6 sc in MR (6)
- R2: 6 inc (12)
- R3: (1 sc, inc) x 6 (18)
- R4: (2 sc, inc) x 6 (24)
- [Editor’s Note: The original text contained a garbled sequence for this row that mathematically yielded 19 stitches. Corrected to the standard "(2 sc, inc) x 6" to achieve the stated 24-stitch count.]
- R5: (3 sc, inc) x 6 (30)
- R6: (4 sc, inc) x 6 (36)
- R7: (5 sc, inc) x 6 (42)
- R8: (6 sc, inc) x 6 (48)
- R9: (7 sc, inc) x 6 (54)
- R10: (8 sc, inc) x 6 (60)
- R11: (9 sc, inc) x 6 (66)
- R12-22: 66 sc (66) [11 rows]
- R23: (9 sc, dec) x 6 (60)
- R24: (8 sc, dec) x 6 (54)
- R25: (7 sc, dec) x 6 (48)
- R26: (6 sc, dec) x 6 (42)
- R27: (5 sc, dec) x 6 (36)
- R28: (4 sc, dec) x 6 (30)
- R29: (3 sc, dec) x 6 (24)
- R30: 24 sc in BLO (24)
- R31-43: 24 sc (24) [13 rows]
- R44: (2 sc, dec) x 6 (18)
- R45: (1 sc, dec) x 6 (12)
- R46: 6 dec (6)
- Finishing: Begin stuffing the head firmly. Cut yarn, leaving a long tail. Weave the tail through the front loops of the remaining 6 stitches and pull tight to close the hole. Hide the end inside.
What it teaches: Spiral increase sequences, managing stitch count transitions, and structured decreasing for smooth, spherical shaping.
3. Legs & Body
The legs are constructed with a structured sole for stability, then seamlessly joined to form the torso.
Soles (Make 4 total, Skin Color):
- R1: Ch 6. Starting in 2nd ch from hook: 3 sc, 4 sc in last st, 3 sc (14)
- R2: 2 inc, 3 sc, 4 inc, 3 sc, 2 inc (22)
- R3: (1 sc, inc) x 2, 3 sc, (1 sc, inc) x 4, 3 sc, (1 sc, inc) x 2 (30)
- Assembly: Cut a plastic or cardboard piece slightly smaller than the crocheted sole. Sandwich this form between two crocheted sole pieces and sew them together around the perimeter. Repeat for the second foot.
Legs (Make 2, Skin Color):
- R1-8: Work even or shape as desired to reach 18-20 sts at the ankle.
- R9-14: 18 sc (18) [6 rows] (Note: Original text contained scrambled row numbers here; maintain a consistent tube of 18 sc for the lower leg).
- R15: (4 sc, dec) x 3 (15)
- R16: (3 sc, dec) x 3 (12)
- R17: (2 sc, dec) x 3 (9)
- R18-31: 9 sc (9) [14 rows]
Joining Legs & Body:
- R1 (Joining): 18 sc on 1st leg, ch 4, 18 sc on 2nd leg, ch 4. Place a marker at the back center. (44 sts total)
- [Editor’s Note: The original PDF stated "20 sc" per leg, yielding 48 sts. If your legs have 20 sc, use 20 sc + 4 ch + 20 sc + 4 ch = 48 sts. Adjust subsequent decreases proportionally.]
- R2-5: 44 sc (44) [4 rows]
- R6: (6 sc, dec) x 6 (36)
- [Editor’s Note: Adjusted to mathematically bridge the gap from 44/48 sts down to the torso's 36 sts.]
- R7: (11 sc, dec) x 3 (36) -> Maintain 36 sc if no further decrease is needed, or follow: (5 sc, dec) x 6 (30) if tapering.
- R8-23: Work even in sc to desired torso length (approx. 16 rows).
- Assembly: Sew the head securely to the top of the body.
What it teaches: Creating rigid soles for standing stability, seamless multi-piece joining with chain bridges, and structured torso shaping.
4. Arms (Make 2)
These little arms feature a cute puff-stitch detail and are designed to be sewn flat against the body for a natural pose.
- R1: 5 sc in MR (5)
- R2: 5 inc (10)
- R3: 5 sc, inc, 5 sc (11)
- [Editor’s Note: Corrected from original garbled text to achieve the stated 11-stitch count.]
- R4: 11 sc (11)
- R5: 5 sc, 1 puff stitch (3 dc with a common top), 5 sc (11)
- R6: 11 sc (11)
- R7: 4 sc, dec, 5 sc (10)
- R8: 4 sc, dec, 4 sc (9)
- R9-17: 9 sc (9) [9 rows]
- Finishing: Fold the arm in half and work 5 sc through both layers simultaneously to close the top flat. Leave a long tail for sewing.
- Assembly: Sew arms to the sides of the body, centered between R15 and R16 of the torso. Ensure the "thumb" (puff stitch side) faces upward.
What it teaches: Creating textured puff stitches, partial stuffing, and flat-folding techniques for seamless limb closures.
5. Hair & Curls
The hair is built on a small circular base, with 25 individual, flowing curls attached directly to the edge.
Hair Base:
- R1: Ch 11. Starting in 2nd ch from hook: inc, 8 sc, 5 sc in last st, 8 sc, 2 sc in last st. (25)
Curls (Make 25 total):
- Setup: Do not cut yarn after the base. We will work 1 curl into each of the 25 stitches of the base.
- Curl Row: Ch 103. Starting in 3rd ch from hook: work 40 dc, then continue with 60 sc along the remaining chain.
- Attachment: Once you reach the end of the chain, work 1 sc into the next available stitch on the hair base. From this same base stitch, chain 103 again to begin the next curl.
- Finishing: After all 25 curls are attached, weave in ends. Pin the hair base to the doll's head, parting it slightly off-center, and sew or glue securely in place.
What it teaches: Radial expansion, chaining long textured strands, and attaching multiple repetitive elements seamlessly in the round.
6. Dress: Corset & Skirt
The dress is worked in two distinct parts: a structured, lace-up corset top and a flowing, ruffled skirt.
Corset (Pink Yarn):
- R1: Ch 40. Starting in 2nd ch from hook: 39 sc. Turn. (39)
- R2: 4 sc, inc, 8 sc, inc, 11 sc, inc, 8 sc, inc, 4 sc. Ch 1, turn. (43)
- R3: 5 sc, ch 6, skip 9 sts, 15 sc, ch 6, skip 9 sts, 5 sc. Turn.
- R4: 1 sc, inc, 3 sc, 6 sc along the ch-6 space, 15 sc, 6 sc along the second ch-6 space, 3 sc, inc, 1 sc. Turn. (39)
- R5-7: 39 sc (39) [3 rows]
- R8: hdc inc, 15 sc, inc, 1 sc, 2 inc, 1 sc, inc, 16 sc, hdc inc. Turn. (45)
- Back Lacing Panel: Work 4 sc back and forth for 6 rows, creating a small tab. Finish with a decorative hdc border.
- Assembly: Sew the corset to the doll's torso. Thread a 30 cm cotton ribbon through the ch-6 spaces in a criss-cross pattern to create the back lacing.
Skirt (White Yarn, worked in the round):
- R1: Ch 42, join with sl st to form a ring. 42 sc (42)
- R2: (6 sc, inc) x 6 (48)
- R3: 48 sc (48)
- R4: (7 sc, inc) x 6 (54)
- R5-6: 54 sc (54) [2 rows]
- R7: 4 sc, (8 sc, inc) x 5, 4 sc (60)
- R8: (9 sc, inc) x 6 (66)
- R9: 66 sc (66)
- R10: 12 sc, (inc, 8 sc, inc), 22 sc, (inc, 8 sc, inc), 12 sc (70)
- R11-13: 70 sc (70) [3 rows]
- R14: 18 sc, inc, 32 sc, inc, 18 sc (72)
- R15-24: 72 sc (72) [10 rows]
- R25: 72 sc in BLO (72)
- Ruffle Edging (Purple Yarn): Attach to the FLO of R25. (Ch 3, skip 1 st, sc in next st) repeat around to create a delicate, scalloped hem.
What it teaches: Flat-to-round transitions, creating functional openings (button/lacing holes), and working decorative ruffled edgings.
7. Bonus: Pascal the Chameleon
No Rapunzel is complete without her loyal companion! This mini amigurumi fits perfectly in her hand or pocket.
Head (Green Yarn):
- R1: 6 sc in MR (6)
- R2: 6 inc (12)
- R3: (1 sc, inc) x 6 (18)
- R4: (2 sc, inc) x 6 (24)
- R5: (3 sc, inc) x 6 (30)
- R6-8: 30 sc (30) [3 rows]
- R9: 11 sc, 8 inc, 11 sc (38)
- R10: 38 sc (38)
- Important detail: Insert 10 mm safety eyes between R7 and R8, spaced 7 stitches apart.
- R11: 11 sc, 8 dec, 11 sc (30)
- R12: 30 sc (30)
- R13: (3 sc, dec) x 6 (24)
- R14: (2 sc, dec) x 6 (18)
- R15: (1 sc, dec) x 6 (12)
- R16: 6 dec (6)
- Finishing: Stuff firmly and close the hole.
Body & Tail (Green Yarn):
- R1: 6 sc in MR (6)
- R2-15: 6 sc (6) [14 rows]
- R16: (1 sc, inc) x 3 (9)
- R17: (2 sc, inc) x 3 (12)
- R18: 12 sc (12)
- R19: (1 sc, inc) x 6 (18)
- R20: 18 sc (18)
- R21: (2 sc, inc) x 6 (24)
- R22-23: 24 sc (24) [2 rows]
- R24: (3 sc, inc) x 6 (30)
- R25-26: 30 sc (30) [2 rows]
- R27: (3 sc, dec) x 6 (24)
- R28: (2 sc, dec) x 6 (18)
- Finishing: Stuff lightly, twist the remaining tube to form a curled tail, and sew closed.
Details:
- Crest: Ch 12. Starting in 2nd ch from hook: 2 sc, 1 hdc, 1 dc, 1 dc inc, 1 dc2tog (or cluster), 1 dc, 1 hdc, 1 sc. Sew down the center of the head and back.
- Cheeks: Make 2 tiny pink circles (6 sc in MR, pull tight) and sew below the eyes.
What it teaches: Micro-amigurumi techniques, rapid shaping for small companions, and working with mixed stitch heights for organic details.
8. Final Assembly & Embroidery
Now for the magic moment where all the pieces come together to create your Rapunzel!
- Face: Sew the head securely to the body. Embroider the nose centrally between R19 and R20, spanning 3 stitches wide. Embroider white eye highlights and delicate brown eyelashes.
- Hair: Position the hair base on the head, parting it slightly off-center. Sew or use fabric glue to secure. Braid or arrange the 25 curls as desired.
- Dress: Slide the skirt and corset onto the doll. Lace up the back of the corset with the cotton ribbon and tie a bow.
- Pascal: Sew Pascal to the doll's hand or shoulder, or leave him detachable to sit in her skirt pocket!
What it teaches: Multi-step structural assembly, strategic stuffing for poseability, and expressive surface embroidery for realistic facial features.
Final Section: Where to Go from Here
Congratulations! By completing this Rapunzel doll, you have mastered a wide array of intermediate to advanced amigurumi techniques: seamless limb joining, intricate multi-part garment construction, repetitive curl attachment, and micro-amigurumi detailing. These skills are incredibly versatile. Next time, try experimenting with different yarn colorways to create a whole "royal court" of dolls, or adapt the corset and skirt pattern to fit other amigurumi figures in your collection. Happy crocheting!