September 8, 2026
Chunky Flower Coaster & Trivet – A Quick & Cozy Crochet Project
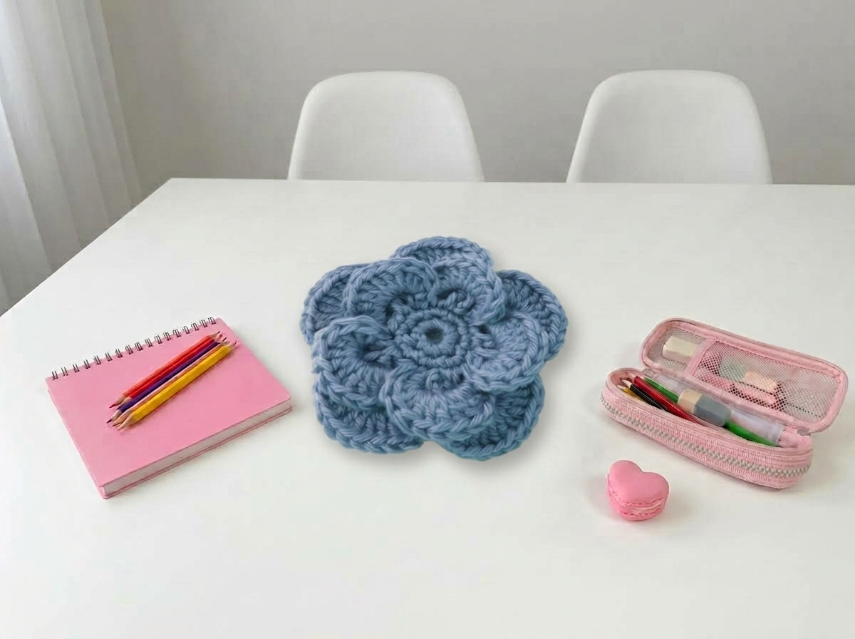
Add a touch of handmade warmth to your table with this adorable, chunky flower coaster! Featuring a classic 5-petal design and a beautifully dense texture, this project is a lightning-fast make that’s perfect for using up bulky yarn scraps. It’s an ideal beginner-friendly project that yields a practical and charming result.
Chunky Flower Coaster & Trivet – Complete Step-by-Step Pattern
1. Gathering Your Supplies
To get that incredibly plush, thick look seen in the photo, we highly recommend using a super bulky or velvet-style yarn. It works up in minutes and gives the coaster a lovely, substantial feel!
- Yarn: Super Bulky (Size 6) or Chunky Velvet yarn (e.g., Bernat Blanket, Himalaya Dolphin Baby, or a thick cotton rope).
- Color: A lovely dusty blue (or any color of your choice!). You'll only need a small amount, approx. 30-40g per flower.
- Hook: 8.0 mm (US L/11) or 10.0 mm (US N/P), depending on your yarn and desired tightness.
- Notions: Tapestry needle for weaving in ends, scissors.
- Finished Size: Approximately 12 cm (4.5 inches) in diameter (make two and stack them for a thicker trivet!).
What you'll master: Working with bulky yarns, maintaining even tension in large stitches, and creating classic floral motifs.
2. Abbreviations & Special Techniques
Let’s quickly review a few terms. If you're new to any of these, don't worry—you'll be a pro by the time you finish the first petal!
- MR: Magic ring
- ch: Chain
- sc: Single crochet
- hdc: Half double crochet
- dc: Double crochet
- sl st: Slip stitch
- inc: Increase (2 sc in one stitch)
- st(s): Stitch(es)
3. The Flower Center
We’ll start with a tight, sturdy center to anchor our beautiful petals.
- R1: 5 sc in MR (5)
- Pro Tip: Pull the tail of your magic ring tightly to close the hole in the center completely!
- R2: 2 sc in each st around (10)
- R3: (1 sc, inc) x 5 (15)
- Note: This round creates the perfect base for our 5 petals.
What you'll master: Spiral increases and creating a perfectly flat circular base.
4. The Petals
Now for the magic moment where your circle transforms into a beautiful flower!
- R4: Ch 1 (does not count as a st).
- Petal 1: Sc in the next 2 sts, [hdc, 3 dc, hdc] all in the next st, sc in the next 2 sts, sl st in the next st.
- Petals 2-5: Repeat the sequence above 4 more times around the circle.
- (Sequence: Sc in next 2 sts, [hdc, 3 dc, hdc] in next st, sc in next 2 sts, sl st in next st).
- Finishing: Sl st into the first sc of the round to join. Fasten off, leaving a tail.
What you'll master: Working complex stitch clusters into a single stitch to create dimensional shapes.
5. Assembly & Finishing (The "Chunky" Trick!)
To get the ultra-thick, luxurious look of the coaster in the photo, we recommend making two identical flowers and stacking them!
- Weave in Ends: Using your tapestry needle, weave in the starting and ending tails securely on the back of each flower. Because bulky yarn can be slippery, weave in multiple directions to lock them in place.
- Stacking: Place one flower directly on top of the other. You can align the petals perfectly, or offset them slightly so the top petals sit in the gaps of the bottom flower for a fuller, 10-petal look!
- Securing (Optional): If you want them to stay together permanently, use your tapestry needle and a long strand of yarn to whip stitch the centers together with a few large, decorative stitches.
What you'll master: Professional finishing techniques and layering motifs for added texture and utility.
Final Section: Where to Go from Here
Congratulations! You’ve just crafted a delightfully cozy Chunky Flower Coaster. This project is incredibly fast, making it perfect for using up stash yarn, crafting last-minute housewarming gifts, or adding a pop of color to your morning coffee routine.
From here, try experimenting with different color combinations to create a whole "garden" of coasters! You could make a vibrant rainbow set, a moody autumn palette, or even use variegated yarn for a surprise pop of color in every petal. Happy crocheting, and enjoy your beautiful new handmade home decor!