September 8, 2026
Cozy Baker Boy Cap – A Stylish & Vintage Crochet Pattern
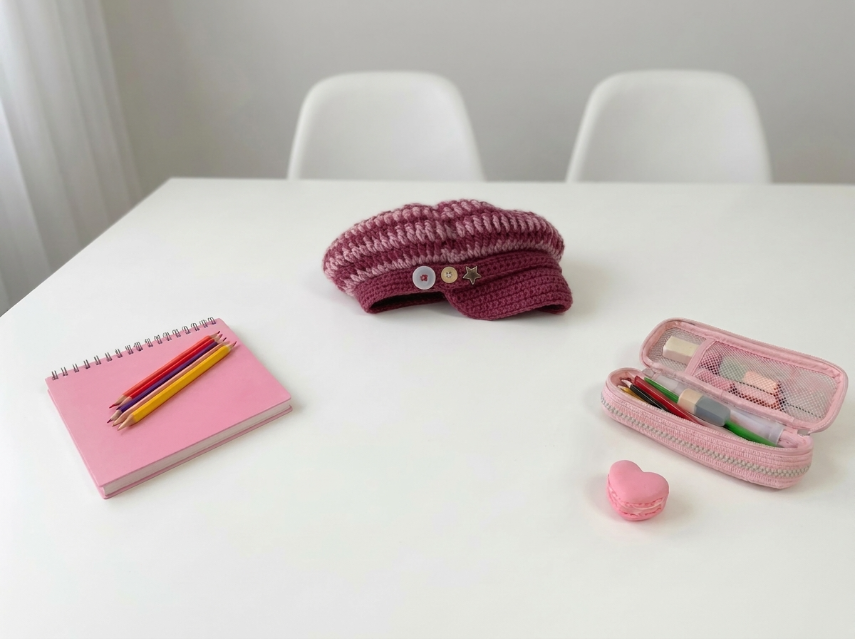
Add a touch of vintage charm to your wardrobe with this adorable Baker Boy Cap (also known as a Newsboy Cap)! Featuring a stretchy ribbed band, a puffy paneled crown, and a cute buttoned brim, this project is a quick and satisfying make perfect for cooler weather. It's an excellent stash-buster and makes a wonderful handmade gift.
Cozy Baker Boy Cap – Complete Step-by-Step Pattern
1. Gathering Your Supplies
To get that structured yet soft look seen in the photo, a worsted or bulky weight yarn with good stitch definition is ideal.
- Yarn: Worsted (Size 4) or Bulky (Size 5) weight yarn. You'll need approx. 150–200g.
- Color: Burgundy, Maroon, or any color you love!
- Hook: 5.0 mm or 5.5 mm (choose the size that gives you a firm, non-stretchy fabric for the brim, but a comfortable fit for the band).
- Notions: 3 decorative buttons (wooden or metal look great!), tapestry needle, scissors, and a measuring tape.
- Finished Size: Adult Medium (fits approx. 54–58 cm head circumference).
What you'll master: Working ribbing in the round, shaping a 3D crown, and constructing a functional brim.
2. Abbreviations & Special Techniques
Let’s quickly review a few terms. If you're new to hat construction, don't worry—this pattern is very forgiving!
- MR: Magic ring
- ch: Chain
- sc: Single crochet
- inc: Increase (2 sc in one stitch)
- dec: Decrease (2 sc crocheted together invisibly)
- sl st: Slip stitch
- FLO: Front loop only (creates the ribbed texture)
- BLO: Back loop only
3. The Ribbed Band
The band is worked in continuous rounds, using the front loop only to create a beautiful, stretchy ribbing that hugs the head comfortably.
- Setup: Ch 2. Join with a sl st to the first ch to form a ring. (Note: Ensure the ring is large enough to fit comfortably over your head—approx. 50–56 cm unstretched. You can ch a specific number and join, then work in rounds. For this pattern, we'll assume approx. 72 stitches for the circumference).
- R1: Ch 1 (does not count as a st). Sc in each ch around. Join with a sl st to the first sc. (72 sts)
- R2–R10: Ch 1. Sc in the FLO of each st around. Join with a sl st. [9 rows]
- Pro Tip: Working in the FLO pushes the back loop forward, creating that classic ribbed look!
- Finishing: Do not fasten off yet. We will work the crown directly onto the top edge of the band.
What you'll master: Creating seamless, stretchy ribbing using FLO techniques.
4. The Puffy Crown
The crown is worked directly onto the top edge of the band (the unworked loops from R1 of the band). We'll increase to create a flat base, work even for depth, and then decrease to close the top.
- R1: Ch 1. Sc in each unworked loop around the top of the band. Join with a sl st. (72 sts)
- R2: Ch 1. (8 sc, inc) x 8. Join. (80 sts)
- R3: Ch 1. (9 sc, inc) x 8. Join. (88 sts)
- R4: Ch 1. (10 sc, inc) x 8. Join. (96 sts)
- R5–R8: Ch 1. 96 sc around. Join. [4 rows] (This creates the height of the crown.)
- R9: Ch 1. (10 sc, dec) x 8. Join. (88 sts)
- R10: Ch 1. (9 sc, dec) x 8. Join. (80 sts)
- R11: Ch 1. (8 sc, dec) x 8. Join. (72 sts)
- R12: Ch 1. (7 sc, dec) x 8. Join. (64 sts)
- R13: Ch 1. (6 sc, dec) x 8. Join. (56 sts)
- R14: Ch 1. (5 sc, dec) x 8. Join. (48 sts)
- R15: Ch 1. (4 sc, dec) x 8. Join. (40 sts)
- R16: Ch 1. (3 sc, dec) x 8. Join. (32 sts)
- R17: Ch 1. (2 sc, dec) x 8. Join. (24 sts)
- R18: Ch 1. (1 sc, dec) x 8. Join. (16 sts)
- R19: Ch 1. Dec x 8. Join. (8 sts)
- Finishing: Cut yarn, leaving a long tail. Thread the tail onto a tapestry needle and weave it through the front loops of the remaining 8 stitches. Pull tight to close the hole at the top of the crown. Secure and weave in the end.
What you'll master: Structural increases and decreases to create a perfectly shaped 3D dome.
5. The Brim (Visor)
The brim is worked flat in rows and then attached to the front of the band. It's shaped to curve slightly over the forehead.
- Setup: Join yarn to the front center of the band (approx. 20 stitches wide).
- Row 1: Ch 1. Sc in the next 20 sts. Turn. (20 sts)
- Row 2: Ch 1. Inc, sc in next 18 sts, inc. Turn. (22 sts)
- Row 3: Ch 1. Sc in each st across. Turn.
- Row 4: Ch 1. Inc, sc in next 20 sts, inc. Turn. (24 sts)
- Row 5–8: Ch 1. Sc in each st across. Turn. [4 rows]
- Row 9: Ch 1. Dec, sc in next 20 sts, dec. Turn. (22 sts)
- Row 10: Ch 1. Sc in each st across. Turn.
- Row 11: Ch 1. Dec, sc in next 18 sts, dec. Turn. (20 sts)
- Row 12: Ch 1. Sc in each st across. Fasten off, leaving a very long tail for sewing.
What you'll master: Shaping flat pieces with strategic increases and decreases.
6. Assembly & Finishing
Now for the magic moment where your cap truly comes to life!
- Attach the Brim: Fold the brim in half lengthwise to find the center. Pin it to the front of the band, aligning the center of the brim with the center of the band. Using your long tail and a tapestry needle, whip stitch the bottom edge of the brim securely to the band.
- Add the Buttons: This is the signature detail! Sew your 3 decorative buttons to the side of the brim, right where it overlaps the band. You can sew them in a vertical line or a slight curve, just like in the photo!
- Weave in Ends: Take your time weaving in all those loose ends on the inside of the cap.
- Final Touches: If your yarn allows, give the cap a gentle steam block to even out the stitches and help the brim hold its shape.
What you'll master: Multi-step structural assembly and adding professional, personalized finishing touches.
Final Section: Where to Go from Here
Congratulations! You’ve just crafted a stylish, vintage-inspired Baker Boy Cap. This project is incredibly satisfying because it combines simple stitches with clever construction to create a high-end looking accessory.
From here, try experimenting with different yarn weights! A fine cotton yarn would make this the perfect breezy summer cap, while a super bulky chenille yarn would create the ultimate cozy winter hat. You could also swap the buttons for a cute embroidered flower or a leather patch. Happy crocheting, and enjoy your beautiful new handmade staple!