August 20, 2026
Katya Doll – A Charming Amigurumi Doll with Custom Outfit & Accessories
Bring this sweet, fully-dressed amigurumi doll to life! Featuring a detailed wardrobe with a ruffled blouse, tailored pants with suspenders, and a cute hat, this pattern is a delightful challenge for intermediate crafters ready to master multi-part assembly, garment construction, and precise stitch mathematics.
Jump to pattern instructions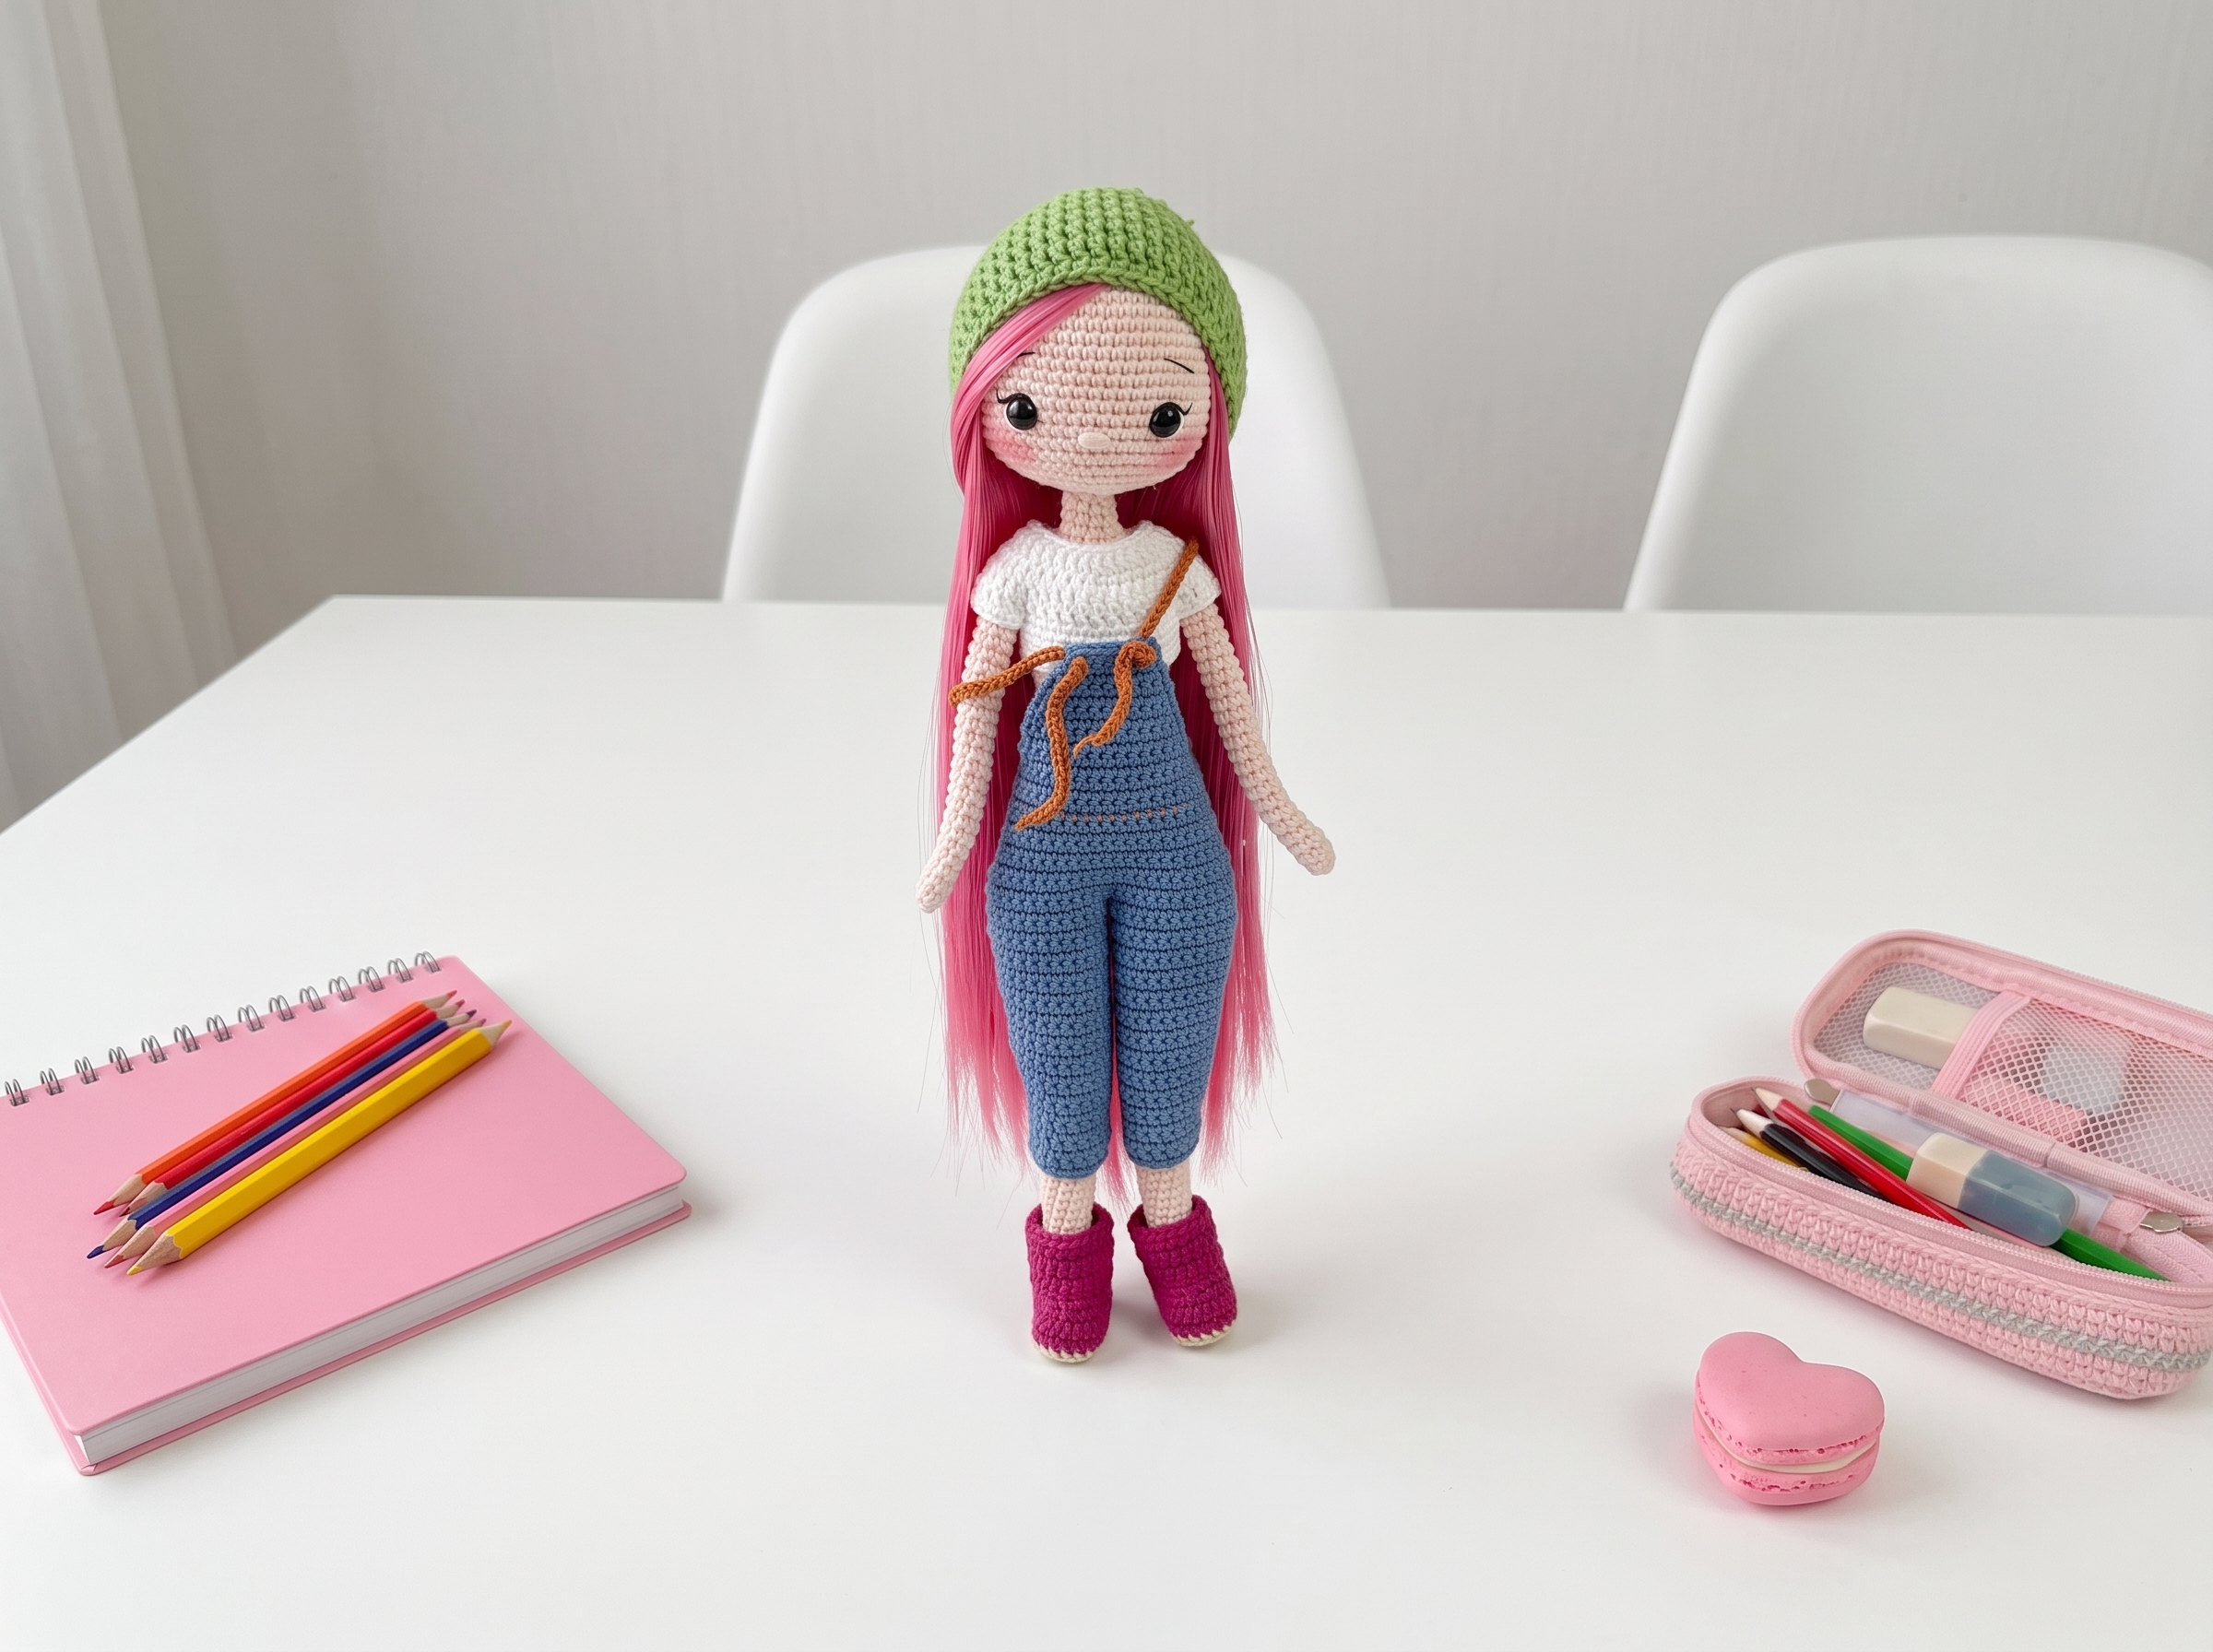
Katya Doll – Complete Step-by-Step Pattern
1. Materials & Abbreviations
Gather your supplies before beginning. Using the recommended cotton blend yarns will give your doll beautiful stitch definition and a professional, durable finish.
- Yarn:
- Main/Body: YarnArt Jeans #73 (Skin)
- Boots: YarnArt Jeans #91 or #07
- Pants: YarnArt Baby Cotton #447
- Blouse: YarnArt Baby Cotton White
- Hat: YarnArt Jeans #69
- Suspenders: YarnArt Baby Cotton Brown
- Hook: 1.75 mm
- Notions: 8 mm safety eyes, 10 cm of 4 mm copper wire (for neck support), synthetic doll hair (wefts), sewing thread, fiberfill stuffing, tapestry needle, scissors, and fabric glue.
- Abbreviations:
- MR – magic ring
- ch – chain
- sc – single crochet
- hdc – half double crochet
- dc – double crochet
- sl st – slip stitch
- inc – increase (2 sc in one stitch)
- dec – decrease (2 sc crocheted together)
- BLO – back loop only
- FLO – front loop only
What it teaches: Proper tool selection for fine cotton yarns, gauge management, and familiarization with standard international crochet abbreviations.
2. Head
The head is worked in a continuous spiral, featuring clever chain-skip techniques to create openings for the eyes, followed by structured decreases to shape the face and neck.
- R1: 6 sc in MR (6)
- R2: 6 inc (12)
- R3: (1 sc, inc) x 6 (18)
- R4: 1 sc, inc, (2 sc, inc) x 5, 1 sc (24)
- R5: (3 sc, inc) x 6 (30)
- R6: 2 sc, inc, (4 sc, inc) x 5, 2 sc (36)
- R7: (5 sc, inc) x 6 (42)
- R8: 3 sc, inc, (6 sc, inc) x 5, 3 sc (48)
- R9: (7 sc, inc) x 6 (54)
- R10-17: 54 sc (54) [8 rows]
- R18: 21 sc, 1 ch (skip 1 sc), 10 sc, 1 ch (skip 1 sc), 21 sc (52) [Creates eye openings]
- R19: 21 sc, 1 sc in each ch space, 10 sc, 1 sc in each ch space, 21 sc (54) [Insert 8 mm safety eyes into the ch spaces]
- R20-21: 54 sc (54) [2 rows]
- R22: (7 sc, dec) x 6 (48)
- R23: (2 sc, dec) x 12 (36)
- R24: 2 sc, dec, (4 sc, dec) x 5, 2 sc (30)
- R25: (3 sc, dec) x 6 (24)
- R26: 1 sc, dec, (2 sc, dec) x 5, 1 sc (18)
- R27: (1 sc, dec) x 6 (12)
- Finishing: Cut yarn, leaving a long tail for sewing. Stuff the head firmly before closing. Embroider the nose (2 sc wide) centered between R19 and R20.
What it teaches: Spiral increase sequences, creating intentional openings with chain spaces, and structured decreasing for spherical shaping.
3. Arms (Make 2)
The arms are simple, un-stuffed tubular limbs designed to be seamlessly integrated into the body later.
- R1 (Skin color): 4 sc in MR (4)
- R2: 4 inc (8)
- R3-25: 8 sc (8) [23 rows]
- Finishing: Cut yarn. Do not stuff. Place a stitch marker directly above the "thumb" area (the inc in R2) to guide body attachment.
What it teaches: Creating uniform, un-stuffed tubular limbs and using stitch markers for precise multi-part assembly.
4. Legs & Body
The legs are constructed with shaped feet, then seamlessly joined to form the torso. The arms are integrated mid-round for a clean, professional finish.
Right Leg (Start with Skin color):
- R1: 7 ch. Starting in 2nd ch from hook: inc, 4 sc, 4 sc in last ch, 4 sc, inc (16)
- R2: 2 inc, 4 sc, 4 inc, 4 sc, 2 inc (24)
- R3: 24 sc in BLO (24)
- R4: 8 sc, 4 dec, 8 sc (20)
- R5: 6 sc, 4 dec, 6 sc (16)
- R6: 4 sc, 4 dec, 4 sc (12)
- R7: 5 sc, 1 dec, 5 sc (11)
- R8-11: 11 sc (11) [4 rows]
- R12: 1 sc, 1 inc, 9 sc (12)
- R13-14: 12 sc (12) [2 rows]
- R15: 1 sc, 1 inc, 10 sc (13)
- R16-17: 13 sc (13) [2 rows]
- R18: 2 sc, 1 inc, 10 sc (14)
- R19-20: 14 sc (14) [2 rows]
- R21: 3 sc, 1 inc, 10 sc (15)
- R22-25: 15 sc (15) [4 rows]
- R26: 2 sc, 1 dec, 1 sc, 1 dec, 8 sc (13)
- R27: 13 sc (13)
- R28: 3 sc, 1 dec, 8 sc (12)
- R29: 12 sc (12)
- R30: 3 sc, 1 inc, 8 sc (13)
- R31: 13 sc (13)
- R32: 3 sc, 1 inc, 1 sc, 1 inc, 7 sc (15)
- R33-34: 15 sc (15) [2 rows]
- R35: 6 sc, 1 inc, 8 sc (16)
- R36-37: 16 sc (16) [2 rows]
- R38: 7 sc, 1 inc, 8 sc (17)
- R39-40: 17 sc (17) [2 rows]
- R41: 8 sc, 1 inc, 8 sc (18)
- R42-45: 18 sc (18) [4 rows]
- R46: 14 sc, 1 sl st. Cut yarn.
Left Leg:
- R1-45: Work identically to the Right Leg, but adjust increases/decreases to mirror the shaping (e.g., R12: 1 sc, 1 inc, 9 sc; R15: 2 sc, 1 inc, 9 sc; R18: 3 sc, 1 inc, 9 sc; R21: 4 sc, 1 inc, 9 sc; R26: 3 sc, 1 dec, 1 sc, 1 dec, 7 sc; R28: 4 sc, 1 dec, 7 sc; R30: 4 sc, 1 inc, 7 sc; R32: 4 sc, 1 inc, 1 sc, 1 inc, 6 sc; R35: 7 sc, 1 inc, 7 sc; R38: 8 sc, 1 inc, 7 sc; R41: 9 sc, 1 inc, 7 sc).
- R42-46: 18 sc (18) [5 rows]
- R47: 6 sc, 1 ch. [Do not cut yarn]. Sl st to the Right Leg to join. Work 18 sc across the Right Leg, 1 sc in the joining ch, and 12 sc across the remaining Left Leg. (37)
- R48: 6 sc, 1 sc in the joining ch, 18 sc, 2 inc, 11 sc (40)
- R49-50: 40 sc (40) [2 rows]
- R51: 19 sc, 1 dec, 12 sc, 1 dec, 5 sc (38)
- R52: 38 sc (38)
- R53: 19 sc, 1 dec, 10 sc, 1 dec, 5 sc (36)
- R54: 19 sc, 1 dec, 8 sc, 1 dec, 5 sc (34)
- R55: 19 sc, 1 dec, 6 sc, 1 dec, 5 sc (32)
- R56: 19 sc, 1 dec, 4 sc, 1 dec, 5 sc (30)
- R57-69: 30 sc (30) [13 rows]
- R70 (Join Arms): Work 2 sc through the left arm and body, 13 sc across the back, 2 sc through the right arm and body, 13 sc across the front. (30)
- [Editor’s Note: The original text states 30 sts here, but lists 38 sts for R71-72, which is mathematically required for R73 to resolve to 31 sts. To maintain pattern integrity, work 8 evenly spaced increases during this round to reach 38 sts.]
- R71-72: 38 sc (38) [2 rows]
- R73: 3 dec, 13 sc, 3 dec, 11 sc, 1 dec (31)
- R74: 3 dec, 1 sc, 1 dec, 1 sc, 1 dec, 1 sc, 4 dec, 8 sc, 1 dec (21)
- R75: 1 dec, 7 sc, 2 dec, 8 sc (18)
- R76: (1 sc, dec) x 6 (12)
- R77-79: 12 sc (12) [3 rows]
- Finishing: Cut a long tail for sewing the head. Insert the 10 cm copper wire into the neck for support before stuffing the body firmly.
What it teaches: Oval foundation chaining, progressive limb decreasing, seamless multi-piece joining with chain bridges, and mid-round limb attachment.
5. Hat
A simple, structured cap worked in continuous rounds of double crochet.
- R1: 12 dc in MR (12)
- R2: 12 dc inc (24)
- R3: (1 dc, inc) x 12 (36)
- R4: (2 dc, inc) x 12 (48)
- R5-11: 48 dc (48) [7 rows]
- R12: 48 sc. Cut yarn.
What it teaches: Working with taller stitches (dc) for rapid expansion and creating a clean, single-crochet brim.
6. Clothing: Blouse & Pants
The doll's wardrobe is worked flat or in the round, featuring tailored shaping and functional details.
Blouse (White):
- R1: 26 ch. Starting in 4th ch from hook: (3 dc, inc) x 6 (30). 2 ch, turn.
- R2: (4 dc, inc) x 6 (36). 2 ch, turn.
- R3: (5 dc, inc) x 6 (42). Join both sides with 1 sl st to form a tube.
- R4: (6 sc, inc) x 6 (48).
- R5: 7 sc, skip 10 sc, 14 sc, skip 10 sc, 7 sc (28). [Creates armholes]
- R6-7: 28 sc (28) [2 rows]. Cut yarn.
Pants (Make 2 identical pieces, then join):
- R1: 17 ch. Turn. 16 sc. 1 ch, turn.
- R2-3: 16 sc. 1 ch, turn. [2 rows]
- R4: 1 sc, 1 inc, 12 sc, 1 inc, 1 sc (18). 1 ch, turn.
- R5-7: 18 sc. 1 ch, turn. [3 rows]
- R8: 1 sc, 1 inc, 14 sc, 1 inc, 1 sc (20). 1 ch, turn.
- R9-12: 20 sc. 1 ch, turn. [4 rows]
- R13: 1 sc, 1 inc, 16 sc, 1 inc, 1 sc (22). 1 ch, turn.
- R14-17: 22 sc. 1 ch, turn. [4 rows]
- R18: 1 sc, 1 inc, 18 sc, 1 inc, 1 sc (24). 1 ch, turn.
- R19-22: 24 sc. 1 ch, turn. [4 rows]
- R23: 1 sc, 1 inc, 20 sc, 1 inc, 1 sc (26). 1 ch, turn.
- R24-27: 26 sc. 1 ch, turn. [4 rows]. Do not cut yarn on the second piece.
Joining & Shaping the Pants:
- R28: Work 12 sc on the right leg piece, then 12 sc on the left leg piece to join them in the center (24). 1 ch, turn.
- R29-30: 24 sc. 1 ch, turn. [2 rows]
- R31: 1 sc, 1 dec, 18 sc, 1 dec, 1 sc (22). 1 ch, turn.
- R32-34: 22 sc. 1 ch, turn. [3 rows]
- R35: 1 sc, 1 dec, 16 sc, 1 dec, 1 sc (20). 1 ch, turn.
- R36-38: 20 sc. 1 ch, turn. [3 rows]
- R39: 1 dec, 16 sc, 1 dec (18). 1 ch, turn.
- R40: 18 sc. 1 ch, turn.
- R41: 1 dec, 14 sc, 1 dec (16). 1 ch, turn.
- R42: 16 sc. 1 ch, turn.
- R43: 1 dec, 12 sc, 1 dec (14). 1 ch, turn.
- R44: 14 sc. 1 ch, turn.
- R45: 1 dec, 10 sc, 1 dec (12). 1 ch, turn.
- R46: 12 sc. 1 ch, turn.
- R47: 1 dec, 8 sc, 1 dec (10). 1 ch, turn.
- R48: 10 sc. 1 ch, turn.
- R49: 1 dec, 6 sc, 1 dec (8). 1 ch, turn.
- R50: 8 sc. 1 ch, turn.
- R51: 1 sc, 1 ch, skip 1 sc, 4 sc, 1 ch, skip 1 sc, 1 sc (8). [Creates strap loops]. Cut yarn.
Back of Pants: Work R28-39 identically to the front, then cut yarn. Suspenders: Chain 110. Sew to the back of the pants and thread through the front loops.
What it teaches: Flat-panel garment construction, creating functional armholes and strap loops, and tailored waist shaping.
7. Boots (Make 2)
The boots feature a structured sole and a folded-over cuff design.
- R1 (Boot color): 7 ch. Starting in 2nd ch from hook: inc, 4 sc, 5 sc in last ch, 4 sc, inc (17)
- R2: 2 inc, 4 sc, 10 hdc, 4 sc, 2 inc (26)
- [Editor’s Note: Original text stated "5 hdc" yielding 21 sts, but R3 requires 26 sts. Corrected to 10 hdc to achieve the mathematically necessary 26 sts.]
- R3: 9 sc, 8 hdc, 9 sc in BLO (26)
- R4: 9 sc, 8 hdc, 9 sc (26)
- R5: 9 sc, 4 dec, 9 sc (22)
- R6: 9 sc, 2 dec, 9 sc (20)
- R7: 1 ch, turn, 20 sc
- R8-11: 1 ch, turn, 20 sc [4 rows]
- R12: 20 sl st. Cut yarn.
What it teaches: Creating rigid soles, executing complex increase sequences for shoe shaping, and working flat turning rows for boot cuffs.
8. Assembly & Finishing
Proper assembly and surface detailing bring the doll's personality to life.
- Head to Body: Sew the head securely to the top of the body using the long tail. Ensure the copper wire is fully inserted for neck stability.
- Facial Details: Embroider the nose, mouth, and eyelashes using dark brown embroidery floss. Add a hint of blush to the cheeks with acrylic paint or pastels.
- Hair: Attach synthetic doll hair wefts to the head using fabric glue, parting it neatly and trimming to the desired length.
- Clothing: Dress the doll in the blouse, pants, and boots. Thread the suspenders and secure them with tiny brown buttons. Place the hat on her head.
What it teaches: Multi-step structural assembly, surface embroidery for expressive facial features, and professional finishing techniques for wearable doll accessories.
Final Section: Where to Go from Here
Congratulations! By completing the Katya doll, you have mastered a wide array of intermediate amigurumi techniques: seamless limb joining, flat-panel garment construction, and precise mathematical stitch tracking. These skills are incredibly versatile. Next time, try experimenting with different yarn colorways to create a custom "seasonal" wardrobe for her, or adapt the pants and blouse pattern to fit other amigurumi dolls in your collection. Happy crocheting!