August 20, 2026
Little Witch Amigurumi – A Spooky-Sweet Crochet Pattern
Bring this charming little witch to life with her striped sleeves, ruffled skirt, and adorable pumpkin accessory! This detailed pattern is perfect for intermediate crocheters ready to master wire armatures, intricate hair assembly, and custom doll clothing.
Jump to pattern instructions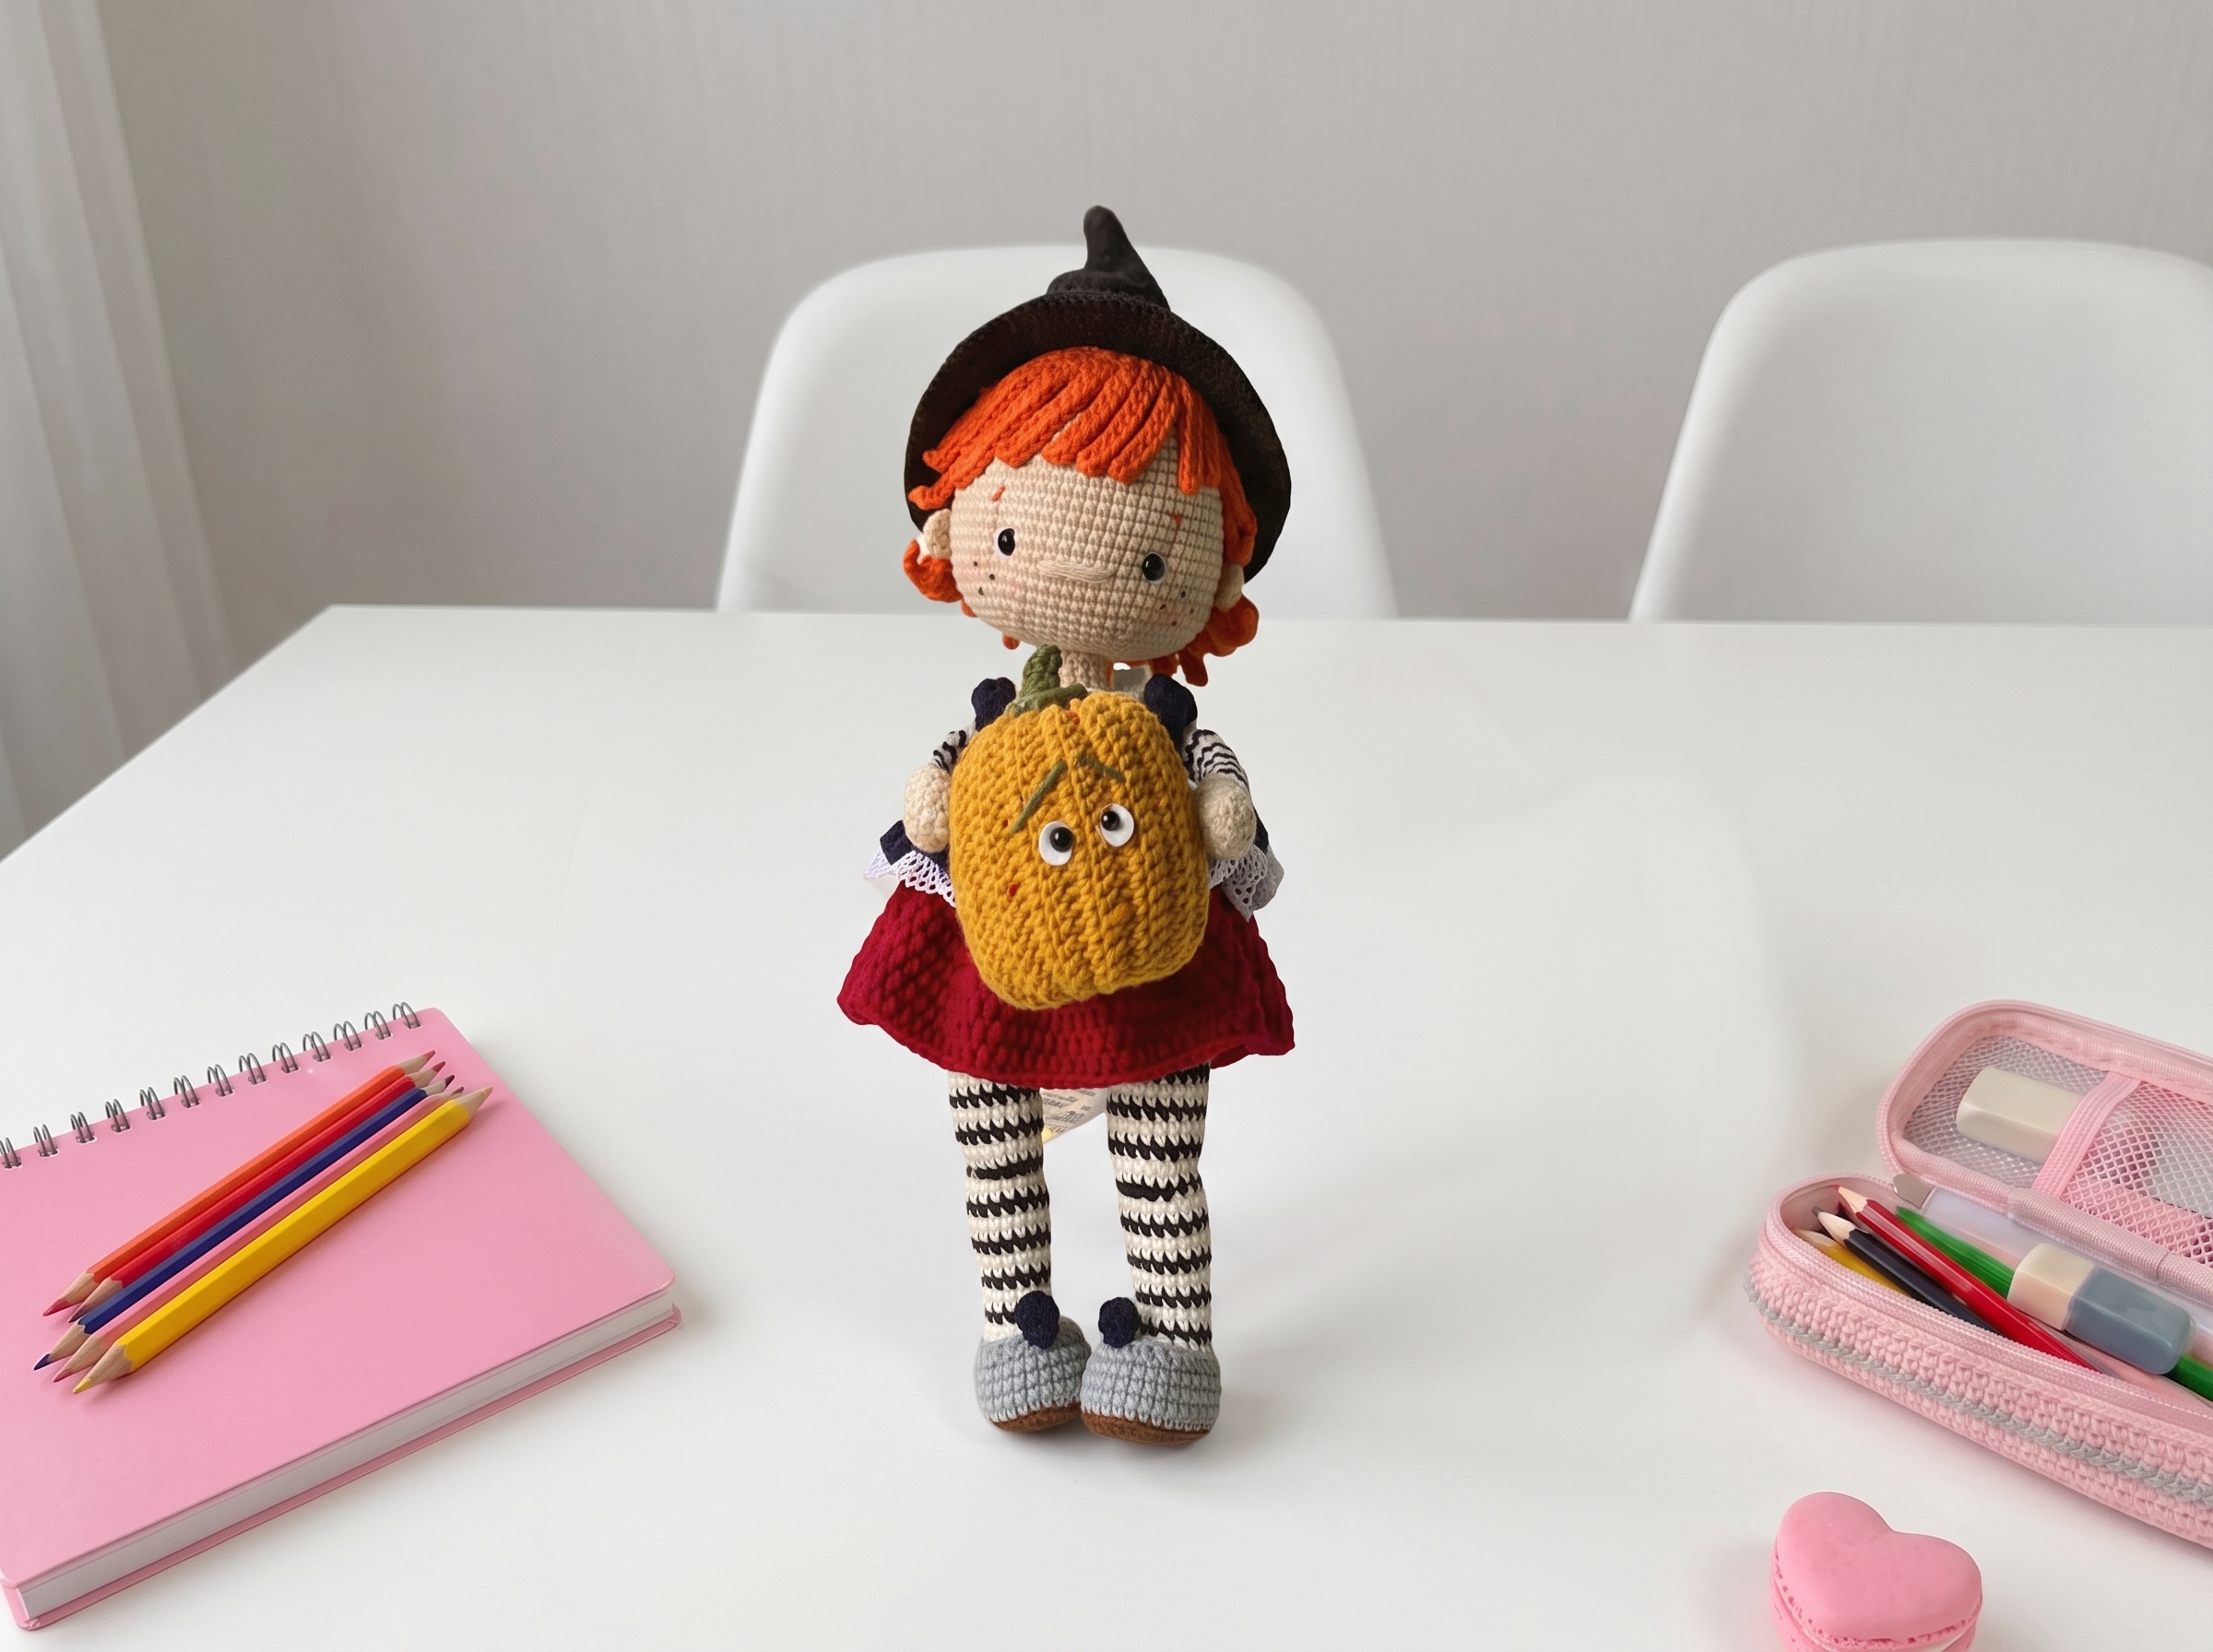
Little Witch Amigurumi – Complete Step-by-Step Pattern
1. Materials & Abbreviations
Gather your supplies before we begin! Using high-quality cotton blend yarns will give your little witch beautiful stitch definition, making her tiny outfit details truly pop.
- Yarn: Cotton blend yarn (e.g., Alize Cotton Gold, YarnArt Jeans, or Gazzal Jeans, approx. 160m/50g).
- Colors: Light Beige (skin), Ginger (hair), Dark Blue (skirt), Black & White (striped sleeves), Burgundy (skirt lining), Gray (shoes), Dark Brown (pumpkin stem), Mustard (pumpkin), Khaki (dress).
- Hooks: 1.75 mm and 2.0 mm (or sizes needed to achieve a tight, stuff-proof gauge).
- Notions: 6 mm, 5 mm, and 4 mm safety eyes, 1.5 m of 2.5 mm craft wire, plastic or dense cardboard (for shoe soles), poly-fil stuffing, sewing needle, scissors, stitch markers, electrical tape, hot glue, white lace, white felt or foamiran, and dark brown oil paint or acrylics (for freckles).
Abbreviations:
- MR – magic ring
- ch – chain
- sc – single crochet
- hdc – half double crochet
- dc – double crochet
- sl st – slip stitch
- inc – increase (2 sc in one stitch)
- dec – decrease (2 sc crocheted together)
- BLO – back loop only
- FLO – front loop only
What you'll master: Proper tool selection for fine cotton yarns, gauge management, and familiarization with standard international crochet abbreviations.
2. Head & Facial Features
The head is worked in a continuous spiral, building up to a beautifully rounded shape before gradually decreasing to form the neck.
- R1: 6 sc in MR (6)
- R2: 6 inc (12)
- R3: (1 sc, inc) x 6 (18)
- R4: (2 sc, inc) x 6 (24)
- R5: (3 sc, inc) x 6 (30)
- R6: (4 sc, inc) x 6 (36)
- R7: (5 sc, inc) x 6 (42)
- R8: (6 sc, inc) x 6 (48)
- R9: (7 sc, inc) x 6 (54)
- R10: (8 sc, inc) x 6 (60)
- R11: (9 sc, inc) x 6 (66)
- R12-26: 66 sc (66) [15 rows]
- R27: (9 sc, dec) x 6 (60)
- R28: (8 sc, dec) x 6 (54)
- R29: (7 sc, dec) x 6 (48)
- R30: (4 sc, dec) x 8 (40)
- R31: (3 sc, dec) x 8 (32)
- R32: (2 sc, dec) x 8 (24)
- R33: (1 sc, dec) x 8 (16)
- R34: (2 sc, dec) x 4 (12)
- Finishing: Fasten off, leaving a long tail for sewing the head to the body.
Facial Details: Insert 6 mm safety eyes between R22 and R23, spaced 13 stitches apart. Embroider the nose between R24 and R25 (3 stitches wide). Use white yarn to embroider eye whites, black yarn for eyelashes and eyebrows (4 stitches wide, angled), and a touch of blush or acrylic paint for rosy cheeks and freckles.
What you'll master: Spiral increase sequences, structured decreasing for spherical shaping, and precise facial feature placement.
3. Ears & Hair
The ears are simple, flat semi-circles, while the hair is built on a radial base with long, flowing strands attached seamlessly in the round.
Ears (Make 2, Light Beige):
- Instructions: In MR, work: 1 ch, 1 sc, 1 hdc, 2 dc, 1 hdc, 1 sc.
- Finishing: Pull the tail tight to form a neat semi-circle. Leave a long tail for sewing. Attach between R21 and R23, about 9 stitches away from the eyes.
Hair (Ginger):
- Base: R1: 6 sc in MR (6). R2: 6 inc (12). R3: (1 sc, inc) x 6 (18). R4: (2 sc, inc) x 6 (24). R5: (3 sc, inc) x 6 (30). R6: (4 sc, inc) x 6 (36). R7: (5 sc, inc) x 6 (42). R8: (6 sc, inc) x 6 (48). R9: (7 sc, inc) x 6 (54). R10: (8 sc, inc) x 6 (60). R11: (9 sc, inc) x 6 (66).
- Strands: Do not cut the yarn. For each strand, chain the specified length, work hdc back down the chain, and sl st into the BLO of the next base stitch.
- Long back strands: (19 ch, 18 hdc, sl st to BLO) x 14 times.
- Short side strands: (13 ch, 11 hdc, sl st to BLO) x 10 times.
- Bangs: Attach yarn to the FLO of R8. Work 11 bangs: (12 ch, 11 sc back down, sl st to FLO), skipping 1 stitch between each.
What you'll master: Radial expansion, chaining long textured strands, and attaching multiple repetitive elements seamlessly in the round.
4. Hat
The witch’s hat is a classic pointed cone with a wide, ruffled brim, worked in continuous rounds.
- R1: 6 sc in MR (6)
- R2: (1 sc, inc) x 3 (9)
- R3: (2 sc, inc) x 3 (12)
- R4: 12 sc (12)
- R5: (3 sc, inc) x 3 (15)
- R6: 2 sc, inc, (4 sc, inc) x 2, 2 sc (18)
- R7-8: 18 sc (18) [2 rows]
- R9: (5 sc, inc) x 3 (21)
- R10: 3 sc, inc, (6 sc, inc) x 2, 3 sc (24)
- R11-12: 24 sc (24) [2 rows]
- R13: (7 sc, inc) x 3 (27)
- R14: 4 sc, inc, (8 sc, inc) x 2, 4 sc (30)
- R15-16: 30 sc (30) [2 rows]
- R17: (9 sc, inc) x 3 (33)
- R18: 5 sc, inc, (10 sc, inc) x 2, 5 sc (36)
- R19-20: 36 sc (36) [2 rows]
- R21: (11 sc, inc) x 3 (39)
- R22: 6 sc, inc, (12 sc, inc) x 2, 6 sc (42)
- R23-24: 42 sc (42) [2 rows]
- R25: (13 sc, inc) x 3 (45)
- R26: 7 sc, inc, (14 sc, inc) x 2, 7 sc (48)
- R27-28: 48 sc (48) [2 rows]
- R29: (15 sc, inc) x 3 (51)
- R30: 8 sc, inc, (16 sc, inc) x 2, 8 sc (54)
- R31-32: 54 sc (54) [2 rows]
- R33: (17 sc, inc) x 3 (57)
- R34: 9 sc, inc, (18 sc, inc) x 2, 9 sc (60)
- R35-36: 60 sc (60) [2 rows]
- R37: (19 sc, inc) x 3 (63)
- R38: 10 sc, inc, (20 sc, inc) x 2, 10 sc (66)
- R39-40: 66 sc (66) [2 rows]
- R41: (21 sc, inc) x 3 (69)
- R42: 11 sc, inc, (22 sc, inc) x 2, 11 sc (72)
- R43 (Brim base, FLO): 4 sc, inc, (8 sc, inc) x 7, 4 sc (80)
- *[Editor’s Note: Adjusted to (8 sc, inc)8 to mathematically achieve the stated 80-stitch count from the previous 72 stitches.]
- R44: (9 sc, inc) x 8 (88)
- R45: 5 sc, inc, (10 sc, inc) x 7, 5 sc (96)
- R46: (11 sc, inc) x 8 (104)
- R47: 6 sc, inc, (12 sc, inc) x 7, 6 sc (112)
- R48: 112 sc (112)
- Finishing: Work a round of reverse single crochet (crab stitch) around the brim edge for a polished finish. Use black yarn and a needle to embroider subtle fold lines on the hat for a realistic, slouchy look.
What you'll master: Gradual conical shaping, FLO texturing for brim definition, and decorative edge finishing.
5. Arms & Legs
These limbs are reinforced with wire for posability, featuring charming striped sleeves and detailed boots.
Arms (Make 2):
- R1 (Skin): 6 sc in MR (6)
- R2: (1 sc, inc) x 3 (9)
- R3: (2 sc, inc) x 3 (12)
- R4-5: 12 sc (12) [2 rows]
- R6: 5 sc, 3-dc puff stitch, 6 sc (12)
- R7: dec, 10 sc (11)
- R8: 9 sc, dec (10)
- R9-10: 10 sc (10) [2 rows]
- Color Changes (Stripes): R11-12 (White), R13 (Black), R14-15 (White), R16 (Black), R17-18 (White), R19 (Black), R20-21 (White), R22 (Black), R23-24 (White), R25 (Black), R26-27 (White).
- Finishing: Insert a 15 cm piece of wire (ends taped). Stuff lightly, leaving the top flat. Fasten off, leaving a tail for sewing.
Legs & Boots (Make 2):
- R1 (Skin): Ch 7. From 2nd ch: 5 sc, 3 sc in last st, turn, 4 sc, inc (14)
- R2: inc, 4 sc, 3 inc, 4 sc, 2 inc (20)
- R3: 1 sc, inc, 4 sc, (1 sc, inc) x 3, 4 sc, (1 sc, inc) x 2 (26)
- R4: 2 sc, inc, 4 sc, (2 sc, inc) x 3, 4 sc, (2 sc, inc) x 2 (32)
- R5 (BLO, switch to Gray): 32 sc (32)
- R6: 30 sc (30) [Leave last 2 sts unworked to center the heel marker]
- R7-8: 32 sc (32) [2 rows]
- R9: 8 sc, (hdc dec) x 8, 8 sc (24)
- R10 (BLO, switch to White): 6 sc, 6 dec, 6 sc (18)
- R11: (4 sc, dec) x 3 (15)
- R12-14: 15 sc (15) [3 rows]
- R15: 2 sc, inc, (4 sc, inc) x 2, 2 sc (18)
- R16-17: 18 sc (18) [2 rows]
- R18-21: 18 sc (18) [4 rows]
- R22-23: 18 sc (18) [2 rows]
- R24 (switch to Black): (1 sc, dec) x 2, 1 sc, 4 inc, 1 sc, (dec, 1 sc) x 2 (18)
- R25: 18 sc (18)
- R26: (1 sc, inc) x 2, 1 sc, dec, 4 sc, dec, 1 sc, (inc, 1 sc) x 2 (20)
- R27-30: 20 sc (20) [4 rows]
- R31: 5 sc, inc, 9 sc, inc, 4 sc (22)
- R32-33: 22 sc (22) [2 rows]
- Finishing: Insert a plastic sole between R4 and R5. Insert a 15 cm wire (taped ends). Stuff firmly. For the boot laces, attach white yarn to the FLO of R10 and work sl st around, leaving long tails to tie a bow.
What you'll master: Working with internal armatures, inserting rigid soles, and executing clean mid-project color changes.
6. Body & Skirt
The body seamlessly joins the legs and integrates the arms mid-round, topped with a beautifully ruffled skirt.
Body:
- R1: Attach White yarn to the inner marked stitch of the left leg. Crochet 22 sc, ch 5, attach to the marked stitch of the right leg, crochet 22 sc. (49 sts + 5 ch)
- R2: 22 sc, 5 sc in the ch space, 22 sc, 5 sc in the ch space (54)
- R3: (inc, 1 sc, inc, 1 sc, inc, 22 sc) x 2 (60)
- R4-5: 60 sc (60) [2 rows]
- R6: 60 sc (60)
- R7: 9 sc, dec, (18 sc, dec) x 2, 9 sc (57)
- R8-10: 57 sc (57) [3 rows]
- R11-12: 57 sc (57) [2 rows]
- R13: (17 sc, dec) x 3 (54)
- R14: 54 sc (54)
- R15: 54 sc (54)
- R16: 8 sc, dec, (16 sc, dec) x 2, 8 sc (51)
- R17: 51 sc (51)
- R18 (switch to Burgundy): 51 sc (51)
- R19 (BLO): (15 sc, dec) x 3 (48)
- R20-22: 48 sc (48) [3 rows]
- R23: 7 sc, dec, (14 sc, dec) x 2, 7 sc (45)
- R24-25: 45 sc (45) [2 rows]
- R26: (13 sc, dec) x 3 (42)
- R27 (Join Arms): 14 sc, work 5 sc through left arm and body, 16 sc, work 5 sc through right arm and body, 2 sc (42)
- R28: 14 sc, 5 sc (arm only), 16 sc, 5 sc (arm only), 2 sc (42)
- R29: (5 sc, dec) x 6 (36)
- R30: 2 sc, dec, (4 sc, dec) x 5, 2 sc (32)
- R31: (3 sc, dec) x 6 (24) + 4 shift stitches to center the back (28)
- R32 (switch to Skin): (BLO) (2 sc, dec) x 6 (18)
- R33: (4 sc, dec) x 3 (15)
- R34: (3 sc, dec) x 3 (12)
- R35-36: 12 sc (12) [2 rows]
- Finishing: Fasten off, leaving a tail. Insert the neck tube (or wire) and sew the head securely to the body.
Skirt (Burgundy):
- R1: Attach to FLO of R18. Ch 2, 51 hdc inc, sl st (102)
- R2-9: Ch 2, 102 hdc, sl st (8 rows)
- Finishing: Fasten off. Sew a strip of white lace around the bottom hem.
What you'll master: Seamless multi-piece joining, mid-round limb attachment, and creating voluminous ruffled garments.
7. Dress, Shoes & Accessories
No witch is complete without her signature outfit and a trusty pumpkin companion!
Dress (Khaki):
- R1: Ch 36. From 7th ch: (2 sc, inc) x 10 (40) [Buttonhole: ch 2, skip 2]
- R2: 40 sc (40)
- R3: (3 sc, inc) x 10 (50)
- R4-5: 50 sc (50) [2 rows]
- R6: 9 sc, ch 10, skip 9 sc, 17 sc, ch 10, skip 9 sc, 9 sc (53)
- R7-11: 53 sc (53) [5 rows]
- Finishing: Work a decorative collar in White yarn along the neckline: 8 sc, (ch 3, 2 dc2tr, ch 3, 2 sc) x 2, 9 sc. Sew 2 small buttons opposite the buttonholes.
Pumpkin (Mustard & Dark Brown):
- Body: Ch 26. From 2nd ch: 25 sc, ch 1, turn. Work 30 rows of 25 sc. Fold in half and seam the sides. Stuff lightly and shape with thread to create pumpkin ridges.
- Stem: Dark Brown. R1: 6 sc in MR (6). R2: 6 inc (12). R3 (BLO): (1 sc, inc) x 6 (18). Attach to FLO of R2: R4: 6 dec (6). R5-7: 6 sc (6). Sew to the top of the pumpkin.
What you'll master: Flat-panel garment construction, creating functional buttonholes, and shaping textured accessories.
8. Assembly & Finishing
Now for the magic moment where your little witch truly comes to life!
- Head to Body: Sew the head securely to the neck opening, ensuring the wire or neck tube is fully inserted for stability.
- Hair & Hat: Pin the hair base to the head, arranging the bangs and long strands naturally. Sew or hot-glue in place. Place the hat on her head, securing it with a few hidden stitches.
- Face: Embroider the mouth, nose, and eyelashes. Add a touch of blush to the cheeks and tiny freckles using a fine brush and dark brown paint.
- Clothing: Dress her in the khaki dress, fastening the buttons. Wrap the white lace-trimmed burgundy skirt around her waist.
- Pumpkin: Tuck the finished pumpkin into her arm or hand, securing it with a hidden stitch.
What you'll master: Multi-step structural assembly, surface embroidery for expressive facial features, and professional finishing techniques for wearable doll accessories.
Final Section: Where to Go from Here
Congratulations! By completing this Little Witch, you have mastered a wide array of intermediate amigurumi techniques: wire armatures, rigid sole insertion, complex garment construction, and intricate hair texturing. These skills are incredibly versatile. Next time, try experimenting with different yarn colorways to create a whole "coven" of witches, or adapt the dress and skirt patterns to design custom outfits for other amigurumi dolls in your collection. Happy crocheting, and enjoy your spooky-sweet new friend!