August 27, 2026
Modern Girls Doll – A Detailed Amigurumi Crochet Pattern
Bring this stylish, posable amigurumi doll to life! Featuring an intricate internal wire armature for dynamic posing, beautifully detailed facial embroidery, and a customizable wardrobe, this pattern is a deeply rewarding project for intermediate crafters ready to master advanced doll construction and surface detailing.
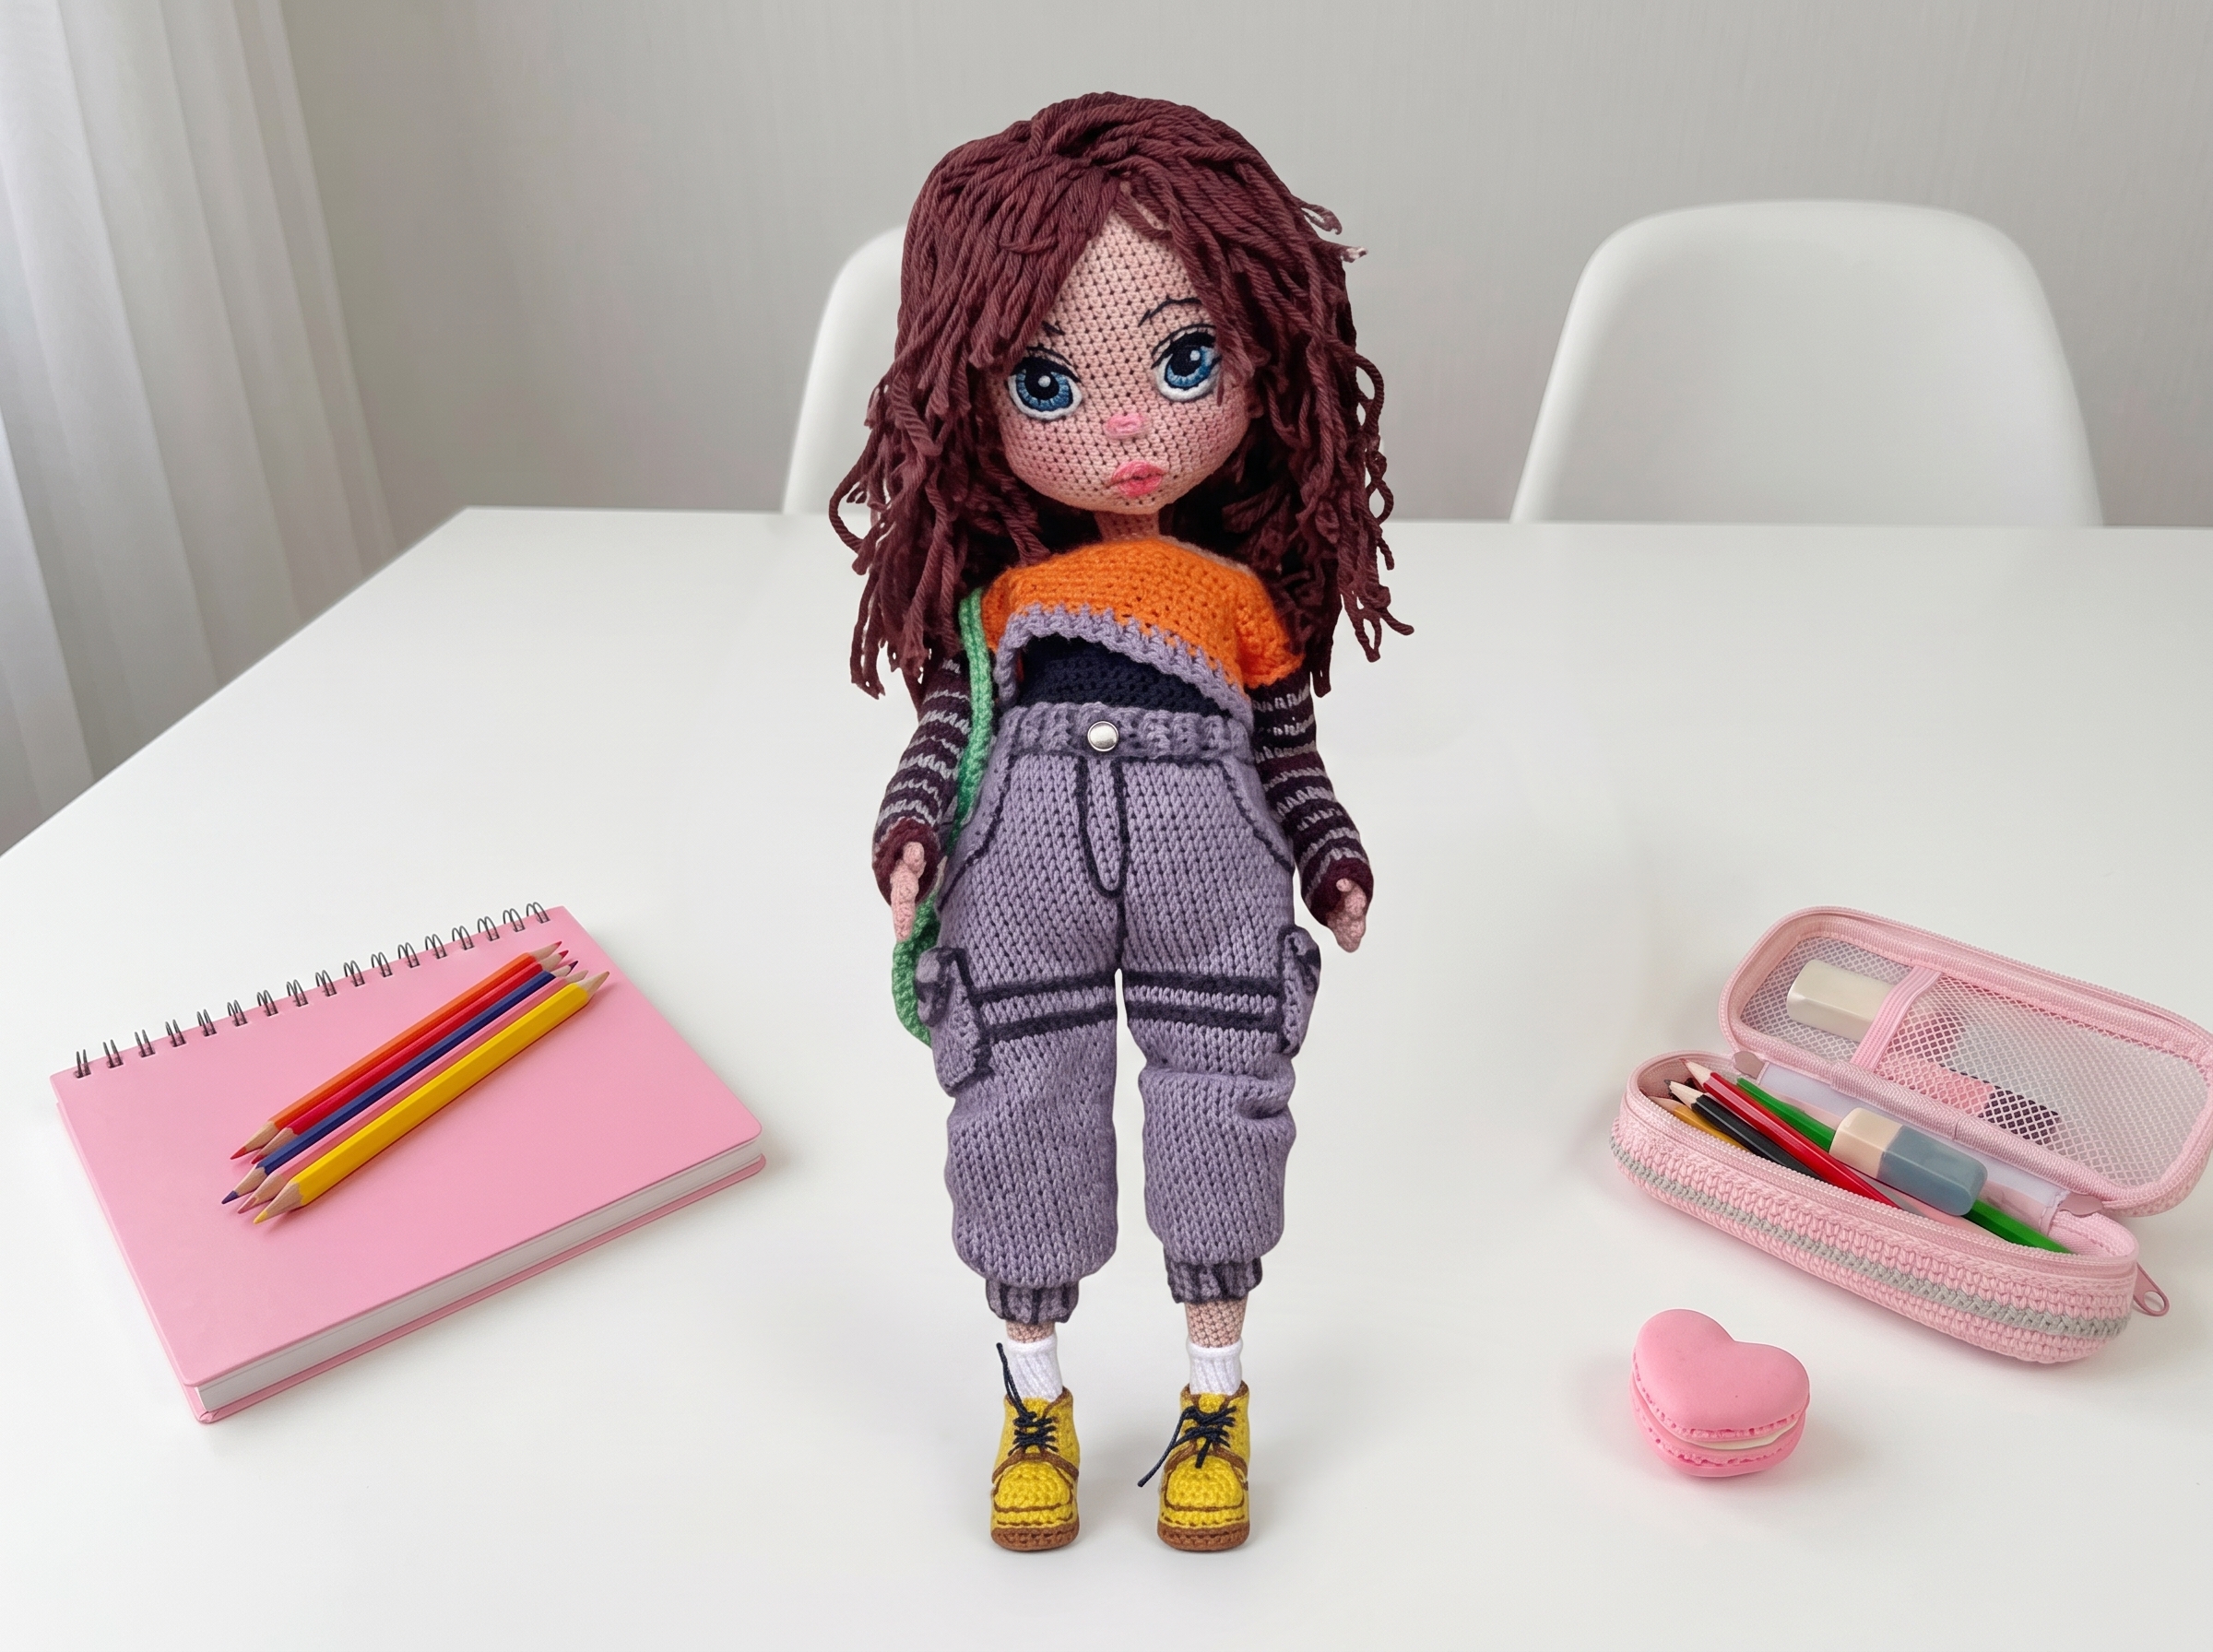
Modern Girls Doll – Complete Step-by-Step Pattern
1. Materials & Abbreviations
Let's gather our supplies! Because this doll features fine details and an internal wire frame, using high-quality, tightly spun cotton yarn and the right tools will make a world of difference in your final result.
- Yarn: Neko Milan Vitta Cotton (or a similar fine 100% cotton yarn). You'll need skin tone for the body, plus your choice of colors for her outfit and hair.
- Hook: 0.8 mm or 0.9 mm (choose whichever gives you a tight, neat gauge).
- Notions:
- 1.5 mm craft wire (for the armature)
- Flat-nose pliers and white electrical tape (for securing wire ends)
- Poly-fil or other doll stuffing
- Thin sewing needles (one long/thick for piercing, one fine for embroidery)
- Black capillary or gel pen, watercolors, and a fine brush
- Self-erasing fabric marker and dry pastel (for blush)
- Black sewing thread and embroidery floss
- Abbreviations:
- KA – magic ring
- ch – chain
- sc – single crochet
- hdc – half double crochet
- dc – double crochet
- sl st – slip stitch
- inc – increase (2 sc in one stitch)
- dec – decrease (2 sc crocheted together)
- BLO – back loop only
- FLO – front loop only
What you'll master: Working with fine cotton yarns, integrating wire armatures safely, and executing complex shaping for realistic doll proportions.
2. Legs (Make 2)
Important: We will be inserting a wire frame into the legs, so we'll stuff them firmly as we go to ensure the wire stays centered and the legs hold their shape.
- R1: 6 sc in KA (6)
- R2: 6 inc (12)
- R3-9: 12 sc (7 rows)
- Heel Shaping (Turning Rows): Work (ch 1, 6 sc, turn) for 3 rows. Then, return to working in the round.
- R10: 3 dec, 3 sc along the heel side, 6 sc, 3 sc along the other heel side (12)
- R11: 15 sc (15)
- R12: 1 sc, skip 1 st, 2 sc, dec, 6 sc, dec, 1 sc (12)
- R13: dec, 10 sc (11)
- R14-15: 11 sc (2 rows)
- Safety Note: Cut a ~15 cm piece of wire. Bend the very tip into a small loop and wrap it tightly with white electrical tape so it doesn't poke through the yarn. Insert the wire into the leg now.
- R16-22: 11 sc (7 rows)
- R23: 2 sc, inc, 8 sc (12)
- R24: 3 sc, inc, 8 sc (13)
- R25: 4 sc, inc, 8 sc (14)
- R26: 5 sc, inc, 8 sc (15)
- R27: 6 sc, inc, 8 sc (16)
- R28: 7 sc, inc, 8 sc (17)
- R29: 8 sc, inc, 8 sc (18)
- R30-41: 18 sc (12 rows)
- R42: 9 sc, skip 1 st, 8 sc (17)
- R43: 8 sc, skip 1 st, 8 sc (16)
- R44: 8 sc, skip 1 st, 7 sc (15)
- R45: 2 inc, 13 sc (17)
- R46: 17 sc (17)
- R47: 2 dec, 13 sc (15)
- R48: 7 sc, inc, 2 sc, inc, 4 sc (17)
- R49: 8 sc, inc, 2 sc, inc, 5 sc (19)
- R50-51: 19 sc (2 rows)
- R52: 9 sc, inc, 3 sc, inc, 5 sc (21)
- R53-54: 21 sc (2 rows)
- R55: 10 sc, inc, 4 sc, inc, 5 sc (23)
- R56: 23 sc (23)
- R57: 11 sc, inc, 5 sc, inc, 5 sc (25)
- R58: 25 sc (25)
- R59: 12 sc, inc, 6 sc, inc, 5 sc (27)
- R60-69: 27 sc (10 rows)
- R70: (7 sc, dec) x 3 (24)
- Tip: Stuff this section lightly so the wire can still bend at the knee. Bend the top of the wire slightly.
- R71-72: 24 sc (2 rows)
- R73: (2 sc, dec) x 6 (18)
- R74: 18 sc (18)
- R75: (1 sc, dec) x 6 (12)
- R76: 6 dec (6)
- Finishing: Fasten off, leaving a long tail for sewing. Do this for both legs.
What you'll master: Creating anatomical heel shaping, managing internal wire frames, and executing progressive increases for realistic calf shaping.
as we go.
3. Body
The body is worked from the bottom up, starting with an oval base that seamlessly transitions into a sculpted torso.
- R1: Ch 11. Starting in the 2nd ch from hook: inc, 8 sc, 4 sc in the last st, turn, 8 sc down the opposite side, inc (24)
- R2: 2 inc, 8 sc, 4 inc, 8 sc, 2 inc (32)
- R3: (1 sc, inc) x 2, 8 sc, (1 sc, inc) x 4, 8 sc, (1 sc, inc) x 2 (40)
- R4: (2 sc, inc) x 2, 8 sc, (2 sc, inc) x 4, 8 sc, (2 sc, inc) x 2 (48)
- R5-6: 48 sc (2 rows)
- R7: (3 sc, inc) x 2, 8 sc, (3 sc, inc) x 4, 8 sc, (3 sc, inc) x 2 (56)
- R8-9: 56 sc (2 rows)
- R10: (4 sc, inc) x 2, 8 sc, (4 sc, inc) x 4, 8 sc, (4 sc, inc) x 2 (64)
- R11-12: 64 sc (2 rows)
- R13: (5 sc, inc) x 2, 8 sc, (5 sc, inc) x 4, 8 sc, (5 sc, inc) x 2 (72)
- R14-17: 72 sc (4 rows)
- R18: Shift the beginning of the round by 4 sc. Then work: 36 sc, (dec, 4 sc) x 3, (4 sc, dec) x 3 (66)
- R19: 36 sc, (dec, 3 sc) x 3, (3 sc, dec) x 3 (60)
- R20: Shift the beginning of the round by 3 sc. Work: 30 sc, (dec, 3 sc) x 3, (3 sc, dec) x 3 (54)
- R21: 24 sc, (dec, 3 sc) x 3, (3 sc, dec) x 3 (48)
- R22: 24 sc, then work 24 sc in the BLO of the previous row (48)
- R23-32: 48 sc (10 rows)
- R33: 6 sc, then working into the BLO of R22: 1 sc, 3 sc in one st, 1 sc, inc, 5 sc, then back to BLO of R22: 1 sc, 3 sc in one st, 1 sc, inc, then 27 sc (56)
- R34: 56 sc (56)
- R35: 15 sc, 5 sl st, 36 sc (56)
- R36: 6 sc, dec, 2 sc, skip 1 st, 2 sc, dec, 5 sl st, dec, 2 sc, skip 1 st, 2 sc, dec, 27 sc (50)
- R37: 9 sc, dec, 1 sc, 5 sl st, 1 sc, dec, 30 sc (48)
- R38: 48 sc (48)
- R39: (dec, 3 sc) x 3, (3 sc, dec) x 3, 18 sc (42)
- R40: (dec, 2 sc) x 3, (2 sc, dec) x 3, 18 sc (36)
- R41: (1 sc, dec) x 12 (24)
- R42: (2 sc, dec) x 6 (18)
- R43: (1 sc, dec) x 4, 6 sc (14)
- Neck (R44-51): 14 sc (8 rows). (You can add 1-2 more rows here if you prefer a slightly longer neck).
- Finishing: Fasten off, leaving a long tail.
What you'll master: Complex torso sculpting, strategic stitch shifting for smooth curves, and creating structural ridges for clothing attachment.
4. Arms (Make 2)
The arms feature beautifully articulated fingers and a thumb, worked using a clever chain-and-slip-stitch technique.
Thumb & Fingers Setup (Same for both arms):
- Thumb: Ch 5. From the 2nd ch from hook: 4 sl st, ch 1, 5 ch. From the 2nd ch from hook: 4 sl st, ch 1. Work 3 sc along the top edge to lift. Fasten off, leaving a tail.
- Fingers: Ch 6, from 2nd ch: 5 sl st, ch 1. Ch 7, from 2nd ch: 6 sl st, ch 1. Ch 6, from 2nd ch: 5 sl st, ch 1. Ch 5, from 2nd ch: 4 sl st, ch 1. Ch 5, from 2nd ch: 4 sl st, ch 1. Ch 6, from 2nd ch: 5 sl st, ch 1. Ch 7, from 2nd ch: 6 sl st, ch 1. Ch 6, from 2nd ch: 5 sl st, ch 1 for lifting.
- R1: Work 15 sc evenly along the top edge of the chains (1 sc into the thumb, 1 sc into each free chain space).
- R2-3: 15 sc (2 rows)
- R4: 3 sc along the thumb edge, 15 sc (18)
Left Arm:
- R5: 15 sc, dec, 1 sc (17)
- R6: 14 sc, dec, 1 sc (16)
- R7: 13 sc, dec, 1 sc (15)
- R8: (3 sc, dec) x 3 (12)
- R9: (2 sc, dec) x 3 (9)
- R10-11: 9 sc (2 rows)
- R12: inc, 8 sc (10)
- Safety Note: Insert a taped wire into the arm now. Stuff very lightly as you go to maintain flexibility.
- R13: 1 sc, inc, 8 sc (11)
- R14: 2 sc, inc, 8 sc (12)
- R15: 3 sc, inc, 8 sc (13)
- R16-21: 13 sc (6 rows)
- R22: 4 sc, skip 1 st, 8 sc (12)
- R23: 3 sc, skip 1 st, 8 sc (11)
- R24: 10 sc, 3 hdc in one st (13)
- R25: 2 sc, 5 sl st, 6 sc (13)
- R26: 13 sc (13)
- R27: 4 sc, inc, 8 sc (14)
- R28-29: 14 sc (2 rows)
- R30: 5 sc, inc, 8 sc (15)
- R31-36: 15 sc (6 rows)
- R37 (Sleeve Cuff): Work 6 sc, ch 1, turn.
- R38: 9 sc, ch 1, turn.
- R39: dec, 5 sc, dec, ch 1, turn.
- R40: 7 sc, ch 1, turn.
- R41: Return to working in the round: dec, 3 sc, dec, 3 sc along the side edge, 6 sc across the bottom, 3 sc along the other side edge (17)
- R42: 7 sc, dec, 4 sc, dec, 2 sc (15)
- Finishing: Fasten off, leaving a long tail for sewing.
Right Arm:
- R5: 4 sc, dec, 12 sc (17)
- R6: 4 sc, dec, 11 sc (16)
- R7: 4 sc, dec, 10 sc (15)
- R8: 4 sc, dec, 2 sc, dec, 3 sc, dec (12)
- R9: (2 sc, dec) x 3 (9)
- R10-11: 9 sc (2 rows)
- R12: 4 sc, inc, 4 sc (10)
- Insert wire and stuff lightly.
- R13: 5 sc, inc, 4 sc (11)
- R14: 6 sc, inc, 5 sc (12)
- R15: 7 sc, inc, 5 sc (13)
- R16-21: 13 sc (6 rows)
- R22: 8 sc, skip 1 st, 4 sc (12)
- R23: 8 sc, skip 1 st, 3 sc (11)
- R24: 2 sc, 3 hdc in one st, 8 sc (13)
- R25: 7 sc, 5 sl st, 1 sc (13)
- R26: 13 sc (13)
- R27: 9 sc, inc, 3 sc (14)
- R28-29: 14 sc (2 rows)
- R30: 10 sc, inc, 3 sc (15)
- R31-36: 15 sc (6 rows)
- R37 (Sleeve Cuff): Work 12 sc, ch 1, turn.
- R38: 9 sc, ch 1, turn.
- R39: dec, 5 sc, dec, ch 1, turn.
- R40: 7 sc, ch 1, turn.
- (Continue mirroring the left arm's cuff shaping, then finish, leaving a long tail).
What you'll master: Intricate finger detailing, asymmetrical arm shaping, and creating tailored sleeve cuffs.
(Note: The original PDF contains extensive patterns for a "Bomber" jacket and pants. Due to length, this guide focuses on the core doll construction. The clothing follows similar flat-panel, turning-row techniques with color changes and buttonhole placements.)
5. Head
The head features advanced sculpting to create realistic, protruding cheeks and a defined jawline.
- R1: 12 sc in KA (12)
- R2: (1 sc, inc) x 6 (18)
- R3: (2 sc, inc) x 6 (24)
- R4: (3 sc, inc) x 6 (30)
- R5: inc, 2 sc, inc, 5 sc, 6 sc in one st, 5 sc, (inc, 4 sc) x 3 (40)
- R6: 5 sc, inc, 4 sc, inc, 6 sc, inc, 4 sc, (inc, 5 sc) x 3 (46)
- R7: inc, 5 sc, inc, 6 sc, 3 dec, 6 sc, (inc, 6 sc) x 3 (48)
- R8: (inc, 7 sc) x 6 (54)
- R9: (inc, 8 sc) x 6 (60)
- R10: (inc, 9 sc) x 2, work 1 sc in BLO, 3 hdc, 5 sc, (inc, 9 sc) x 2, inc, 4 sc, inc, 4 sc
- R11: 9 sc, inc, 12 sc. Important: Work into the remaining unworked loops of R10 behind the previous stitches to build the cheeks: 5 sc, then 16 sc, inc, 10 sc, inc, 9 sc, inc, 1 sc.
- R12: 24 sc, work 3 hdc in one st into the BLO of the previous row, 43 sc
- R13: 24 sc, work 3 sc into the remaining unworked loops of R12, 43 sc (70)
- R14-15: 70 sc (2 rows)
- R16: 25 sc, work (1 sc, hdc, dc) all in one st in the BLO, then (dc, hdc, 1 sc) in the next BLO st, 43 sc
- R17: 25 sc, (skip 1 st, 1 sc) x 3, 43 sc
- R18: 8 sc, inc, 17 sc, skip 1 st, 17 sc, inc, 26 sc (72)
- R19: 72 sc (72)
- R20: 8 sc, inc, 36 sc, inc, 26 sc (74)
- R21: 74 sc (74)
- R22: 8 sc, inc, 38 sc, inc, 26 sc (76)
- R23: 76 sc (76)
- R24: 8 sc, inc, 40 sc, inc, 26 sc (78)
- R25-32: 78 sc (8 rows)
- R33: 5 sc, dec, (11 sc, dec) x 5, 6 sc (72)
- R34: 72 sc (72)
- R35: (10 sc, dec) x 6 (66)
- R36: 66 sc (66)
- R37: 4 sc, dec, (9 sc, dec) x 5, 5 sc (60)
- R38: (8 sc, dec) x 6 (54)
- R39: 3 sc, dec, (7 sc, dec) x 5, 4 sc (48)
- R40: (6 sc, dec) x 6 (42)
- R41: 2 sc, dec, (5 sc, dec) x 5, 3 sc (36)
- R42: (4 sc, dec) x 6 (30)
- R43: 1 sc, dec, (3 sc, dec) x 5, 2 sc (24)
- R44: (2 sc, dec) x 6 (18)
- R45: (dec, 1 sc) x 6 (12)
- R46: 6 dec (6)
- Finishing: Fasten off, leaving a long tail. Stuff the head firmly before closing.
What you'll master: Advanced facial sculpting, working into multiple loop layers to build 3D cheekbones, and smooth, symmetrical crown decreasing.
6. Face Embroidery & Details
This is where your doll truly comes to life! Take your time and enjoy the artistic process.
- Guidelines: Use a self-erasing fabric marker to lightly draw the placement of the eyes, nose, and mouth.
- Eyes: Using thin black yarn (like Pekhorka "Crochet") or embroidery floss, embroider the eye shape (starting with a small magic ring of 6 sc, then building out). Fill in the iris color, then add white highlights. Outline the entire eye with black sewing thread for a crisp, defined look. sp
- Lips: Outline the lips with white embroidery thread, then gently color them in with watercolors for a soft, realistic tint.
- Nose & Cheeks: Use dry pastel chalk. Lightly dust the tip of the nose and the apples of the cheeks, then blend with a dry, clean brush for a natural, flushed appearance.
What you'll master: Mixed-media doll finishing, combining embroidery and traditional art supplies for hyper-realistic features.
7. Yellow Boots (Make 2)
Give your doll some stylish footwear!
- R1: Ch 15. From the 2nd ch from hook: inc, 6 sc, 4 hdc, 2 dc, 4 dc in the last st, turn, 2 dc, 4 hdc, 6 sc, inc (20)
- R2: inc, 13 sc, 4 inc (working into the sc), 13 sc, inc (28) (Note: Adjust counts to match your gauge; the goal is a smooth oval expansion).
- R3: Work 38 sc in the FLO.
- R4: 38 sc (38)
- R5: 14 sc, 5 dec (working into the dc posts from R1), 14 sc (33)
- R6: 13 sc, 4 dec, 12 sc (29)
- R7: 11 sc, 4 dec, 10 sc (25)
- R8: 9 sc, 4 dec, 8 sc (21)
- R9: 9 sc, 2 dec, 8 sc (19)
- R10: 8 sc, 2 dec, 7 sc (17)
- R11: 8 sc, 2 dc, 7 sc. Fasten off.
- Sole Attachment: Crochet a matching sole in white yarn for the first two rows. Place the white sole against the bottom of the yellow boot (front sides facing each other) and crochet a border of slip stitches counter-clockwise through the remaining back loops of the boot and the front loops of the sole.
- Heel Detail: Ch 5. From 2nd ch from hook: 3 sc, 4 sc in one st, 3 sc. Ch 1, turn. R2: 4 sc, 2 inc, 4 sc. Attach to the back of the sole similarly, and add a decorative border of (sl st, ch 1) in each stitch.
What you'll master: Creating multi-part footwear, attaching rigid soles, and working decorative heel tabs.
(Note: The original pattern also includes detailed instructions for a "Bomber" jacket and pants, worked flat with color changes, buttonholes, and tailored fits. The techniques mirror the body and arm shaping, utilizing turning rows and strategic increases/decreases.)
8. Final Assembly
Now, let's bring all the pieces together into a fully posable work of art!
- Body & Legs: Use a long, thick needle or an awl to pierce the attachment points on the bottom of the body and the top of the legs. Insert the protruding wire from the legs into the body. Use flat-nose pliers to bend the wire ends securely inside the torso so the legs cannot detach.
- Arms: Similarly, pierce the upper body at the shoulder line. Thread the arm wires through the body and out through the neck opening. Leave the wire ends protruding from the neck for now—they will be used to secure the head!
- Head to Body: Place the head onto the neck opening, ensuring the wires from the arms pass through the designated holes in the base of the head (worked in R11/R12). Once aligned, use pliers to bend the wire ends securely inside the head. Stuff the neck area firmly to hide the mechanics.
- Dress & Accessories: Dress your doll in her custom-crocheted outfit, fasten any buttons, and style her yarn hair.
What you'll master: Professional doll armature assembly, secure internal wiring, and multi-component structural joining.
Final Section: Where to Go from Here
Take a step back and admire your incredible work! By completing this Modern Girls doll, you have conquered some of the most advanced techniques in amigurumi: internal wire armatures, intricate finger detailing, multi-layered facial sculpting, and mixed-media embroidery.
This pattern is a true milestone for any crochet artist. From here, the possibilities are endless. Try experimenting with different yarn colors to create a whole squad of unique characters, or use the core body pattern as a base to design your own custom wardrobe, from cozy winter coats to elegant evening gowns. Happy crocheting, and enjoy your beautiful new handmade companion!