September 15, 2026
Mystery Snail Amigurumi – A Whimsical Crochet Pattern
Meet this adorable mystery snail with a curious question mark shell! Featuring a sweet blue-gray body, a charming pink shell with purple spots, and expressive eyes on stalks, this playful amigurumi is a delightful intermediate project. Perfect for adding a touch of whimsy to your collection or gifting a unique handmade friend.
Jump to pattern instructions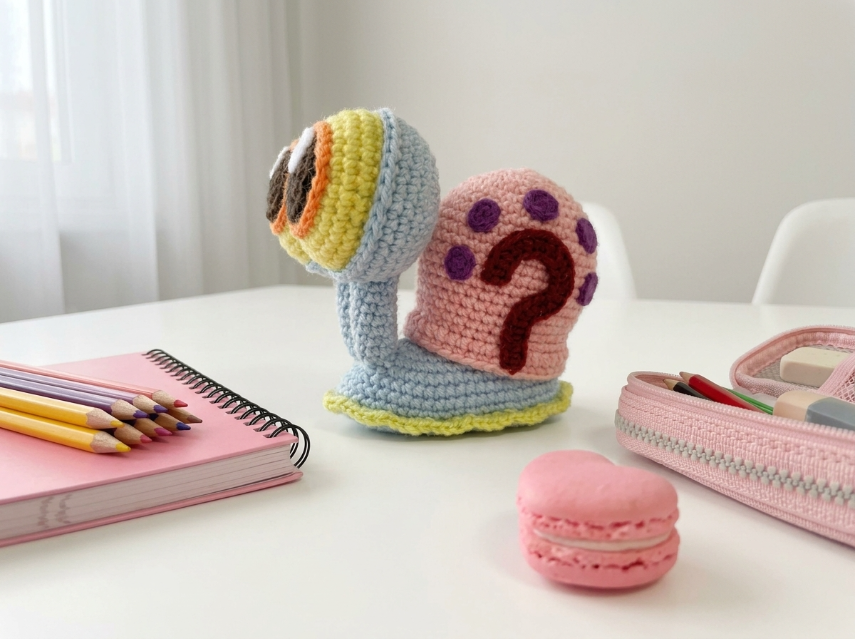
Mystery Snail Amigurumi – Complete Step-by-Step Pattern
1. Gathering Your Supplies
To create this charming snail, you'll need smooth cotton yarn for crisp stitch definition and that perfect amigurumi look.
- Yarn: Worsted weight cotton or cotton blend yarn (e.g., YarnArt Jeans, Catania, or similar, approx. 160m / 50g). You will need:
- Light Blue/Gray: For the body and foot (approx. 50g)
- Pink: For the shell (approx. 30g)
- Yellow: For the base/foot trim (small amount)
- Purple/Violet: For the shell spots (small amount)
- Dark Red/Burgundy: For the question mark (small amount)
- White: For the eyes (small amount)
- Brown/Orange/Yellow: For the eye details (tiny amounts)
- Black: For pupils (tiny amount)
- Hook: 2.5 mm or 3.0 mm (choose the size that gives you a tight, stuff-proof gauge).
- Notions:
- Poly-fil stuffing
- Tapestry needle
- Scissors
- Stitch markers
- Safety eyes (6-8 mm) OR black embroidery floss
- Optional: Wire or pipe cleaners for posable eyestalks
What you'll master: Working with multiple colors, creating 3D shapes, surface embroidery, and assembling whimsical characters.
2. Abbreviations & Special Techniques
Let's quickly review a few terms. If you're new to any of these, don't worry—you'll be a pro by the time your snail is complete!
- MR: Magic ring
- ch: Chain
- sc: Single crochet
- inc: Increase (2 sc in one stitch)
- dec: Decrease (2 sc crocheted together invisibly)
- sl st: Slip stitch
- BLO: Back loop only
- FLO: Front loop only
- st(s): Stitch(es)
3. The Body & Foot (Light Blue/Gray)
We'll start with the body, working from the bottom up. The foot is worked flat and then joined to create the base.
Foot Base:
- R1 (Light Blue/Gray): Ch 10. Sc in the 2nd ch from the hook, sc in next 7 ch, 3 sc in last ch. Working down the opposite side of the chain: sc in next 7 ch, 2 sc in last ch. (20 sts)
- R2: Inc, sc 7, 3 inc, sc 7, 2 inc. (26 sts)
- R3: Sc in each st around. (26 sts)
- R4: (Sc 11, inc) x 2. (28 sts)
- R5-6: Sc in each st around. (28 sts)
Body:
- R7: (Sc 6, inc) x 4. (32 sts)
- R8-10: Sc in each st around. (32 sts)
- R11: (Sc 7, inc) x 4. (36 sts)
- R12-14: Sc in each st around. (36 sts)
- R15: (Sc 8, inc) x 4. (40 sts)
- R16-20: Sc in each st around. (40 sts)
- Stuffing: Begin stuffing the body firmly as you work.
- R21: (Sc 8, dec) x 4. (36 sts)
- R22: (Sc 7, dec) x 4. (32 sts)
- R23: (Sc 6, dec) x 4. (28 sts)
- Continue stuffing firmly.
- Finishing: Fasten off, leaving a long tail. Do NOT close the hole yet—we'll attach the head/neck next!
What you'll master: Creating a sturdy base and structured body shaping.
4. The Neck & Eyestalks (Light Blue/Gray)
The neck is worked directly from the body opening, then splits into two eyestalks.
Neck:
- R1: Join yarn to the opening. Sc in each st around. (28 sts)
- R2-4: Sc in each st around. (28 sts)
- R5: (Sc 5, dec) x 4. (24 sts)
- R6-8: Sc in each st around. (24 sts)
Split for Eyestalks:
-
Right Eyestalk:
- Work in rows across 12 sts only.
- Row 1-10: Ch 1, turn. Sc in each st across. (12 sts)
- Row 11-15: (Sc 4, dec) x 2. (10 sts)
- Row 16-18: Sc across. (10 sts)
- Finishing: Fasten off, leaving a tail. Stuff lightly.
-
Left Eyestalk:
- Join yarn to the remaining 12 sts.
- Repeat the same pattern as the right eyestalk.
What you'll master: Working split sections and creating posable appendages.
5. The Shell (Pink)
The shell is worked in a spiral from the center out, creating a dome shape.
- R1 (Pink): 6 sc in MR (6)
- R2: 6 inc (12)
- R3: (1 sc, inc) x 6 (18)
- R4: (2 sc, inc) x 6 (24)
- R5: (3 sc, inc) x 6 (30)
- R6: (4 sc, inc) x 6 (36)
- R7: (5 sc, inc) x 6 (42)
- R8: (6 sc, inc) x 6 (48)
- R9: (7 sc, inc) x 6 (54)
- R10: (8 sc, inc) x 6 (60)
- R11: (9 sc, inc) x 6 (66)
- R12: Sc in each st around. (66 sts)
- R13: (9 sc, dec) x 6 (60 sts)
- R14: (8 sc, dec) x 6 (54 sts)
- R15: (7 sc, dec) x 6 (48 sts)
- Stuffing: Stuff the shell lightly to maintain the dome shape.
- R16: (6 sc, dec) x 6 (42 sts)
- R17: (5 sc, dec) x 6 (36 sts)
- R18: Sc in each st around. (36 sts)
- Finishing: Fasten off, leaving a long tail for sewing.
What you'll master: Creating a spiral dome shape and strategic stuffing.
6. Shell Spots (Purple, Make 5-6)
These cute spots add personality to the shell!
- R1 (Purple): 4 sc in MR (4)
- R2: 4 inc (8)
- R3: Sc in each st around. (8 sts)
- Finishing: Fasten off, leaving a tail for sewing. Do not stuff.
What you'll master: Creating small, flat appliqués.
7. The Question Mark (Dark Red/Burgundy)
This is embroidered directly onto the shell using surface embroidery or duplicate stitch.
Instructions:
- Thread your tapestry needle with dark red/burgundy yarn.
- Position the question mark on the front-center of the shell, slightly off-center to the right.
- Using duplicate stitch or backstitch, embroider a curved question mark shape approximately 8-10 stitches tall.
- Top curve: Start at the top, curve to the right, then down.
- Bottom dot: Create a small filled circle or square at the bottom.
- Secure the ends on the inside of the shell.
What you'll master: Surface embroidery and creating graphic designs on amigurumi.
8. The Eyes (White with Details)
Eye White (Make 2):
- R1 (White): 6 sc in MR (6)
- R2: 6 inc (12)
- R3: (1 sc, inc) x 6 (18)
- R4: (2 sc, inc) x 6 (24)
- Finishing: Fasten off, leaving a tail. Do not stuff.
Eye Details:
- Using brown, orange, or yellow yarn, embroider a small circle or oval in the center of each white eye.
- Using black yarn or embroidery floss, add a tiny pupil in the center of the colored portion.
- Alternatively, you can use small felt circles or safety eyes if preferred.
What you'll master: Creating detailed facial features.
9. The Yellow Base Trim
This adds a cheerful border to the foot.
Instructions:
- Join yellow yarn to the edge of the foot (R3 of the foot base).
- Work a round of sc evenly around the entire edge, placing 2-3 sc in each stitch of the foot edge to create a ruffled, decorative trim.
- Finishing: Fasten off and weave in ends.
What you'll master: Adding decorative edging.
10. Assembly & The Magic of Personality
Now for the most rewarding part: bringing your mystery snail to life!
-
Attach the Shell: Position the pink shell on the back of the body, starting just behind the neck. Using your long tail and a tapestry needle, sew it securely in place, making sure it sits at a slight angle for a natural look.
-
Sew the Eyestalks: If you haven't already, stuff the eyestalks lightly. Sew the open ends of the eyestalks together at the top, creating a rounded shape.
-
Attach the Eyes: Sew the white eye circles to the top of each eyestalk, positioning them so they face forward. Add the colored details and pupils.
-
Sew the Spots: Arrange the purple spots randomly across the pink shell, avoiding the question mark area. Sew them securely in place.
-
Final Touches:
- Weave in all loose ends.
- If desired, use pink yarn or blush to add rosy cheeks below the eyes.
- Adjust the stuffing to ensure the snail sits upright nicely.
- Optional: Insert wire or pipe cleaners into the eyestalks before final assembly to make them posable!
What you'll master: Multi-step assembly and adding character-defining details.
Final Section: Where to Go from Here
Congratulations! You've just crafted an adorable Mystery Snail with a question mark shell. This whimsical character is perfect for display, gifting, or adding to a collection of handmade amigurumi friends.
From here, try experimenting with different shell colors and designs! You could make a "mystery octopus" with a similar concept, or create a whole series of mystery creatures with different symbols on their shells (stars, hearts, exclamation marks). You could also change the body color to create different species of snails or even make a giant version as a pillow! Happy crocheting, and enjoy your curious new friend!