September 8, 2026
Retro Granny Square Blanket – A Cozy, Colorful Crochet Project
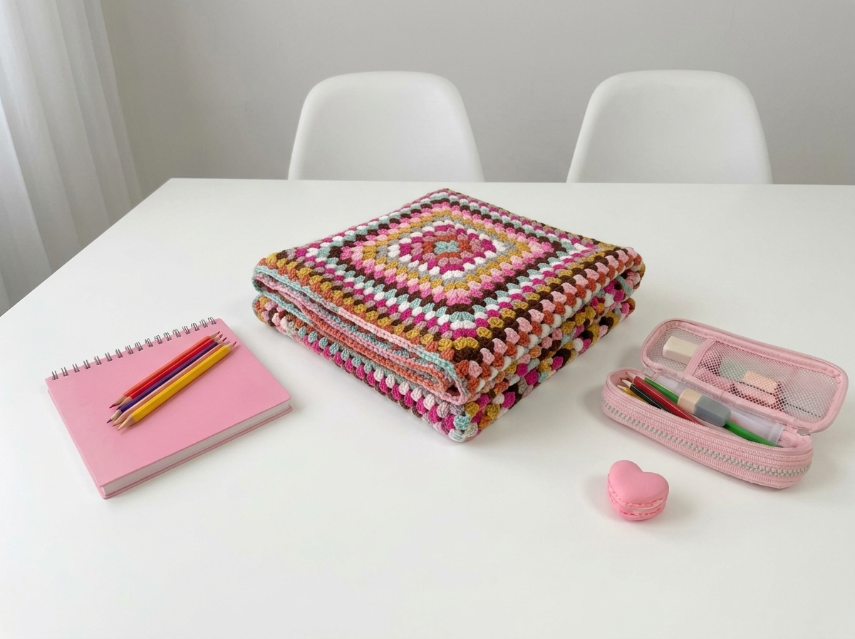
Wrap yourself in nostalgia with this vibrant Retro Granny Square Blanket! Featuring a classic cluster stitch pattern in a warm, earthy palette of browns, pinks, teals, and mustards, this blanket is the ultimate comfort project. It’s perfect for using up stash yarn and adds a beautiful, handmade touch to any sofa or bed.
Retro Granny Square Blanket – Complete Step-by-Step Pattern
1. Gathering Your Supplies
To get that soft, drapey look seen in the photo, a soft acrylic or cotton-acrylic blend yarn is perfect.
- Yarn: Worsted weight (Size 4) yarn. You will need a variety of colors to create the retro look.
- Colors: Cream/White (base), Chocolate Brown, Dusty Pink, Teal/Mint, Mustard Yellow, and a deep Magenta.
- Amount: Approx. 1000–1500g total depending on desired size.
- Hook: 5.0 mm (US H/8) or the size needed to achieve a loose, drapey fabric.
- Notions: Tapestry needle for weaving in ends, scissors, and stitch markers (optional).
- Finished Size: The blanket in the photo appears to be made of roughly 12-16 large squares (e.g., a 3x4 or 4x4 grid), resulting in a throw size of approx. 120 x 150 cm.
What you'll master: Color changing, working in the round, and assembling modular crochet pieces.
2. Abbreviations & Special Techniques
Let’s quickly review a few terms. If you're new to Granny Squares, this is the perfect project to learn!
- MR: Magic ring
- ch: Chain
- sc: Single crochet
- dc: Double crochet
- sl st: Slip stitch
- sp: Space (the gap created by chains in the previous row)
- Cluster: 3 dc worked into the same space.
- Reverse Single Crochet (Crab Stitch): Working single crochet stitches backwards (from left to right for right-handers) to create a rope-like edge.
3. The Classic Granny Square (Make as many as needed)
We’ll create a standard 4-round granny square. You can change colors every round to create that beautiful, striped retro effect!
-
Round 1 (Color A - e.g., Cream):
- Create a MR.
- Ch 3 (counts as first dc), 2 dc in ring, ch 2.
- [3 dc in ring, ch 2] x 3.
- Sl st to the top of the beginning ch-3 to join. (4 clusters of 3 dc, 4 ch-2 spaces).
- Fasten off Color A.
-
Round 2 (Color B - e.g., Brown):
- Join yarn in any ch-2 corner space.
- Ch 3 (counts as first dc), 2 dc in same space, ch 2, 3 dc in same space.
- [3 dc, ch 2, 3 dc] in each corner space around.
- Sl st to join.
- Fasten off Color B.
-
Round 3 (Color C - e.g., Pink):
- Join yarn in any ch-2 corner space.
- Ch 3, 2 dc, ch 2, 3 dc in same space (corner made).
- Ch 1, [3 dc, ch 2, 3 dc] in next corner space.
- Repeat around: Ch 1, 3 dc in next corner space.
- Sl st to join.
- Fasten off Color C.
-
Round 4 (Color D - e.g., Teal):
- Join yarn in any ch-2 corner space.
- Ch 3, 2 dc, ch 2, 3 dc in same space (corner made).
- Ch 1, 3 dc in next ch-1 space.
- Ch 1, [3 dc, ch 2, 3 dc] in next corner space.
- Repeat pattern: Ch 1, 3 dc in next ch-1 space, Ch 1, corner in next corner.
- Sl st to join.
- Fasten off and weave in ends.
Pro Tip: To create the specific look in the photo, alternate your color sequences (e.g., Cream -> Brown -> Pink -> Teal -> Mustard) for every square to create a cohesive but varied palette.
What you'll master: Consistent tension in granny squares and clean color changes.
4. Assembling the Blanket
Now for the magic moment where your squares turn into a blanket!
- Layout: Arrange your squares into your desired grid (e.g., 4 squares wide by 5 squares tall).
- Joining: Place two squares together with right sides facing up. Using your tapestry needle and a long tail of yarn (or a contrasting color for a decorative seam), whip stitch the squares together through the back loops only. This creates a flat, sturdy seam.
- Repeat: Join all squares into rows, then join the rows together.
What you'll master: Visualizing geometric patterns and executing strong, invisible seams.
5. The Border (The "Rope" Edge)
The blanket in the photo has a beautiful, textured edge that looks like a cord. This is achieved using the Reverse Single Crochet (Crab Stitch).
- Setup: Join your final border color (e.g., Cream or Brown) in any corner.
- Round 1: Ch 1. Work 1 sc in each stitch and chain space around the entire blanket. In the corners, work (1 sc, ch 2, 1 sc) to keep the corners sharp. Sl st to join.
- Round 2 (The Crab Stitch):
- Ch 1. Do NOT turn your work.
- Insert your hook into the stitch to the right of your current stitch (backwards).
- Yarn over, pull up a loop, yarn over, pull through both loops on hook.
- Continue working backwards all the way around the blanket.
- In the corners, work 3 Reverse Single Crochets in the same corner space to keep it flat.
- Finishing: Sl st to join. Fasten off and weave in all ends securely.
What you'll master: Working backwards to create a professional, decorative corded edge.
Final Section: Where to Go from Here
Congratulations! You’ve just crafted a beautiful, retro-inspired Granny Square Blanket. This project is a fantastic way to use up stash yarn and practice your square-making skills.
From here, try experimenting with different color palettes to create a whole collection! You could make a "sunset" version with oranges and pinks, or a "forest" version with greens and browns. You could even make smaller squares to create matching cushion covers or a table runner. Happy crocheting, and enjoy your cozy new handmade treasure! 🧶