September 13, 2026
Sweet Cherry Crochet Phone Case – A Cute & Protective Accessory
Protect your phone in the sweetest way possible! This charming phone case features a cozy burgundy base, a crisp white center square, and adorable 3D cherries that pop right off the screen. Complete with a matching dangling cherry charm, this project is a fun, intermediate-friendly make that adds a pop of personality to your everyday tech.
Jump to pattern instructions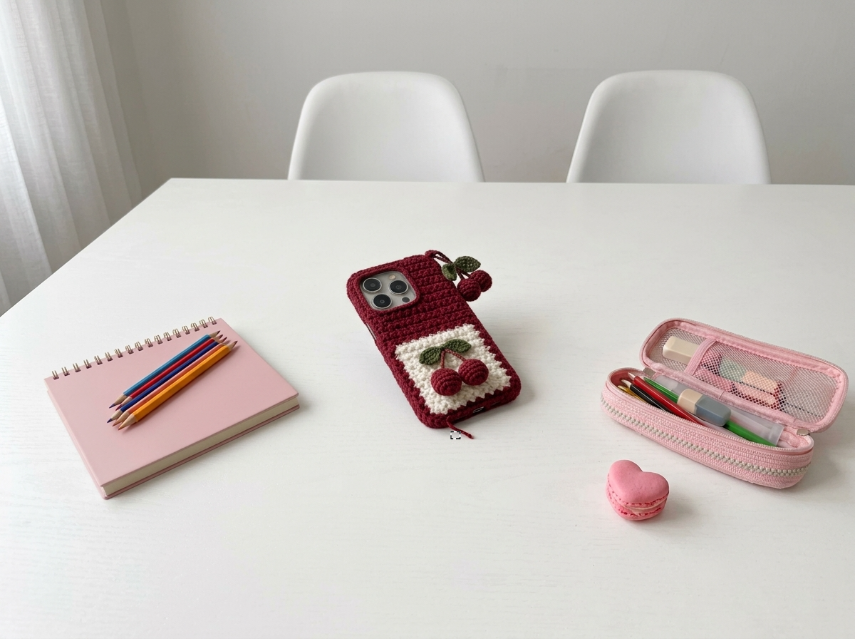
Sweet Cherry Crochet Phone Case – Complete Step-by-Step Pattern
1. Gathering Your Supplies
To ensure your phone case is protective and doesn't stretch out over time, it’s crucial to use a tight stitch and a sturdy yarn. Cotton or a cotton-acrylic blend works best!
- Yarn: DK or Worsted weight cotton yarn (e.g., YarnArt Jeans, Catania, or similar). You will need small amounts of:
- Burgundy / Dark Red: For the main case body.
- White / Cream: For the center square.
- Green: For the leaves and stems.
- Dark Red: For the 3D cherries.
- Hook: 2.5 mm or 3.0 mm (Use a hook size smaller than recommended for your yarn to create a stiff, durable fabric).
- Notions: Tapestry needle, scissors, stitch markers, a little bit of poly-fil stuffing (for the cherries), and a small jump ring or keychain hardware (optional, for the charm).
- Important: Have your phone handy to measure as you go!
What you'll master: Creating a custom-fit fabric, working 3D appliqué elements, and assembling a functional accessory.
2. Abbreviations & Special Techniques
Let’s quickly review a few terms. If you're new to any of these, don't worry—you'll be a pro by the time your phone is dressed!
- MR: Magic ring
- ch: Chain
- sc: Single crochet
- inc: Increase (2 sc in one stitch)
- dec: Decrease (2 sc crocheted together invisibly)
- sl st: Slip stitch
- BLO: Back loop only
3. The Phone Case Base (Burgundy)
Since phone sizes vary, this pattern uses a "measure-as-you-go" method to ensure a perfect fit for your specific device.
- Foundation Chain: Measure the width of the back of your phone. Chain that many stitches plus 2 (for the turning chain).
- Row 1: Sc in the 2nd ch from the hook and each ch across. Turn.
- Rows 2–X: Ch 1, turn. Sc in each st across.
- Pro Tip: Keep checking the fit! The case should cover the back of the phone and wrap just slightly around the sides (about 1 cm on each side) to hold it securely. Stop when it reaches the desired height.
- The Camera Cutout: When you reach the top of the phone (where the camera is), chain the width of the camera module, skip those stitches on the row below, and continue sc across to the end of the row.
- Edging (Optional): Work a round of sc evenly around the entire edge of the case to give it a clean, finished look. Fasten off and weave in ends.
What you'll master: Custom sizing and creating functional cutouts in flat crochet fabric.
4. The White Center Square
This crisp white square provides the perfect canvas for our cherry appliqué.
- Instructions: With White yarn, Ch 12 (or enough to make a square about 6-7 cm wide).
- Row 1: Sc in the 2nd ch from the hook and each ch across. Turn. (11 sc)
- Rows 2–11: Ch 1, turn. Sc in each st across. (11 sc)
- Finishing: Fasten off, leaving a long tail for sewing.
What you'll master: Creating a neat, solid geometric shape for appliqué.
5. The 3D Cherries (Make 3: 2 for the case, 1 for the charm)
These little spheres give the case its signature cute, popping texture!
- R1 (Dark Red): 6 sc in MR (6)
- R2: 6 inc (12)
- R3-5: 12 sc (12) [3 rows]
- R6: (4 sc, dec) x 2 (10)
- Stuffing: Add a tiny pinch of poly-fil to round out the cherry. Don't overstuff, or it will be hard to sew!
- R7: (3 sc, dec) x 2 (8)
- Finishing: Fasten off, leaving a long tail. Weave the tail through the front loops of the remaining stitches and pull tight to close the hole.
The Stems & Leaves (Green):
- Instructions: Ch 6. Sc in the 2nd ch from the hook, hdc, dc, (ch 3, sc in 2nd ch from hook, hdc, dc) all in the last chain stitch to form a leaf. Work sc, hdc, dc back down the opposite side of the starting chain.
- Finishing: Fasten off, leaving a tail.
What you'll master: Crocheting small, stuffed 3D shapes and creating organic leaf shapes.
6. Assembly & Finishing
Now for the magic moment where your phone case comes to life!
- Attach the Square: Position the white square in the lower center of the burgundy case. Using your long tail and a tapestry needle, whip stitch it securely to the case on all four sides.
- Attach the Cherries: Place your two 3D cherries on the bottom half of the white square. Sew them down securely.
- Add the Leaves: Sew the green stems and leaves just above the cherries, making them look like they are growing out of the fruit!
- The Charm: Take your third cherry. Sew a small loop of green yarn to the top of its stem, or attach a small jump ring. Sew the base of the stem securely to the top right corner of the phone case (near the camera cutout), letting the cherry dangle freely.
What you'll master: Multi-step structural assembly and adding playful, dimensional details.
Final Section: Where to Go from Here
Congratulations! You’ve just crafted a sweet, protective, and totally unique Cherry Crochet Phone Case. This project is a fantastic way to use up scrap yarn and practice your 3D appliqué skills.
From here, try experimenting with different fruit themes! You could make a strawberry case with green leaves and white "seeds," a peach case with a fuzzy orange yarn, or even a little avocado with a removable 3D pit. Happy crocheting, and enjoy your beautiful new handmade accessory! 🍒