September 8, 2026
Vintage Daisy Granny Square Bag – A Retro Crochet Project
Step back in time with this charming, retro-inspired Granny Square Bag! Featuring a beautiful checkerboard of daisy-like motifs in soft beige, mustard, and slate blue, this bag is the perfect blend of vintage nostalgia and modern style. With its cute drawstring closure and floral handle, it’s a delightful intermediate project that’s perfect for carrying your essentials on a sunny day.
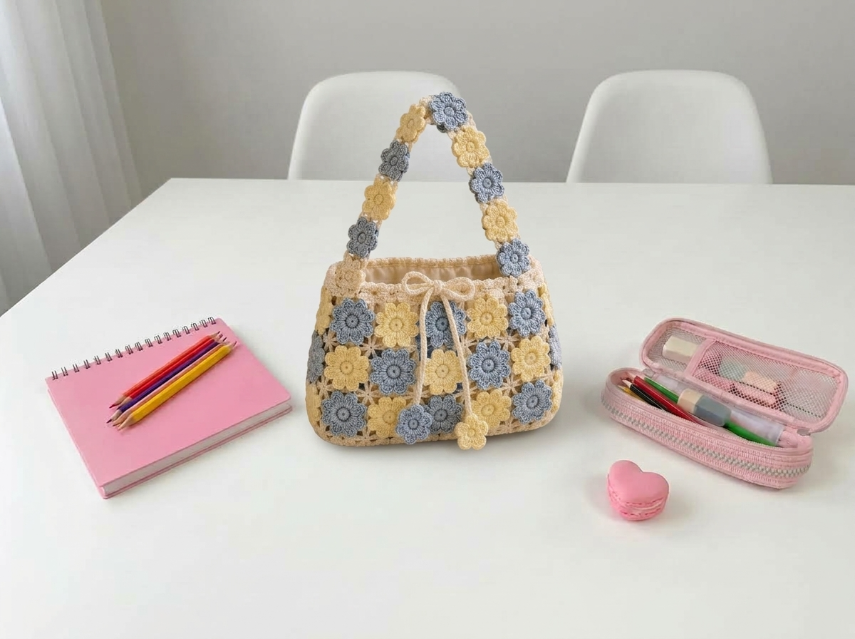
Vintage Daisy Granny Square Bag – Complete Step-by-Step Pattern
1. Gathering Your Supplies
To get that crisp, structured look for your bag, a sturdy cotton or acrylic-cotton blend yarn is best.
- Yarn: Worsted weight (Size 4) cotton yarn (e.g., Lily Sugar'n Cream, Paintbox Cotton Aran).
- Color A (Beige/Cream): Approx. 100g (for the main body and handle base)
- Color B (Mustard Yellow): Approx. 50g (for the flower centers/accents)
- Color C (Slate Blue/Grey): Approx. 50g (for the flower centers/accents)
- Note: You can adjust the colors to create your own unique checkerboard pattern!
- Hook: 4.0 mm (US G/6) or the size needed to achieve a firm fabric.
- Notions: Tapestry needle for weaving in ends and sewing, scissors, stitch markers, and a long ribbon or cord for the drawstring (approx. 1 meter).
- Finished Size: Approximately 25 cm (10 inches) wide and 20 cm (8 inches) tall, excluding the handle.
What you'll master: Creating uniform granny squares, seamless joining techniques, and assembling a functional, lined bag.
2. Abbreviations & Special Techniques
Let’s quickly review a few terms. If you're new to granny squares, this is the perfect project to practice!
- MR: Magic ring
- ch: Chain
- sc: Single crochet
- dc: Double crochet
- sl st: Slip stitch
- sp: Space (the gap created by chains in the previous row)
- Join-as-you-go: A method of connecting squares as you crochet the final round, eliminating the need for sewing later (optional, but recommended for a clean finish!).
3. The Daisy Motif (Make 24)
We’ll create a classic 2-round granny square that looks like a blooming daisy. You can make these in batches, alternating colors to create your checkerboard pattern.
-
Round 1 (Center):
- With Color A (Beige), create a MR.
- Ch 3 (counts as first dc), 2 dc in ring, ch 2.
- [3 dc in ring, ch 2] x 3.
- Sl st to the top of the beginning ch-3 to join. (4 clusters of 3 dc, 4 ch-2 spaces).
- Fasten off Color A.
-
Round 2 (Border & Petals):
- Join Color B (Mustard) or Color C (Blue) in any ch-2 corner space.
- Ch 3 (counts as first dc), 2 dc in same space, ch 1.
- [3 dc in same space, ch 1] x 3.
- Sl st to the top of the beginning ch-3 to join.
- Fasten off and weave in ends.
Pro Tip: To create the checkerboard look shown in the photo, make 8 squares with a Beige center/Mustard border, 8 with Beige center/Blue border, and 8 solid Beige squares (or mix as you like!).
What you'll master: Consistent tension in granny squares and clean color changes.
4. Assembling the Bag Body
Now for the magic moment where your squares turn into a bag! We’ll create two panels (Front and Back) and sew them together.
- Layout: Arrange your squares into two rectangular panels, each 4 squares wide and 3 squares tall.
- Joining: Using your tapestry needle and a long tail of Beige yarn, whip stitch the squares together along the edges. Make sure to match the colors up to create your desired pattern (e.g., alternating yellow and blue flowers).
- Sewing the Bag: Place the two panels together with right sides facing out. Whip stitch the two side seams and the bottom seam securely.
What you'll master: Visualizing geometric patterns and executing strong, invisible seams.
5. The Floral Handle
The handle is made of a long strip of the same daisy motifs, giving the bag a cohesive, whimsical look.
- Layout: Join 6 to 8 Daisy Motifs in a single long row (depending on how long you want your handle to be).
- Attachment: Pin the ends of the flower strip to the top corners of the bag’s side seams.
- Sewing: Sew the handle securely to the bag, going through all layers of the squares to ensure it can hold weight. Reinforce the attachment points with a few extra stitches.
What you'll master: Creating modular accessories and reinforcing stress points.
6. The Drawstring Closure
To keep your belongings safe, we’ll add a cute drawstring closure that peeks out from the top of the bag.
- The Channel: If your squares are loose at the top, you can crochet a simple round of single crochet (sc) around the entire top opening of the bag to create a sturdy rim.
- The Drawstring: Cut a length of beige yarn or ribbon (approx. 1 meter). Thread it onto a tapestry needle.
- Weaving: Weave the needle in and out of the top row of stitches (or the spaces between the dc clusters) all the way around the bag opening. Leave about 15 cm of tail at both ends.
- The Bow: Tie the two ends together in a cute bow at the front center of the bag. You can even attach a small leftover flower motif to the ends of the drawstring for an extra touch of charm!
What you'll master: Creating functional closures and adding decorative finishing touches.
Final Section: Where to Go from Here
Congratulations! You’ve just crafted a beautiful, retro-inspired Daisy Granny Square Bag. This project is a fantastic way to use up stash yarn and practice your square-making skills.
From here, try experimenting with different color palettes to create a whole collection! You could make a "sunset" version with oranges and pinks, or a "forest" version with greens and browns. You could even line the bag with a cute fabric to give it extra structure and protect your belongings. Happy crocheting, and enjoy your stylish new handmade accessory! 🌼