September 18, 2026
Amigurumi Turtle Duo – A Slow & Steady Crochet Pattern
Meet these adorable crocheted tortoises! Featuring detailed shell patterns with hexagonal scutes, sweet embroidered faces, and sturdy legs, these slow-moving friends are perfect for display or play. This intermediate pattern offers two color variations: a gray tortoise with orange spots and a classic tan/brown version.
Jump to pattern instructions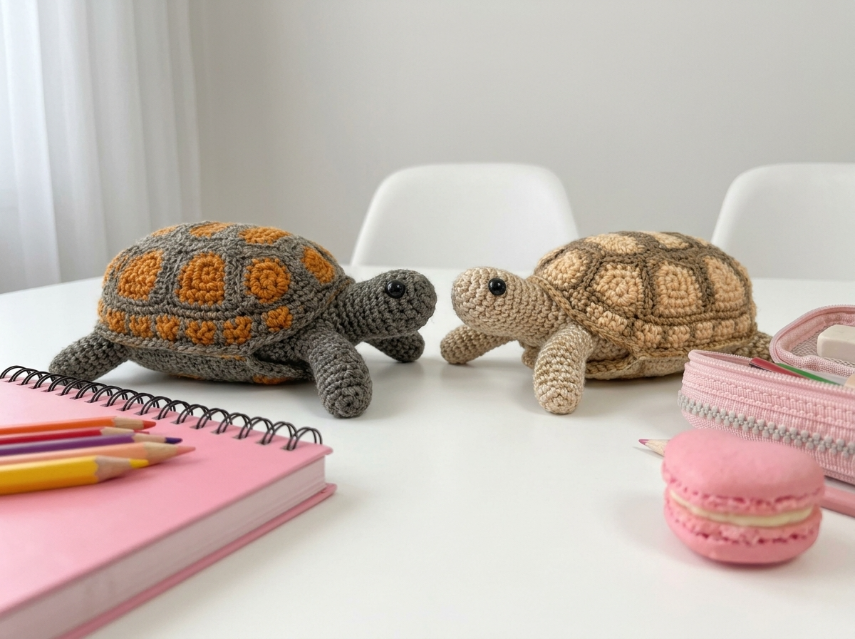
Amigurumi Turtle Duo – Complete Step-by-Step Pattern
1. Gathering Your Supplies
To create these sturdy turtles with defined shell patterns, use a firm cotton yarn.
- Yarn: Worsted weight cotton or acrylic blend (e.g., YarnArt Jeans, Catania).
- Version 1 (Gray Turtle):
- Gray: Main body color (approx. 100g)
- Orange/Rust: Shell spots (approx. 30g)
- Black: Tiny amount for eyes
- Version 2 (Tan Turtle):
- Cream/Beige: Main body color (approx. 100g)
- Light Brown: Shell pattern (approx. 30g)
- Dark Brown: Shell details (tiny amount)
- Black: Tiny amount for eyes
- Version 1 (Gray Turtle):
- Hook: 3.0 mm or 3.5 mm (choose size for tight, firm stitches)
- Notions:
- 8-10 mm black safety eyes (2)
- Poly-fil stuffing
- Tapestry needle
- Scissors
- Stitch markers
- Optional: Black embroidery floss for facial details
What you'll master: Creating a detailed shell pattern, working in continuous rounds, and assembling a stable amigurumi.
2. Abbreviations & Special Techniques
- MR: Magic ring
- ch: Chain
- sc: Single crochet
- inc: Increase (2 sc in one stitch)
- dec: Decrease (2 sc crocheted together invisibly)
- sl st: Slip stitch
- BLO: Back loop only
- FLO: Front loop only
- st(s): Stitch(es)
3. The Shell Base (Main Color)
The shell is worked from the top down, creating a dome shape.
- R1: 6 sc in MR (6)
- R2: 6 inc (12)
- R3: (1 sc, inc) x 6 (18)
- R4: (2 sc, inc) x 6 (24)
- R5: (3 sc, inc) x 6 (30)
- R6: (4 sc, inc) x 6 (36)
- R7: (5 sc, inc) x 6 (42)
- R8: (6 sc, inc) x 6 (48)
- R9: (7 sc, inc) x 6 (54)
- R10-13: 54 sc (54) [4 rows]
- Note: This creates the dome of the shell.
- Finishing: Fasten off, leaving a long tail. Do not stuff yet.
What you'll master: Creating a rounded dome shape.
4. The Shell Pattern (Contrast Color)
This is where the magic happens! We'll create the hexagonal scute pattern.
For the Gray Turtle (Orange Spots):
- Using Orange yarn, you will embroider or crochet circles onto the shell.
- Method 1 (Embroidery): Use backstitch or satin stitch to create hexagonal shapes on the shell surface.
- Method 2 (Crochet Circles): Make small circles (MR 6 sc, R2 6 inc) and sew them onto the shell in a pattern.
For the Tan Turtle (Brown Pattern):
- Using Light Brown yarn, create a grid pattern on the shell.
- Instructions: Use surface crochet or embroidery to create hexagonal outlines across the shell, mimicking real tortoise scutes.
What you'll master: Surface embroidery or appliqué techniques.
5. The Body/Undershell (Main Color)
This forms the bottom part that sits on the table.
- R1: 6 sc in MR (6)
- R2: 6 inc (12)
- R3: (1 sc, inc) x 6 (18)
- R4: (2 sc, inc) x 6 (24)
- R5: (3 sc, inc) x 6 (30)
- R6: (4 sc, inc) x 6 (36)
- R7: (5 sc, inc) x 6 (42)
- R8: (6 sc, inc) x 6 (48)
- R9-12: 48 sc (48) [4 rows]
- Note: This creates a shallow bowl shape.
- Finishing: Fasten off, leaving a tail for sewing.
What you'll master: Creating a stable base.
6. The Head (Main Color)
- R1: 6 sc in MR (6)
- R2: 6 inc (12)
- R3: (1 sc, inc) x 6 (18)
- R4: (2 sc, inc) x 6 (24)
- R5-7: 24 sc (24) [3 rows]
- Eye Placement: Insert safety eyes between R5 and R6, spaced about 6-8 stitches apart.
- R8: (2 sc, dec) x 6 (18)
- R9: 18 sc (18)
- Stuffing: Stuff the head firmly.
- R10: (1 sc, dec) x 6 (12)
- Finishing: Fasten off, leaving a long tail.
What you'll master: Shaping a rounded head with facial features.
7. The Legs (Main Color, Make 4)
Short, sturdy legs for slow and steady movement!
- R1: 6 sc in MR (6)
- R2: 6 inc (12)
- R3: (1 sc, inc) x 6 (18)
- R4-6: 18 sc (18) [3 rows]
- R7: (1 sc, dec) x 6 (12)
- Finishing: Fasten off, leaving a tail. Stuff lightly.
What you'll master: Creating uniform, stable appendages.
8. Assembly & The Magic of Details
Now for the most rewarding part: bringing your turtle to life!
-
Attach Shell to Body:
- Place the dome shell (R1-13) on top of the body base.
- Using your long tails, sew them together around the edges.
- Stuffing: Stuff firmly between the shell and body as you sew.
-
Attach Head:
- Sew the head to the front opening of the shell/body.
- Position it so it extends forward naturally.
-
Attach Legs:
- Sew the four legs to the bottom of the body, spacing them evenly.
- Position two in front and two in back so the turtle sits flat.
-
Facial Details:
- If not using safety eyes, embroider black eyes.
- Use black embroidery floss to add a small smile below the eyes.
- Optional: Add tiny nostrils with black thread.
-
Shell Details:
- Complete your shell pattern (orange spots or brown hexagons) if you haven't already.
- Make sure the pattern is evenly distributed across the shell.
What you'll master: Multi-step assembly and creating a stable sitting figure.
Final Section: Where to Go from Here
Congratulations! You've just crafted an adorable amigurumi turtle. These patient creatures are perfect for display, gifting, or slow-moving adventures.
From here, try experimenting with different species! You could make a sea turtle with flippers instead of legs, or a box turtle with a hinged shell. You could also create a whole family of turtles in different sizes, or add accessories like a tiny hat or scarf. Happy crocheting, and remember: slow and steady wins the race!