September 18, 2026
Forest Friend Raccoon with Mushroom – A Cute Amigurumi Pattern
Meet this adorable woodland raccoon, ready for a forest adventure! Featuring a classic grey and black mask, a fluffy striped tail, and a cute little orange mushroom held tight in its paws, this pattern is a delightful intermediate project. It’s perfect for adding a touch of nature-inspired charm to your shelf.
Jump to pattern instructions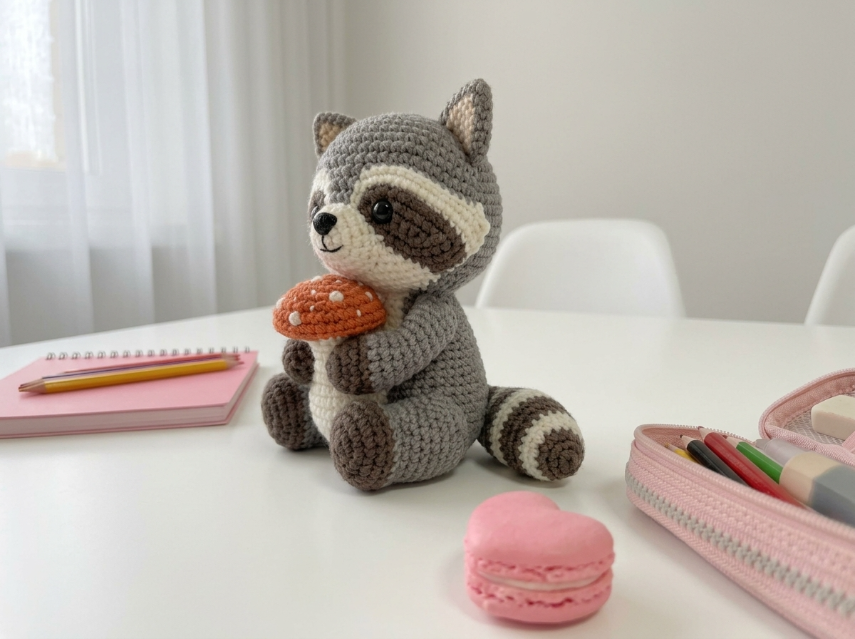
Forest Friend Raccoon with Mushroom – Complete Step-by-Step Pattern
1. Gathering Your Supplies
To get that soft, plush look with crisp color definition, a smooth cotton or acrylic blend yarn is best.
- Yarn: Worsted weight cotton or acrylic blend (e.g., YarnArt Jeans, Catania). You will need:
- Grey: Main color for body, head, and tail (approx. 100g).
- Dark Charcoal/Black: For the mask, paws, feet, and nose (approx. 30g).
- Cream/White: For the muzzle, belly, inner ears, tail stripes, and mushroom details (approx. 30g).
- Orange/Rust: For the mushroom cap (small amount).
- Hook: 2.5 mm or 3.0 mm (choose the size that gives you a tight, stuff-proof gauge).
- Notions:
- 10-12 mm black safety eyes.
- Poly-fil stuffing.
- Tapestry needle.
- Scissors.
- Stitch markers.
What you'll master: Colorwork for the mask, creating a striped tail, and assembling a character holding an accessory.
2. Abbreviations & Special Techniques
- MR: Magic ring
- ch: Chain
- sc: Single crochet
- inc: Increase (2 sc in one stitch)
- dec: Decrease (2 sc crocheted together invisibly)
- sl st: Slip stitch
- BLO: Back loop only
3. The Head (Grey, Dark Charcoal, Cream)
The head features the iconic raccoon mask. We will crochet the base in grey and add the mask details.
- R1 (Grey): 6 sc in MR (6)
- R2: 6 inc (12)
- R3: (1 sc, inc) x 6 (18)
- R4: (2 sc, inc) x 6 (24)
- R5: (3 sc, inc) x 6 (30)
- R6: (4 sc, inc) x 6 (36)
- R7-11: 36 sc (36) [5 rows]
- Eye Placement: Insert safety eyes between R8 and R9, spaced about 8-10 stitches apart.
- R12: (4 sc, dec) x 6 (30)
- R13: (3 sc, dec) x 6 (24)
- Stuffing: Stuff the head firmly.
- R14: (2 sc, dec) x 6 (18)
- Finishing: Fasten off, leaving a long tail. Do not close the hole yet; we will attach the body.
The Mask & Muzzle (Appliqué Method): Instead of complex color changes in the round, it is often easier to crochet the head solid grey and sew on the features.
- Mask (Dark Charcoal): Create two eye patches. Ch 4, sc in 2nd ch, hdc, dc, 3dc in last ch, hdc, sc. (Teardrop shape). Sew these around the eyes, angling them towards the nose.
- Muzzle (Cream): Create a rounded triangle or oval. MR 6 sc, R2 6 inc, R3 (1 sc, inc) x 6. Sew this over the nose area, overlapping the bottom of the mask patches.
- Nose: Embroider a small black triangle on the top of the muzzle.
What you'll master: Shaping a head and adding facial appliqués.
4. The Body (Grey & Cream)
- R1 (Grey): 6 sc in MR (6)
- R2: 6 inc (12)
- R3: (1 sc, inc) x 6 (18)
- R4: (2 sc, inc) x 6 (24)
- R5: (3 sc, inc) x 6 (30)
- R6-10: 30 sc (30) [5 rows]
- R11: (3 sc, dec) x 6 (24)
- R12-13: 24 sc (24) [2 rows]
- Stuffing: Stuff the body firmly.
- Finishing: Fasten off, leaving a tail.
The Belly Patch (Cream):
- Create a large oval or pear shape using Cream yarn (similar to the muzzle but larger). Sew this to the front of the grey body.
What you'll master: Creating a sturdy torso.
5. The Striped Tail (Grey, Cream, Dark Charcoal)
The tail is long and fluffy with distinct rings.
- R1 (Grey): 6 sc in MR (6)
- R2: 6 inc (12)
- R3-5 (Grey): 12 sc (12) [3 rows]
- R6-8 (Cream): Change to Cream. 12 sc.
- R9-11 (Dark Charcoal): Change to Dark Charcoal. 12 sc.
- R12-14 (Cream): Change to Cream. 12 sc.
- R15-17 (Dark Charcoal): Change to Dark Charcoal. 12 sc.
- R18-20 (Grey): Change to Grey. 12 sc.
- Note: You can repeat the stripe pattern (Grey-Cream-Dark) as many times as you like for a longer tail.
- Finishing: Stuff the tail firmly. Fasten off.
What you'll master: Managing multiple color changes in a tube.
6. Arms & Legs
Arms (Grey & Dark Charcoal):
- R1-4 (Grey): 6 sc in MR, R2 6 inc, R3-4 12 sc.
- R5-8 (Dark Charcoal): Change color for the paws. 12 sc.
- Finishing: Stuff lightly. Flatten the top. Make 2.
Legs (Grey & Dark Charcoal):
- R1 (Grey): 6 sc in MR (6)
- R2: 6 inc (12)
- R3-5 (Grey): 12 sc (12)
- R6-8 (Dark Charcoal): Change color for feet. 12 sc.
- Finishing: Stuff firmly. Make 2.
What you'll master: Creating limbs with color-blocked paws.
7. The Mushroom (Orange & Cream)
This cute accessory is held by the raccoon.
Cap (Orange):
- R1: 6 sc in MR (6)
- R2: 6 inc (12)
- R3: (1 sc, inc) x 6 (18)
- R4: (2 sc, inc) x 6 (24)
- R5: 24 sc (24)
- R6: (2 sc, dec) x 6 (18) - Curve it in slightly.
- Finishing: Stuff lightly. Fasten off.
Stem (Cream):
- R1: 4 sc in MR (4)
- R2-4: 4 sc (4) [3 rows]
- Finishing: Stuff firmly. Fasten off.
White Spots:
- Use white yarn to embroider small French knots or sew tiny white circles onto the orange cap.
What you'll master: Creating a miniature food item.
8. Assembly & The Magic of Details
Now for the most rewarding part: bringing your raccoon to life!
- Head to Body: Sew the head securely to the top of the body.
- Tail: Sew the striped tail to the back of the body, curving it to the side.
- Legs: Sew the legs to the bottom front of the body so the raccoon sits in a relaxed pose.
- The Mushroom:
- Sew the Cream stem to the bottom of the Orange cap.
- Position the mushroom against the raccoon's chest/belly.
- Arms: Sew the arms to the sides of the body, positioning them so they wrap around the mushroom stem, making it look like the raccoon is hugging it.
- Ears (Grey & Cream): Make two small semi-circles (Grey outer, Cream inner) and sew them to the top of the head.
What you'll master: Complex assembly and posing a character with a prop.
Final Section: Where to Go from Here
Congratulations! You’ve just crafted a charming Forest Friend Raccoon. This project is a wonderful way to practice color blocking and character assembly.
From here, try experimenting with different accessories! You could make the raccoon hold an acorn, a little lantern, or a tiny book. You could also change the colors to make a "Red Panda" version with rust and white yarn. Happy crocheting!