September 18, 2026
Kawaii Bakery Friends – Pretzel & Croissant Amigurumi
Who says pastries can't have personality? These adorable crocheted bakery friends feature a twisted pretzel with salt crystals and a flaky croissant, both with sweet embroidered faces and tiny legs. Perfect as keychains, desk companions, or gifts for baking enthusiasts!
Jump to pattern instructions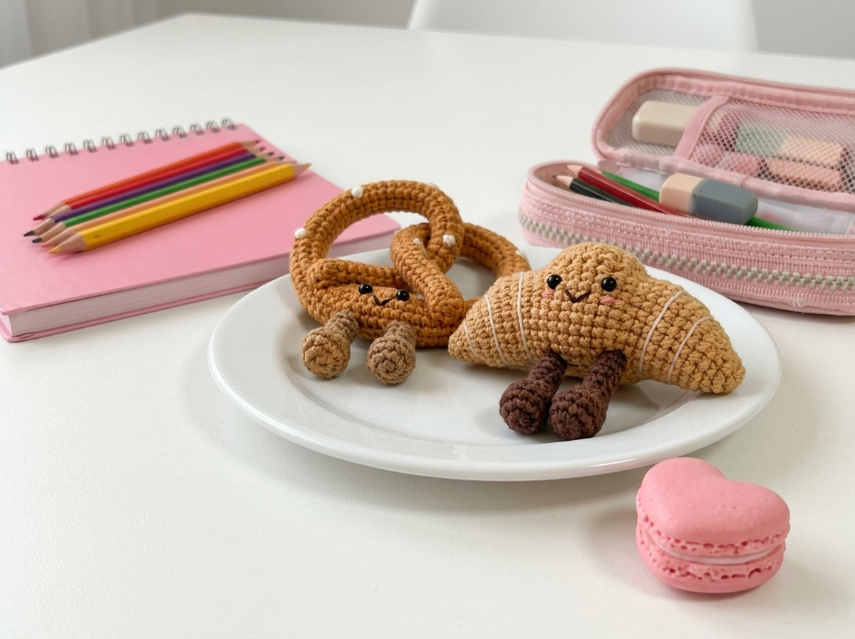
Kawaii Bakery Friends – Complete Step-by-Step Pattern
1. Gathering Your Supplies
These quick projects use minimal yarn and work up in no time!
- Yarn: Worsted weight cotton or acrylic blend (e.g., YarnArt Jeans, Catania).
- Pretzel:
- Brown/Tan (approx. 20g)
- Darker Brown (for legs, tiny amount)
- White (for salt crystals, tiny amount)
- Croissant:
- Golden Brown/Tan (approx. 20g)
- Dark Brown (for legs, tiny amount)
- Cream/Light Yellow (for stripe details, tiny amount)
- Pretzel:
- Hook: 3.0 mm or 3.5 mm
- Notions:
- Black embroidery floss (for faces)
- Pink embroidery floss (for cheeks)
- Poly-fil stuffing
- Tapestry needle
- Scissors
- Stitch markers
What you'll master: Creating shaped amigurumi, surface embroidery, and working with minimal yarn.
2. Abbreviations & Special Techniques
- MR: Magic ring
- ch: Chain
- sc: Single crochet
- inc: Increase (2 sc in one stitch)
- dec: Decrease (2 sc crocheted together)
- sl st: Slip stitch
- st(s): Stitch(es)
3. The Pretzel Body
The pretzel is worked in a twisted figure-8 shape.
- R1: 6 sc in MR (6)
- R2: 6 inc (12)
- R3: (1 sc, inc) x 6 (18)
- R4: 18 sc (18)
- R5: (1 sc, dec) x 6 (12)
- R6-8: 12 sc (12) [3 rows]
- Note: This creates one "arm" of the pretzel.
- Finishing: Fasten off, leaving a long tail. Do NOT stuff yet.
Make 3 more identical arms (4 total).
What you'll master: Creating uniform tubes for assembly.
4. Assembling the Pretzel Shape
-
Arrange the Arms: Lay the 4 tubes in a figure-8/pretzel shape:
- Two arms form the top loops
- Two arms form the bottom loops
- They should all meet in the center
-
Sew Together: Using your long tails, sew all four arms together at the center point.
-
Connect the Loops: Sew the ends of the top loops together, and the ends of the bottom loops together, creating the classic pretzel twist.
-
Stuffing: Once the shape is secured, stuff each arm lightly through the center gaps.
What you'll master: Modular assembly and 3D shaping.
5. The Pretzel Face & Details
Legs (Dark Brown, Make 2):
- R1: 4 sc in MR (4)
- R2-4: 4 sc (4) [3 rows]
- Finishing: Fasten off, leaving tail. Stuff lightly. Sew to the bottom of the pretzel.
Salt Crystals (White):
- Using white yarn, embroider 6-8 small French knots or tiny circles scattered across the top of the pretzel arms.
Face:
- Eyes: Using black embroidery floss, embroider two small dots or horizontal ovals on one of the top arms.
- Cheeks: Using pink floss, add tiny blush marks below the eyes.
- Mouth: Embroider a small smile between the eyes.
What you'll master: Surface embroidery and adding character details.
6. The Croissant Body
The croissant is worked as a crescent shape.
- R1: 6 sc in MR (6)
- R2: 6 inc (12)
- R3: (1 sc, inc) x 6 (18)
- R4: (2 sc, inc) x 6 (24)
- R5-8: 24 sc (24) [4 rows]
- Note: This creates a fat tube.
- R9: (2 sc, dec) x 6 (18)
- R10: 18 sc (18)
- Finishing: Fasten off, leaving tail.
Shaping the Croissant:
- Stuff the tube firmly.
- Gently bend it into a crescent/c curved shape.
- Using yarn, sew the two ends together lightly to hold the curve, or simply let it rest in the curved position.
What you'll master: Creating a curved shape from a straight tube.
7. The Croissant Details
Legs (Dark Brown, Make 2):
- Same as pretzel legs. Sew to the bottom/inside curve of the croissant.
Flaky Layers (Cream/Light Yellow):
- Using cream yarn, embroider 3-4 horizontal lines across the body of the croissant to mimic flaky pastry layers.
Face:
- Eyes: Black embroidery floss, two small dots on the upper curve.
- Cheeks: Pink blush marks.
- Mouth: Small smile.
- Position the face on the "outside" curve of the crescent.
What you'll master: Adding realistic texture details.
8. Final Assembly & Finishing
- Weave in Ends: Secure all loose yarn tails inside the bodies.
- Shape Check: Gently adjust the pretzel loops and croissant curve.
- Optional Keychain: Add a small loop of chain stitches to the top of each pastry and attach a keychain ring.
What you'll master: Professional finishing touches.
Final Section: Where to Go from Here
Congratulations! You've just baked up some adorable Kawaii Bakery Friends. These tiny pastries are perfect for gifting, collecting, or adding charm to your keys or bag.
From here, try experimenting with other bakery items! You could make a donut with sprinkles, a baguette with a face, or a cupcake with frosting. You could even create an entire bakery collection! Happy crocheting, and bon appétit!