September 18, 2026
Pastel Plush Dragon – A Soft & Cuddly Crochet Pattern
Meet this dreamy, long-bodied dragon! Featuring a soft yellow plush body, a flowing mane of purple faux fur, and delicate wings, this project combines texture and cuteness. It’s perfect as a comfort toy or a unique decorative piece.
Jump to pattern instructions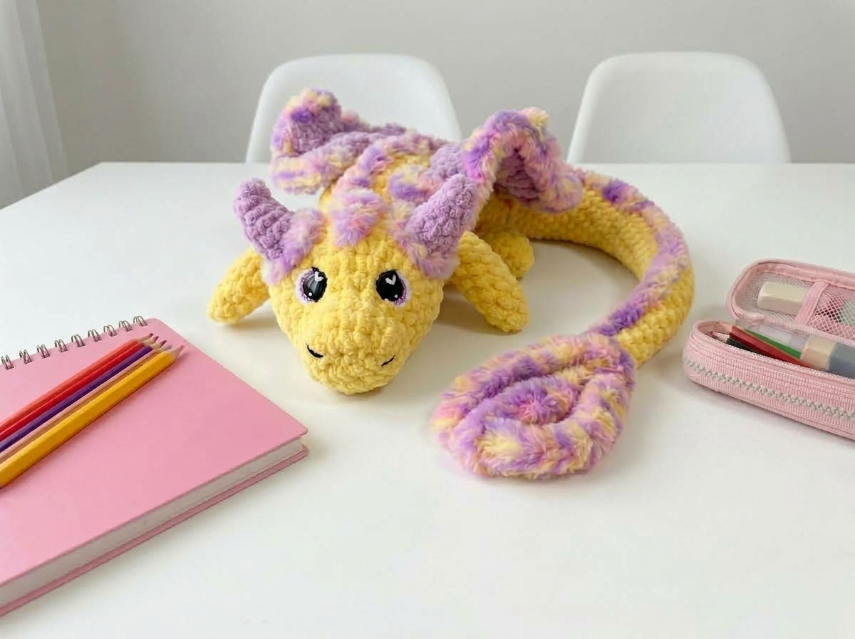
Pastel Plush Dragon – Complete Step-by-Step Pattern
1. Gathering Your Supplies
To achieve the incredibly soft look in the photo, you need specific yarn types.
- Yarn:
- Yellow: Plush/Chenille yarn (e.g., Himalaya Dolphin Baby, YarnArt Dolce) for the main body (approx. 150-200g).
- Purple/Variegated: Faux fur or "Eyelash" yarn (e.g., YarnArt Himalaya Dolphin Baby in a variegated colorway, or a distinct eyelash yarn) for the mane, wings, and tail fin (approx. 50-100g).
- Hooks:
- 4.0 mm or 4.5 mm for the plush yarn (check label).
- 5.0 mm or 6.0 mm for the faux fur yarn (it's often thicker/harder to see stitches).
- Notions:
- Large safety eyes (12mm - 14mm) with glitter if possible.
- Black embroidery floss (for eyelashes and mouth).
- Poly-fil stuffing.
- Tapestry needle (large eye for plush yarn).
- Scissors.
- Stitch markers (essential for plush yarn!).
What you'll master: Working with two different textures of yarn and assembling a long-form character.
2. Abbreviations & Special Techniques
- MR: Magic ring
- ch: Chain
- sc: Single crochet
- inc: Increase (2 sc in one stitch)
- dec: Decrease (2 sc crocheted together)
- sl st: Slip stitch
- st(s): Stitch(es)
Pro Tip: Plush yarn is slippery. Use a stitch marker for the first stitch of every round and count your stitches constantly!
3. The Head (Yellow Plush)
We start at the snout and work back.
- R1: 6 sc in MR (6)
- R2: 6 inc (12)
- R3: (1 sc, inc) x 6 (18)
- R4: (2 sc, inc) x 6 (24)
- R5-8: 24 sc (24) [4 rows]
- Eye Placement: Insert safety eyes between R6 and R7, spaced about 6-8 stitches apart.
- R9: (2 sc, dec) x 6 (18)
- R10: 18 sc (18)
- Finishing: Fasten off, leaving a long tail. Stuff the head firmly. Do not close the hole completely; we will attach the body.
What you'll master: Shaping a rounded head for a long toy.
4. The Body (Yellow Plush)
This is a long, snake-like tube.
- R1: 6 sc in MR (6)
- R2: 6 inc (12)
- R3: (1 sc, inc) x 6 (18)
- R4-40: 18 sc (18) [37 rows]
- Note: This creates the long body. You can make it longer or shorter depending on your preference.
- Finishing: Fasten off, leaving a tail. Stuff the body lightly (it should be floppy, not stiff).
What you'll master: Creating a long, uniform tube.
5. The Legs (Yellow Plush, Make 4)
Tiny little nubs for the dragon to rest on.
- R1: 6 sc in MR (6)
- R2-6: 6 sc (6) [5 rows]
- Finishing: Fasten off, leaving a tail. Stuff very lightly. Flatten the top for sewing.
What you'll master: Creating small, uniform appendages.
6. The Fluffy Accents (Purple Variegated Faux Fur)
Note: Faux fur yarn is tricky. If you can't see the stitches, just estimate or use a larger hook.
The Mane/Spines:
- Instructions: We will make a long strip to sew down the back.
- Chain: Ch 40 (or measure from the top of the head to the middle of the back).
- Row 1: Sc in 2nd ch from hook, ch 3, sc in next ch. Repeat across. This creates a bumpy, spine-like texture.
- Finishing: Fasten off.
The Wings (Make 2):
- Instructions: Ch 15.
- Row 1: Sc in 2nd ch, hdc in next 3, dc in next 4, hdc in next 3, sc in last 4.
- Row 2: Ch 1, turn. Work a border of sc around the whole shape to make it neat.
- Finishing: Fasten off.
The Tail Fin:
- Instructions: Similar to the wings but larger and flatter.
- Chain: Ch 20.
- Row 1: Sc across, working 3 sc in the last chain. Sc down the other side.
- Row 2-3: Sc around to build height.
- Finishing: Fasten off.
What you'll master: Working with difficult faux fur yarn.
7. Assembly & The Magic of Details
Now for the most rewarding part: bringing your dragon to life!
- Head to Body: Sew the head securely to one end of the long body tube.
- Legs: Sew the four legs to the underside of the front part of the body (near the head) so the dragon can lie flat.
- The Mane: Pin the purple spine strip along the top of the head and down the back of the body. Sew it securely in place.
- Wings: Sew the wings to the sides of the body, just behind the head/legs.
- Tail Fin: Sew the large tail fin to the very end of the body tube.
- Face Details:
- Use black embroidery floss to add long, dramatic eyelashes to the safety eyes (as seen in the photo).
- Embroider a small, cute "w" shaped mouth below the eyes.
What you'll master: Multi-step assembly and mixing textures.
Final Section: Where to Go from Here
Congratulations! You’ve just crafted a dreamy Pastel Plush Dragon. This project is incredibly soft and satisfying to make.
From here, try experimenting with different color combinations! You could make a "Fire Dragon" with red plush and orange fur, or an "Ice Dragon" with white plush and blue fur. Happy crocheting, and enjoy your new magical friend!