October 2, 2026
Confetti Hearts Blanket
This blanket looks like a field of tiny rainbow hearts scattered across a soft oatmeal sky. Each little heart is stitched in a different shimmering color, with pinks, purples, teals, oranges, and golds peeking out in neat rows that shift back and forth like confetti. It is simple single crochet worked flat, with a small heart chart you repeat over and over, so it is a lovely way to use up sparkly scrap yarn. Perfect for a baby, a cozy lap, or the back of the couch. Pour something warm, pick your favorite colors, and let us scatter some hearts.
Jump to pattern instructions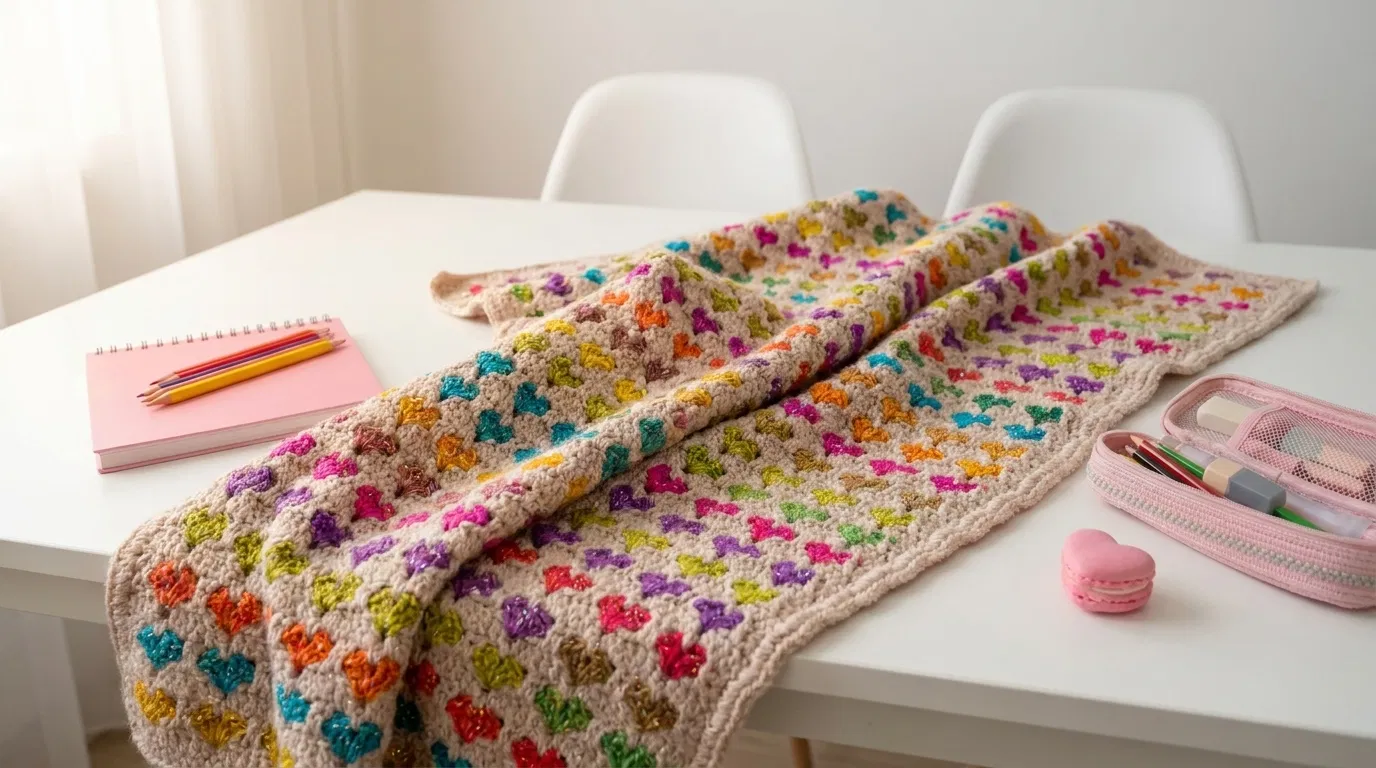
Confetti Hearts Blanket
Difficulty: Intermediate (only single crochet, but it uses color changes and a simple chart)
Finished Size: About 22 inches wide and 38 inches long (56 x 97 cm), a baby or lap blanket size.
Time to Complete: 25 to 30 hours, in easy, relaxing sessions.
What You Will Need
Yarn:
- Oatmeal or beige (B), about 850 yards (780 m). This is the background and the border.
- Assorted sparkly or metallic scraps for the hearts (H), about 100 yards (90 m) in total. Use 8 to 10 colors, such as hot pink, purple, teal, orange, gold, lime green, red, and magenta.
- Tip: Use a DK weight cotton blend or acrylic for the background. For the hearts, a yarn with a little sparkle gives the glittery look in the photo. Make sure the heart yarns are about the same thickness as the background yarn, so the fabric stays even.
Tools:
- 4.0 mm (G/6) crochet hook
- Small bobbins or clothespins for the heart colors (optional but helpful)
- Yarn needle with a large eye for weaving in ends
- Stitch markers
- Sharp scissors
- Blocking mats and pins
Gauge: 18 stitches and 20 rows in single crochet = 4 x 4 inches (10 x 10 cm). Please make a swatch, since the gauge decides the size of your blanket.
The Basics (US Terms)
- ch = chain
- sc = single crochet
- sl st = slip stitch
- st(s) = stitch(es)
- B = background color
- H = heart color
- RS / WS = right side / wrong side
- The blanket is worked flat in rows. Ch 1 at the start of each row does not count as a stitch.
The Heart Chart
Each heart is 7 stitches wide and 6 rows tall. The chart is worked from the bottom up. In the chart, 1 means a heart stitch and 0 means a background stitch.
| Heart row | Chart (7 stitches) | |---|---| | 6 (top) | 0 1 1 0 1 1 0 | | 5 | 1 1 1 1 1 1 1 | | 4 | 1 1 1 1 1 1 1 | | 3 | 0 1 1 1 1 1 0 | | 2 | 0 0 1 1 1 0 0 | | 1 (bottom) | 0 0 0 1 0 0 0 |
The heart is the same from left to right, so you read the chart the same way on RS and WS rows.
Color Change Basics
The hearts are worked with the intarsia method, which means each heart has its own small piece of yarn, and nothing is carried across the back.
- Cut a 1 yard (1 m) length of heart yarn for each heart in the row. Wind each one on a bobbin or clothespin if you like.
- To change colors, work the last stitch before the new color until 2 loops remain on the hook. Then pull the new color through to finish the stitch.
- When you change back to the background, do the same thing, and twist the old and new yarns around each other once on the wrong side. This keeps the colors connected and prevents holes.
- Leave the background yarn attached for the whole row, and drop it at the edge of each heart.
- Use a new length of yarn for each heart band. When you finish the 6 heart rows, cut the heart yarn and weave in the ends on the wrong side.
Easier option: If you do not want to juggle lots of bobbins, work the whole blanket in the background color and add the hearts afterwards with duplicate stitch (surface embroidery over the single crochet stitches) using the same chart. The look is nearly the same, and the weaving is much simpler.
Let Us Get Started
The blanket is made of 14 bands of 12 rows each. Each band has 6 heart rows and 6 plain background rows. Band A and Band B alternate, so the hearts stagger back and forth like the photo.
Part 1: The Blanket
Foundation and the first rows:
- Foundation: With the background color, ch 99.
- Row 1 (WS): Sc in the 2nd ch from the hook and in each chain across. (98 stitches)
- Rows 2 to 6: Ch 1, turn. Sc in each stitch across. (98 stitches) This is the plain bottom edge, which gives the first hearts some space.
Band A (12 rows):
- Heart rows 1 to 6: Each row is worked like this. Ch 1, turn. Sc in 3 stitches in B. Work the heart chart row across the next 7 stitches (heart color for the 1s, B for the 0s). (Sc in 7 stitches in B, work the chart row across the next 7 stitches) 6 times. Sc in the last 4 stitches in B. (98 stitches, 7 hearts)
- Rows 7 to 12: Ch 1, turn. Sc in each stitch across in B. (98 stitches)
Band B (12 rows):
- Heart rows 1 to 6: Each row is worked like this. Ch 1, turn. Sc in 10 stitches in B. Work the chart row across the next 7 stitches. (Sc in 7 stitches in B, work the chart row across the next 7 stitches) 5 times. Sc in the last 11 stitches in B. (98 stitches, 6 hearts)
- Rows 7 to 12: Ch 1, turn. Sc in each stitch across in B. (98 stitches)
Repeating the bands:
- Work Band A, then Band B, and repeat until you have worked 14 bands in total (7 Band A and 7 Band B). That is 168 rows.
- Work 4 more rows in plain B for the top edge. (98 stitches)
- Fasten off and weave in all ends.
Part 2: The Border
Worked with the background color.
- Round 1: With the right side facing, join B in any corner. Ch 1, then work 3 sc in the corner. Work sc evenly along each side, placing 1 sc in each stitch along the top and bottom edges, and about 1 sc in each row along the side edges. Work 3 sc in each corner. Join with a sl st to the first sc.
- Round 2: Ch 1. Sc in each stitch around, working 3 sc in each corner stitch. Join with a sl st.
- Round 3: Repeat Round 2.
- Round 4 (reverse sc edge): Ch 1, do not turn. Work 1 reverse sc (working left to right) in each stitch around. Join with a sl st and fasten off.
- Weave in all remaining ends.
Assembly and Finishing
Weaving in Ends:
- Weave in each heart's ends on the wrong side, going through the stitches of the same color for about 1 inch (2.5 cm), then back again.
- Trim the ends close to the fabric, but not too close, so they do not pop out.
Blocking:
- Pin the blanket flat on blocking mats, and gently spray or steam it. Be careful with metallic yarns, and use a low heat setting or a damp cloth.
- Let it dry fully. Blocking evens out the stitches and makes the hearts lie flat.
A Few Friendly Tips
- Swatch first: Make a 5 x 5 inch swatch with one heart and check your gauge. If you have too many stitches per inch, go up a hook size. If you have too few, go down.
- Count as you go: Count your stitches at the end of each heart row, and use stitch markers at the start of each heart for the first few rows. They are a lifesaver.
- Keep the tension even: Intarsia can pucker if the yarns are pulled too tight. Keep the twist at the back loose and gentle.
- Color planning: Lay out your heart colors before you start. Spread them out so no two matching hearts sit next to each other, and keep a few of the brightest ones in the center.
- Different sizes: For a wider blanket, add 14 stitches to the foundation chain (one more heart per row). For a longer blanket, add more bands. For a baby blanket, work 7 to 8 bands.
- Make it your own: Try one color for all the hearts, such as pink and white for a nursery, or a pastel rainbow on a cream background. You can also use a dark background to make the colors glow.
- Care: Machine wash gently on a cool setting and lay flat to dry. Metallic yarns can be delicate, so check the label before washing.
I hope you enjoy making this sweet and sparkly blanket. It is such a happy project, and every little heart makes it more fun to watch it grow.
If you run into any trouble or just want to share how your blanket turned out, please reach out. I love seeing what you create.
Happy crocheting!