September 17, 2026
Cuddly Mint Plush Dragon – A Soft & Huggable Amigurumi Pattern
Create the ultimate cuddle buddy with this adorable Mint Plush Dragon! Made with soft chenille yarn, this dragon features huge, expressive glitter eyes, cute brown horns, and unique wings with a smooth felt center for structure. It’s a delightful intermediate project that results in an incredibly soft, huggable friend.
Jump to pattern instructions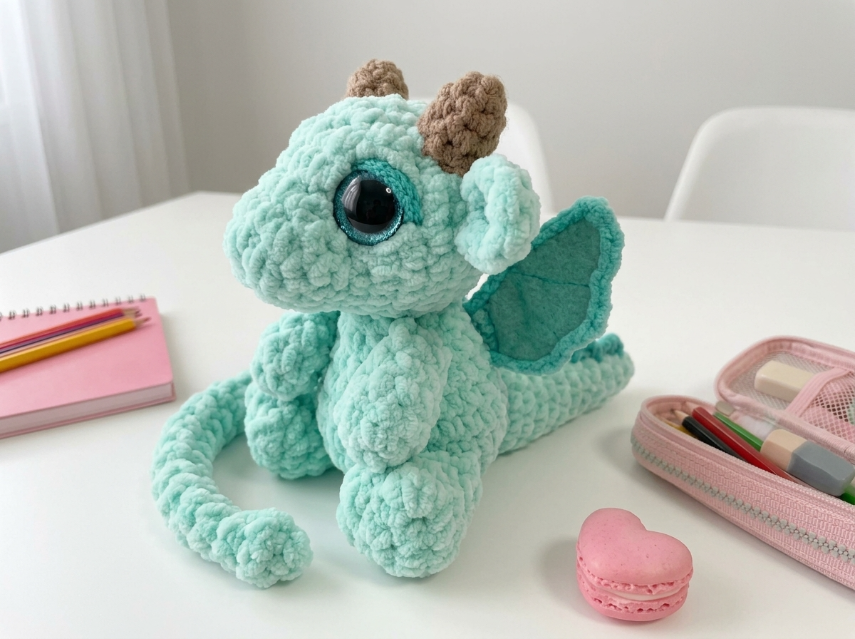
Cuddly Mint Plush Dragon – Complete Step-by-Step Pattern
1. Gathering Your Supplies
The secret to this dragon's irresistible look is the yarn texture. You must use plush yarn!
- Yarn: Chenille/Velvet yarn (e.g., Himalaya Dolphin Baby, YarnArt Dolce, Bernat Blanket).
- Mint Green: Main color (approx. 200g).
- Brown/Tan: For horns (small amount).
- Teal/Darker Green: For wing accents (small amount).
- Hook: 4.0 mm or 4.5 mm (Plush yarn is thick, so use a hook that matches the yarn label, usually larger than standard cotton).
- Notions:
- Large Safety Eyes: 16mm - 20mm black safety eyes (preferably with a glitter finish like in the photo).
- Felt Sheet: A piece of teal felt for the wing membranes (this gives them that flat, structured look seen in the photo).
- Poly-fil stuffing.
- Tapestry needle (large eye for plush yarn).
- Scissors.
- Stitch markers (essential for plush yarn as stitches are hard to see).
What you'll master: Working with slippery plush yarn, inserting large safety eyes, and combining crochet with felt for structure.
2. Abbreviations & Special Techniques
- MR: Magic ring
- ch: Chain
- sc: Single crochet
- inc: Increase (2 sc in one stitch)
- dec: Decrease (2 sc crocheted together invisibly - Note: with plush yarn, a standard "invisible decrease" can be tricky. Just sc 2 together is fine.)
- sl st: Slip stitch
- st(s): Stitch(es)
Pro Tip: Plush yarn is slippery and stitches can be hard to see. Use a stitch marker for the first stitch of every round and count your stitches constantly!
3. The Head (Mint Green)
The head is large and round to accommodate those big eyes.
- R1: 6 sc in MR (6)
- R2: 6 inc (12)
- R3: (1 sc, inc) x 6 (18)
- R4: (2 sc, inc) x 6 (24)
- R5: (3 sc, inc) x 6 (30)
- R6: (4 sc, inc) x 6 (36)
- R7: (5 sc, inc) x 6 (42)
- R8-13: 42 sc (42) [6 rows]
- Eye Placement: Insert your large safety eyes between R9 and R10, spaced about 6-8 stitches apart. Secure the washers tightly on the inside.
- R14: (5 sc, dec) x 6 (36)
- R15: (4 sc, dec) x 6 (30)
- R16: (3 sc, dec) x 6 (24)
- Stuffing: Stuff the head firmly now. It should be a solid sphere.
- R17: (2 sc, dec) x 6 (18)
- Finishing: Fasten off, leaving a long tail. Do not close the hole completely yet; we will attach the body.
What you'll master: Shaping a large, sturdy head for heavy safety eyes.
4. The Body (Mint Green)
We work the body from the bottom up so it sits flat.
- R1: 6 sc in MR (6)
- R2: 6 inc (12)
- R3: (1 sc, inc) x 6 (18)
- R4: (2 sc, inc) x 6 (24)
- R5: (3 sc, inc) x 6 (30)
- R6: (4 sc, inc) x 6 (36)
- R7-12: 36 sc (36) [6 rows]
- Note: This creates the round belly.
- R13: (4 sc, dec) x 6 (30)
- R14: 30 sc (30)
- Finishing: Fasten off, leaving a long tail. Stuff the body firmly.
What you'll master: Creating a stable base for a sitting figure.
5. The Wings (Mint & Teal Felt)
To get that specific look in the photo where the wing center is smooth and flat, we use felt!
- Step 1 (The Felt): Cut two wing shapes out of your teal felt sheet. They should look like a teardrop or a bat wing shape, approx. 8-10 cm tall.
- Step 2 (The Border): With Mint yarn, join to the edge of the felt shape.
- Row 1: Work a round of sc evenly around the entire edge of the felt shape. This covers the raw edge and makes it soft.
- Row 2 (Optional Texture): You can add a "crab stitch" (reverse single crochet) border for a nice ridge, or just fasten off.
- Finishing: Fasten off. Repeat for the second wing.
What you'll master: Combining mixed media (felt and yarn) for professional results.
6. The Limbs & Tail (Mint Green)
Front Legs (Make 2):
- R1: 6 sc in MR (6)
- R2: 6 inc (12)
- R3-6: 12 sc (12) [4 rows]
- Finishing: Fasten off. Stuff lightly. Flatten the top.
Back Legs (Make 2):
- R1: 6 sc in MR (6)
- R2: 6 inc (12)
- R3: (1 sc, inc) x 6 (18)
- R4-7: 18 sc (18) [4 rows]
- Finishing: Fasten off. Stuff firmly. These need to support the sitting weight.
Tail:
- R1: 6 sc in MR (6)
- R2-30: 6 sc (6) [29 rows]
- Note: This makes a long, snake-like tail.
- Finishing: Fasten off. Stuff very lightly so it can curl.
What you'll master: Creating varied limb sizes for a sitting pose.
7. The Horns & Ears
Horns (Brown, Make 2):
- R1: 4 sc in MR (4)
- R2: 4 inc (8)
- R3: 8 sc (8)
- R4: (2 sc, dec) x 2 (6)
- Finishing: Fasten off. Stuff lightly.
Ears (Mint, Make 2):
- R1: 4 sc in MR (4)
- R2: 4 inc (8)
- R3: 8 sc (8)
- Finishing: Fasten off. Flatten the bottom.
8. Assembly & The Magic of Details
Now for the most rewarding part: bringing your dragon to life!
- Head to Body: Sew the head securely to the top of the body. Angle it slightly forward so the dragon looks like it's looking up.
- Limbs:
- Sew the back legs to the bottom sides of the body so the dragon sits in a "V" shape.
- Sew the front legs to the front of the chest/belly area.
- Tail: Sew the tail to the back of the body, between the back legs. Curl it to the side as seen in the photo.
- Wings: Pin the wings to the back of the dragon, high up on the shoulders. Sew them securely. The felt will help them stand up a bit.
- Horns & Ears:
- Sew the brown horns to the top of the head, slightly angled outward.
- Sew the ears just below and to the side of the horns.
- Final Touches:
- If your safety eyes don't have glitter, you can use a little fabric paint or glitter glue to add sparkle to the pupils!
- Fluff the yarn with your fingers to hide any seams.
What you'll master: Multi-step assembly and posing a plush figure.
Final Section: Where to Go from Here
Congratulations! You’ve just crafted a super-soft Cuddly Mint Plush Dragon. This project is incredibly satisfying because the plush yarn works up so fast and hides any imperfections in your stitching.
From here, try experimenting with different colors! You could make a "Sunset Dragon" with pink and orange yarn, or a "Midnight Dragon" with dark blue and purple. You could even make a tiny version as a keychain using standard cotton yarn. Happy crocheting, and enjoy your new best friend!