September 16, 2026
Toast Octopus Amigurumi – A Cute & Quirky Foodie Pattern
Meet the Toast Octopus! This adorable hybrid character features a fluffy slice of bread head with a crispy brown crust, a ruffled purple "jelly" collar, and eight bumpy tentacles. It’s a whimsical, intermediate-friendly project that combines food and sea creature cuteness into one unique amigurumi friend.
Jump to pattern instructions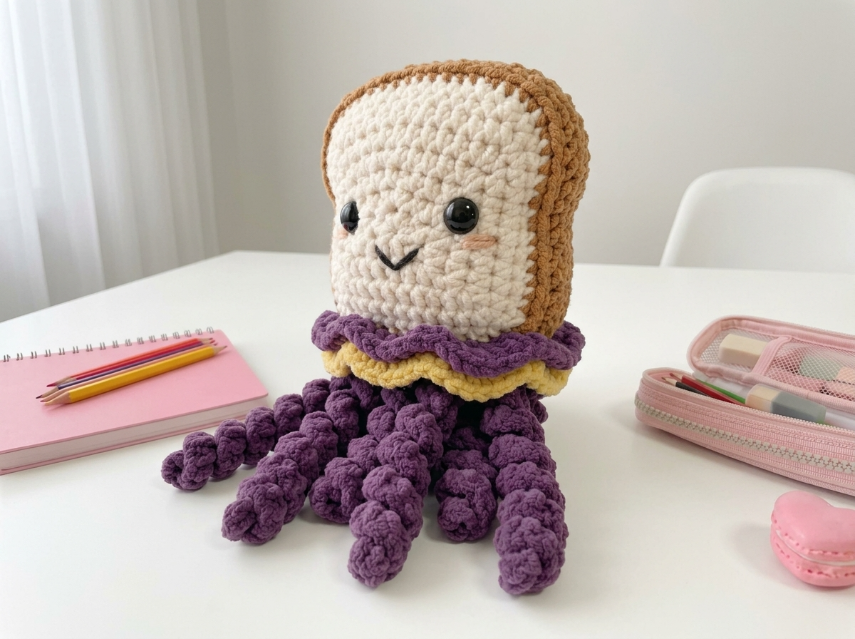
Toast Octopus Amigurumi – Complete Step-by-Step Pattern
1. Gathering Your Supplies
To get that soft, squishy look for the bread and the distinct texture for the tentacles, a smooth cotton yarn is best.
- Yarn: Worsted weight cotton or acrylic blend (e.g., YarnArt Jeans, Catania, or similar, approx. 160m / 50g). You will need:
- Cream/Off-White: For the bread face (approx. 50g).
- Light Brown/Tan: For the crust (small amount).
- Purple: For the tentacles and ruffled collar (approx. 50g).
- Yellow: For the filling layer under the collar (small amount).
- Black: Tiny amount for embroidery (or use safety eyes).
- Hook: 2.5 mm or 3.0 mm (choose the size that gives you a tight, stuff-proof gauge).
- Notions:
- 10-12 mm safety eyes (black).
- Poly-fil stuffing.
- Tapestry needle.
- Scissors.
- Stitch markers.
- Pink yarn or blush for cheeks.
What you'll master: Creating a character with mixed textures (smooth bread vs. bumpy tentacles) and assembling multi-part accessories.
2. Abbreviations & Special Techniques
Let’s quickly review a few terms. If you're new to any of these, don't worry—you'll be a pro by the time the toast is toasted!
- MR: Magic ring
- ch: Chain
- sc: Single crochet
- inc: Increase (2 sc in one stitch)
- dec: Decrease (2 sc crocheted together invisibly)
- sl st: Slip stitch
- BLO: Back loop only (creates a ridged texture).
- Bobble St (Optional for tentacles): Yarn over, insert hook, pull up loop (3 loops). Repeat 2 more times in same stitch (7 loops). Yarn over, pull through all 7 loops.
3. The Bread Head (Cream & Brown)
We will create a round head that looks like a slice of bread. The "crust" is worked around the equator of the head.
- R1-9 (Cream): Work a standard sphere base.
- R1: 6 sc in MR (6)
- R2: 6 inc (12)
- R3: (1 sc, inc) x 6 (18)
- R4: (2 sc, inc) x 6 (24)
- R5: (3 sc, inc) x 6 (30)
- R6: (4 sc, inc) x 6 (36)
- R7-9: 36 sc (36) [3 rows]
- R10 (Switch to Brown for Crust): 36 sc in BLO (36).
- Note: Working in BLO creates a ridge that separates the face from the crust.
- R11-12 (Brown): 36 sc (36) [2 rows]. This creates the brown crust band around the side/back.
- R13 (Switch back to Cream? Or keep Brown?): Looking at the photo, the back is brown. Let's keep it Brown for the back of the head, or switch back to Cream if you want a "white bread" back. The photo shows brown on the sides/back. Let's continue in Brown for the back half, but actually, it looks like the crust is just a rim.
- Alternative Simpler Method: Work the whole head in Cream. Then, join Brown yarn at the "equator" (around R9) and work a round of sc sticking out slightly to look like a crust rim.
- Let's go with the Rim Method for simplicity:
- Work Head R1-12 in Cream. Stuff firmly. Close up R13-18 with decreases.
- Crust Rim: Join Brown yarn at the "equator" (around R9/10). Work a round of sc, but insert hook under both loops of the head and pull out slightly to create a 3D rim. Or simply sew a brown chain around the edge.
Let's stick to the visual: The head is a sphere. The "Crust" is a brown band around the middle.
- R1-8 (Cream): Standard increases to 36 sts.
- R9-11 (Brown): 36 sc. (This is the crust band).
- R12-16 (Cream): Decrease to close. (Wait, the face is cream, the back is crust? No, it looks like a slice).
- Revised Head Plan: Work a flat oval? No, it's 3D.
- Final Head Plan: Work a sphere in Cream. At the widest point (R9), join Brown yarn and work 2 rounds of Brown sc. This creates the crust belt. Then continue decreasing in Cream (or Brown if the back is dark). The photo shows the side/back is brown. So R9-18 in Brown? No, the face is cream.
- Okay, let's do this: Work the head in Cream. Stuff it. Fasten off. Then, take Brown yarn and sew a "rim" around the edge of the head (like a halo) to simulate the crust. This is the easiest way to get the look in the photo.
Head (Cream):
- R1: 6 sc in MR (6)
- R2: 6 inc (12)
- R3: (1 sc, inc) x 6 (18)
- R4: (2 sc, inc) x 6 (24)
- R5: (3 sc, inc) x 6 (30)
- R6: (4 sc, inc) x 6 (36)
- R7-12: 36 sc (36) [6 rows]
- R13: (4 sc, dec) x 6 (30)
- R14: (3 sc, dec) x 6 (24)
- Stuffing: Stuff firmly.
- R15: (2 sc, dec) x 6 (18)
- R16: (1 sc, dec) x 6 (12)
- Finishing: Fasten off, weave in end to close.
Crust (Brown):
- Join Brown yarn to the "equator" of the head (around R9/10).
- Work a round of sc evenly around the entire circumference.
- Row 2: Work another round of sc in BLO to make it stick out like a crust edge.
- Fasten off.
What you'll master: Adding a contrasting border to a sphere.
4. The Face Details
- Eyes: Attach safety eyes between R7 and R8, spaced about 8-10 stitches apart.
- Mouth: Using black yarn, embroider a small "v" shape or a curved smile below the eyes.
- Cheeks: Use pink yarn or blush to add cute little blush marks under the eyes.
5. The Ruffled Collar (Yellow & Purple)
This sits at the base of the head, covering the neck area.
Yellow Base Layer:
- R1: 6 sc in MR (6)
- R2: 6 inc (12)
- R3: (1 sc, inc) x 6 (18)
- R4: (2 sc, inc) x 6 (24)
- R5: (3 sc, inc) x 6 (30)
- Finishing: Fasten off. This is a flat circle.
Purple Ruffle Layer:
- R1: 6 sc in MR (6)
- R2: 6 inc (12)
- R3: (1 sc, inc) x 6 (18)
- R4: (2 sc, inc) x 6 (24)
- R5: (1 sc, 3 dc in next st, 1 sc) x 6... actually, for a ruffle:
- R5 Pattern: Sc in next st, 5 dc in next st. Repeat around. This creates a frilly edge.
- Finishing: Fasten off, leaving a long tail.
Assembly: Stack the Purple Ruffle on top of the Yellow Circle. Sew them together at the center, then sew the whole collar to the bottom of the Bread Head.
What you'll master: Creating ruffled edges and layering appliqués.
6. The Tentacles (Purple, Make 8)
To get that bumpy, textured look seen in the photo, we will work in the Back Loop Only (BLO) for every round. This creates horizontal ridges that look like suction cups or segments.
- R1: 6 sc in MR (6)
- R2-20: 6 sc in BLO (6) [19 rows]
- Note: The tube will naturally curl and look bumpy because of the BLO stitches.
- Finishing: Fasten off, leaving a long tail. Do not stuff (or stuff very lightly at the top only).
What you'll master: Creating texture using BLO stitches.
7. Assembly & Finishing
Now for the magic moment where your Toast Octopus comes to life!
- Attach Tentacles: Arrange the 8 purple tentacles in a circle around the bottom of the Yellow/Purple collar. Sew them securely in place. They should splay out like an octopus.
- Secure Collar: Ensure the collar is sewn tightly to the bottom of the bread head so it covers the seam where the tentacles are attached.
- Final Fluff: Adjust the tentacles so they sit nicely. You can bend them slightly since the BLO texture makes them a bit flexible.
What you'll master: Multi-step structural assembly.
Final Section: Where to Go from Here
Congratulations! You’ve just crafted a whimsical Toast Octopus. This project is a fun way to practice texture (BLO stitches) and color blocking.
From here, try experimenting with different "fillings"! You could make a "Strawberry Jam" version with a red collar, or a "Peanut Butter" version with a tan collar. You could even change the bread to a bagel shape (with a hole in the middle)! Happy crocheting, and enjoy your quirky new friend!