September 16, 2026
One-Eyed Monster Amigurumi – A Cute & Quirky Crochet Pattern
Say hello to this adorable, big-eyed monster! Featuring a bright lime-green body, a giant expressive eye, tiny tan horns, and a sweet little smile, this pattern is a fun and fast project. It’s perfect for beginners looking to practice their amigurumi skills or for anyone who loves a touch of monster magic in their collection.
Jump to pattern instructions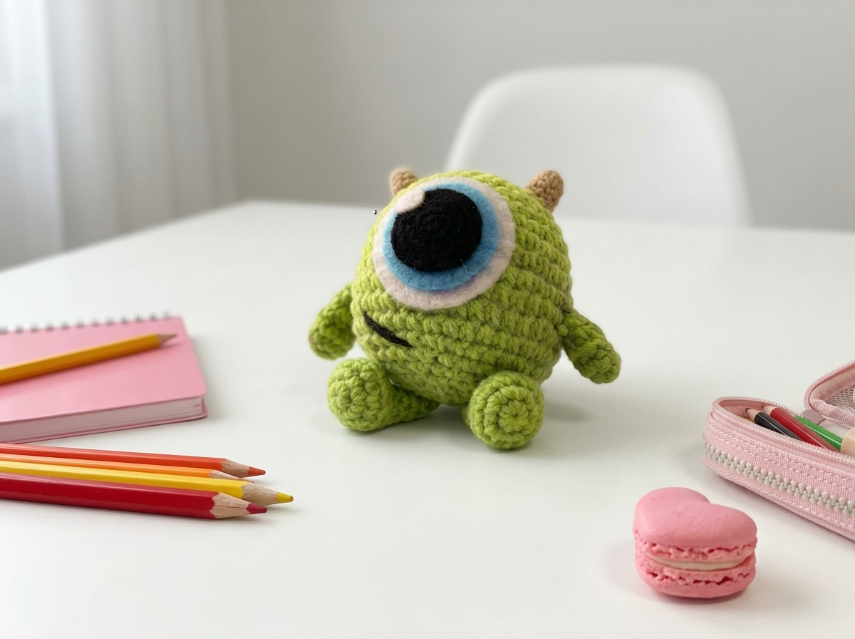
One-Eyed Monster Amigurumi – Complete Step-by-Step Pattern
1. Gathering Your Supplies
To get that clean, classic amigurumi look, a smooth cotton or cotton-blend yarn is highly recommended.
- Yarn: Worsted weight cotton or acrylic blend (e.g., YarnArt Jeans, Catania, or similar, approx. 160m / 50g). You will need small amounts of:
- Lime Green: For the head, body, arms, and legs (approx. 50g)
- White: For the eye sclera (small amount)
- Light Blue: For the eye iris (small amount)
- Black: For the pupil and mouth embroidery (tiny amount)
- Light Brown/Tan: For the little horns (tiny amount)
- Hook: 2.5 mm or 3.0 mm (choose the size that gives you a tight, stuff-proof gauge).
- Notions:
- Poly-fil stuffing
- Tapestry needle
- Scissors
- Stitch markers
- Optional: Felt circles in white, blue, and black (if you prefer not to crochet the eye layers).
What you'll master: Creating a classic spherical amigurumi shape, working with multiple colors for appliqués, and adding character-defining details.
2. Abbreviations & Special Techniques
Let’s quickly review a few terms. If you're new to any of these, don't worry—you'll be a pro by the time your monster is complete!
- MR: Magic ring
- ch: Chain
- sc: Single crochet
- inc: Increase (2 sc in one stitch)
- dec: Decrease (2 sc crocheted together invisibly)
- sl st: Slip stitch
3. The Head & Body (Lime Green)
For this cute monster, the head and body are worked as one continuous, round piece!
- R1: 6 sc in MR (6)
- R2: 6 inc (12)
- R3: (1 sc, inc) x 6 (18)
- R4: (2 sc, inc) x 6 (24)
- R5: (3 sc, inc) x 6 (30)
- R6: (4 sc, inc) x 6 (36)
- R7-12: 36 sc (36) [6 rows]
- Note: This creates the nice, round, chubby shape.
- R13: (4 sc, dec) x 6 (30)
- R14: (3 sc, dec) x 6 (24)
- Stuffing: Begin stuffing the body firmly now. Make sure it's evenly filled so it sits nicely.
- R15: (2 sc, dec) x 6 (18)
- R16: (1 sc, dec) x 6 (12)
- Finishing: Fasten off, leaving a long tail. Weave the tail through the front loops of the remaining stitches and pull tight to close the hole. Hide the end inside.
What you'll master: Spiral increase/decrease sequences and achieving a flawless, spherical shape.
4. The Giant Eye (White, Blue, Black)
The star of the show! We will create this using layered flat circles. (Alternatively, you can cut these shapes out of felt).
White Sclera:
- R1: 6 sc in MR (6)
- R2: 6 inc (12)
- R3: (1 sc, inc) x 6 (18)
- R4: (2 sc, inc) x 6 (24)
- Finishing: Fasten off, leaving a tail for sewing.
Blue Iris:
- R1: 6 sc in MR (6)
- R2: 6 inc (12)
- R3: (1 sc, inc) x 6 (18)
- Finishing: Fasten off.
Black Pupil:
- R1: 6 sc in MR (6)
- R2: 6 inc (12)
- Finishing: Fasten off.
What you'll master: Creating layered appliqués for dimensional details.
5. The Little Horns (Light Brown, Make 2)
These tiny nubs give the monster its quirky charm.
- R1: 4 sc in MR (4)
- R2-4: 4 sc (4) [3 rows]
- Finishing: Fasten off, leaving a long tail. Stuff very lightly (or not at all) and flatten the bottom for sewing.
What you'll master: Creating small, uniform 3D accessories.
6. The Arms (Lime Green, Make 2)
Tiny, cute arms that stick out from the sides.
- R1: 6 sc in MR (6)
- R2-5: 6 sc (6) [4 rows]
- Finishing: Fasten off, leaving a long tail. Do not stuff. Flatten the top to sew.
What you'll master: Creating simple, un-stuffed appendages.
7. The Legs/Feet (Lime Green, Make 2)
Round little feet that help the monster sit upright.
- R1: 6 sc in MR (6)
- R2: 6 inc (12)
- R3-5: 12 sc (12) [3 rows]
- Finishing: Fasten off, leaving a long tail. Stuff firmly so the feet are solid.
What you'll master: Creating sturdy, stuffed bases for sitting figures.
8. Assembly & The Magic of Embroidery
Now for the most rewarding part: bringing your monster to life!
- Attach the Limbs:
- Sew the two legs to the bottom front of the body, spacing them evenly so the monster can sit.
- Sew the two arms to the sides of the body, roughly halfway down.
- Attach the Horns: Sew the two tan horns to the very top of the head, spaced slightly apart.
- The Eye: Stack the circles! Place the Blue Iris on top of the White Sclera, and the Black Pupil on top of the Blue. Sew this stack securely to the front-center of the face.
- Pro Tip: You can add a tiny white French knot or stitch to the black pupil for a cute "catchlight" sparkle!
- The Mouth: Thread your tapestry needle with black yarn. Embroider a simple, sweet curved smile just below the giant eye.
What you'll master: Multi-step structural assembly and expressive surface embroidery.
Final Section: Where to Go from Here
Congratulations! By completing this One-Eyed Monster, you've practiced foundational spiral shaping, creating appliqués, and adding personality through facial details. This project is a fantastic confidence-builder and makes a wonderfully quirky gift.
From here, try experimenting with different colors to create a whole "monster squad"! You could make a blue one with purple horns, or a pink one with yellow spikes. You could even add tiny crochet teeth to the mouth for a goofier look. Happy crocheting, and enjoy your new little friend!