September 16, 2026
Remy the Chef Mouse Amigurumi – A Culinary Crochet Pattern
"Anyone can cook!" Bring a little bit of magic to your kitchen with this adorable Chef Mouse. Featuring a tall white toque, a cute grey snout, and a trusty wooden spoon, this pattern is a delightful intermediate project. It’s perfect for fans of cooking movies or anyone who loves a touch of whimsy in their home decor.
Jump to pattern instructions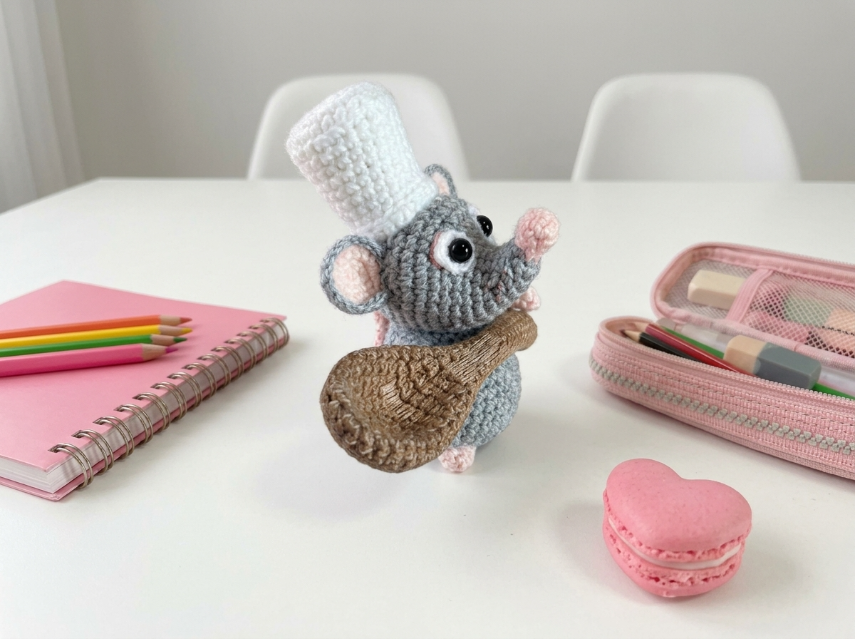
Remy the Chef Mouse – Complete Step-by-Step Pattern
1. Gathering Your Supplies
To get that soft, classic look, a smooth cotton yarn is best.
- Yarn: Worsted weight cotton or acrylic blend (e.g., YarnArt Jeans, Catania). You will need small amounts of:
- Grey: For the head, body, ears, and snout (approx. 50g).
- White: For the chef's hat (approx. 30g).
- Pink: For the inner ears, nose, and feet (tiny amount).
- Brown: For the wooden spoon (small amount).
- Black: For the eyes (tiny amount or safety eyes).
- Hook: 2.5 mm or 3.0 mm (choose the size that gives you a tight, stuff-proof gauge).
- Notions:
- 8-10 mm black safety eyes (or black embroidery floss).
- Poly-fil stuffing.
- Tapestry needle.
- Scissors.
- Stitch markers.
What you'll master: Creating a character with distinct proportions, working modular accessories (hat and spoon), and assembly.
2. Abbreviations & Special Techniques
- MR: Magic ring
- ch: Chain
- sc: Single crochet
- inc: Increase (2 sc in one stitch)
- dec: Decrease (2 sc crocheted together invisibly)
- sl st: Slip stitch
- BLO: Back loop only
3. The Head & Body (Grey)
We will work the head and body as one continuous piece to keep it sturdy.
- R1: 6 sc in MR (6)
- R2: 6 inc (12)
- R3: (1 sc, inc) x 6 (18)
- R4: (2 sc, inc) x 6 (24)
- R5: (3 sc, inc) x 6 (30)
- R6-10: 30 sc (30) [5 rows]
- Eye Placement: If using safety eyes, insert them now between R7 and R8, spaced about 6-8 stitches apart.
- R11: (3 sc, dec) x 6 (24)
- R12-15: 24 sc (24) [4 rows]
- Note: This section forms the lower body.
- R16: (2 sc, dec) x 6 (18)
- R17-18: 18 sc (18) [2 rows]
- Stuffing: Stuff the body and head firmly.
- Finishing: Fasten off, leaving a long tail. Weave the tail through the front loops of the remaining stitches and pull tight to close the bottom.
What you'll master: Shaping a pear-like body structure.
4. The Snout (Grey)
This gives the mouse its distinctive profile.
- R1: 4 sc in MR (4)
- R2: 4 inc (8)
- R3: (1 sc, inc) x 4 (12)
- R4-6: 12 sc (12) [3 rows]
- Finishing: Fasten off, leaving a long tail. Stuff lightly to make it round, then sew it to the front of the face, centered between the eyes and slightly lower.
What you'll master: Creating a 3D facial feature.
5. The Ears (Grey & Pink)
Outer Ear (Grey, Make 2):
- R1: 6 sc in MR (6)
- R2: 6 inc (12)
- R3: (1 sc, inc) x 6 (18)
- R4: 18 sc (18)
- Finishing: Fasten off, leaving a tail.
Inner Ear (Pink, Make 2):
- R1: 4 sc in MR (4)
- R2: 4 inc (8)
- R3: (1 sc, inc) x 4 (12)
- Finishing: Fasten off.
Assembly: Sew the pink circle onto the center of the grey circle. Then, pinch the bottom of the ear slightly and sew it to the top sides of the head.
What you'll master: Layering colors for detail.
6. The Chef's Hat (White)
A tall, cylindrical hat to make him look professional!
- R1: 6 sc in MR (6)
- R2: 6 inc (12)
- R3: (1 sc, inc) x 6 (18)
- R4: (2 sc, inc) x 6 (24)
- R5-15: 24 sc (24) [11 rows]
- Note: This creates the tall tube. You can add more rows for a taller hat.
- R16 (Brim): 24 sc in BLO (24). This creates a ridge at the bottom.
- R17: 24 sc (24).
- Finishing: Fasten off, leaving a tail. Stuff the top lightly so it holds its shape, then sew it securely to the top of the mouse's head.
What you'll master: Creating a cylinder shape and using BLO for structure.
7. The Wooden Spoon (Brown)
Every chef needs a tool!
- Handle: Ch 15. Sc in the 2nd ch from the hook and each ch across. (14 sc).
- Row 2-4: Ch 1, turn. Sc in each st across. (14 sc).
- The Bowl: Do not turn. Ch 3, work 4 sc in the last chain, then work sc evenly around the handle end to create an oval shape.
- Row 5 (Bowl depth): Work a round of sc around the oval to give it a little depth.
- Finishing: Fasten off.
Alternative Simple Spoon: Just crochet a long brown rectangle and a separate brown oval, then sew them together.
What you'll master: Creating flat accessories.
8. The Feet & Nose (Pink)
Feet (Make 2):
- R1: 6 sc in MR (6)
- R2: 6 inc (12)
- R3: 12 sc (12)
- Finishing: Fasten off. Stuff lightly and sew to the bottom front of the body.
Nose:
- Embroider a small pink oval or circle on the tip of the grey snout using pink yarn.
What you'll master: Small details and finishing touches.
9. Assembly & The Magic of Details
Now for the most rewarding part: bringing your Chef Mouse to life!
- Face: Sew the snout securely to the face. If you didn't use safety eyes, embroider two small black dots now.
- Ears: Sew the ears to the top of the head, just below where the hat will sit.
- Hat: Place the white hat on top of the head. Sew it down securely around the base.
- Feet: Sew the pink feet to the bottom of the body so the mouse can sit.
- The Spoon: You can sew the spoon into the mouse's "hands" (if you add small grey nubs for arms) or just prop it against him for a photo op!
What you'll master: Multi-step assembly and character styling.
Final Section: Where to Go from Here
Congratulations! You’ve just crafted a culinary masterpiece. This Chef Mouse is a charming addition to any kitchen shelf or desk.
From here, try experimenting with different accessories! You could make him a tiny apron, a whisk instead of a spoon, or even a little plate of cheese. You could also change the yarn colors to make a "Ratatouille" inspired blue-grey mouse or a brown field mouse. Happy crocheting, and bon appétit!