September 15, 2026
Dreamy Plush Unicorn – A Magical Crochet Pattern
Bring a touch of magic to your desk with this adorable plush unicorn! Featuring a soft white body, a whimsical curly teal mane, and a golden horn, this project is a delightful mix of textures. It’s a perfect intermediate project for creating a stunning decorative piece or a unique pencil topper.
Jump to pattern instructions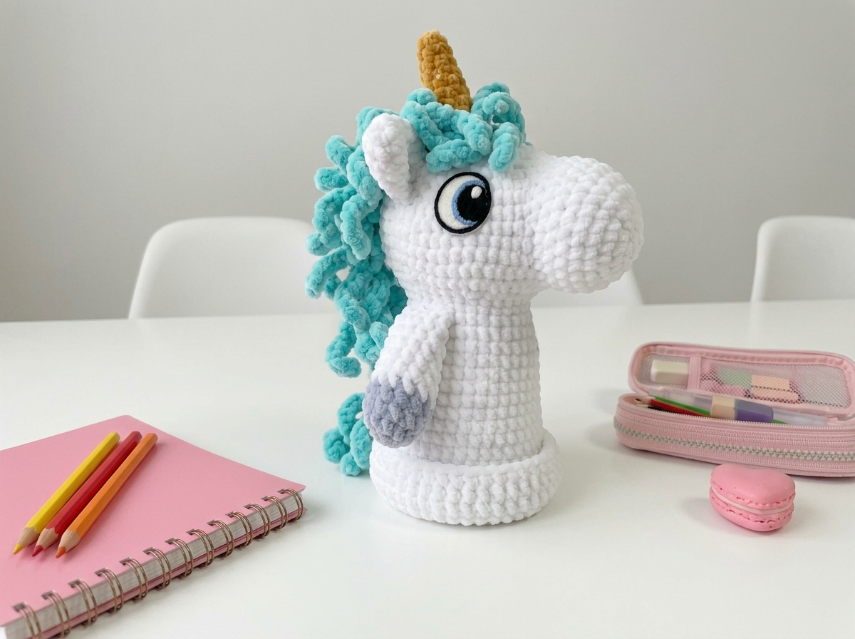
Dreamy Plush Unicorn – Complete Step-by-Step Pattern
1. Gathering Your Supplies
To achieve that incredibly soft, squishy look, plush yarn is the star of the show!
- Yarn:
- Main Body (White): Plush/Velvet yarn (e.g., Himalaya Dolphin Baby, YarnArt Dolce). Approx. 100g.
- Mane & Tail (Teal/Blue): A very fluffy, faux fur, or eyelash yarn (or the same plush yarn worked loosely). Approx. 50g.
- Horn (Gold/Mustard): Cotton or acrylic yarn (for structure). Small amount.
- Hoof (Grey): Cotton or acrylic yarn. Small amount.
- Hook:
- 3.5 mm or 4.0 mm for the plush yarn (check label, usually needs a larger hook to avoid splitting the fibers).
- 2.5 mm for the cotton details (horn/hoof).
- Notions:
- Large safety eye (12-14 mm) or black felt for the eye.
- Poly-fil stuffing.
- Tapestry needle.
- Scissors.
- Black embroidery floss (for eyelashes/eye details).
- Wire or pipe cleaner (optional, for a posable horn).
What you'll master: Working with plush yarn, mixing textures, and creating a character with personality.
2. Abbreviations & Special Techniques
- MR: Magic ring
- ch: Chain
- sc: Single crochet
- inc: Increase (2 sc in one stitch)
- dec: Decrease (2 sc crocheted together invisibly)
- sl st: Slip stitch
- BLO: Back loop only
- FLO: Front loop only
- Loop Stitch (Simplified): Yarn over, insert hook, pull up a very long loop (2-3 cm), yarn over, pull through 2 loops on hook, yarn over, pull through remaining 2 loops. (This creates a fluffy loop on the front).
3. The Head & Body (White Plush Yarn)
We will work this as one continuous piece, starting from the top of the head down to the base.
- R1: 6 sc in MR (6)
- R2: 6 inc (12)
- R3: (1 sc, inc) x 6 (18)
- R4: (2 sc, inc) x 6 (24)
- R5: (3 sc, inc) x 6 (30)
- R6-10: 30 sc (30) [5 rows]
- Eye Placement: Insert your large safety eye between R7 and R8, about 5-6 stitches from the center front. Secure the washer on the inside.
- R11: (3 sc, dec) x 6 (24)
- R12: (2 sc, dec) x 6 (18)
- Stuffing: Stuff the head firmly now.
- R13-20: 18 sc (18) [8 rows]
- Note: This forms the neck/upper body.
- R21: (2 sc, inc) x 6 (24)
- Note: We increase here to create a wider base so it can stand.
- R22-26: 24 sc (24) [5 rows]
- R27: 24 sc in BLO (24)
- Note: This creates a ridge for the bottom edge.
- R28: 24 sc (24)
- Finishing: Fasten off. Stuff the base firmly so it stands upright. Weave in the end.
What you'll master: Shaping a head-to-body transition and creating a stable base.
4. The Muzzle (White Plush Yarn)
This cute snout gives the unicorn its character.
- R1: 6 sc in MR (6)
- R2: 6 inc (12)
- R3: (1 sc, inc) x 6 (18)
- R4: (2 sc, inc) x 6 (24)
- R5-6: 24 sc (24) [2 rows]
- Finishing: Fasten off, leaving a long tail. Stuff lightly to make it round.
What you'll master: Creating a 3D facial feature.
5. The Ears (White Plush Yarn, Make 2)
- R1: 4 sc in MR (4)
- R2: (1 sc, inc) x 2 (6)
- R3-5: 6 sc (6) [3 rows]
- Finishing: Fasten off, leaving a tail. Flatten the bottom to sew.
6. The Horn (Gold Yarn)
- R1: 4 sc in MR (4)
- R2: 4 inc (8)
- R3: (1 sc, inc) x 4 (12)
- R4: (2 sc, inc) x 4 (16)
- R5-8: 16 sc (16) [4 rows]
- Finishing: Fasten off, leaving a long tail. Stuff firmly.
What you'll master: Creating a cone shape.
7. The Front Leg & Hoof
- Leg (White):
- R1: 6 sc in MR (6)
- R2-6: 6 sc (6) [5 rows]
- Hoof (Grey): Change to grey yarn.
- R7: 6 sc in BLO (6)
- R8: (1 sc, inc) x 3 (9)
- R9: 9 sc (9)
- Finishing: Fasten off. Stuff lightly.
8. The Magical Mane (Teal Fluffy Yarn)
This is the most fun part! We will create a "curly" look using loops.
Method A: The Loop Chain (Easiest)
- Cut 15-20 strands of your teal fluffy yarn, each about 15 cm long.
- Fold a strand in half. Insert your hook under a stitch on the head (starting from the top of the head, behind the horn, down the neck).
- Pull the folded loop through the stitch.
- Pull the two loose ends of the yarn strand through that loop and tighten (this is a Lark's Head Knot).
- Repeat this all the way down the back of the neck and head, packing them tightly for a full mane.
Method B: Crocheted Loops (Advanced)
- Join teal yarn to the top of the head.
- Work a row of Loop Stitches (see abbreviations) around the back of the head and down the neck.
- Repeat for 2-3 rows to build volume.
What you'll master: Adding texture and volume with faux fur or loop techniques.
9. Assembly & The Magic of Details
Now for the most rewarding part: bringing your unicorn to life!
- Attach the Muzzle: Sew the white muzzle to the front of the face, centered below the eye.
- Attach the Ears: Sew the ears to the top of the head, slightly behind the eyes.
- Attach the Horn: Sew the gold horn to the forehead, right between the ears and slightly forward.
- Attach the Leg: Sew the front leg to the side of the body, near the front.
- The Face:
- If you didn't use a safety eye, embroider a large black circle.
- Use black embroidery floss to add long, dramatic eyelashes to the safety eye.
- Add a tiny white French knot or stitch for the "catchlight" in the eye to make it sparkle.
- The Tail: Attach a few loops of teal yarn to the back base of the unicorn, just like the mane.
What you'll master: Multi-step assembly and adding expressive facial features.
Final Section: Where to Go from Here
Congratulations! You’ve just crafted a magical Dreamy Plush Unicorn. This project is a wonderful way to experiment with different yarn textures and create a character full of charm.
From here, try experimenting with different colors! You could make a "Midnight Unicorn" with black plush yarn and a silver horn, or a "Rainbow Unicorn" with a multi-colored mane. You could even turn this pattern into a pencil topper by making the base smaller and hollow! Happy crocheting, and enjoy your magical new friend!