September 14, 2026
Cozy Nesting Character Amigurumi – A Cute Crochet Pattern with Basket
This adorable white character nestled in a cozy crocheted basket is pure charm! Featuring big black eyes, sweet pink cheeks, and a matching lid, this intermediate-friendly project is perfect for creating a delightful decorative piece or a unique storage solution for small treasures.
Jump to pattern instructions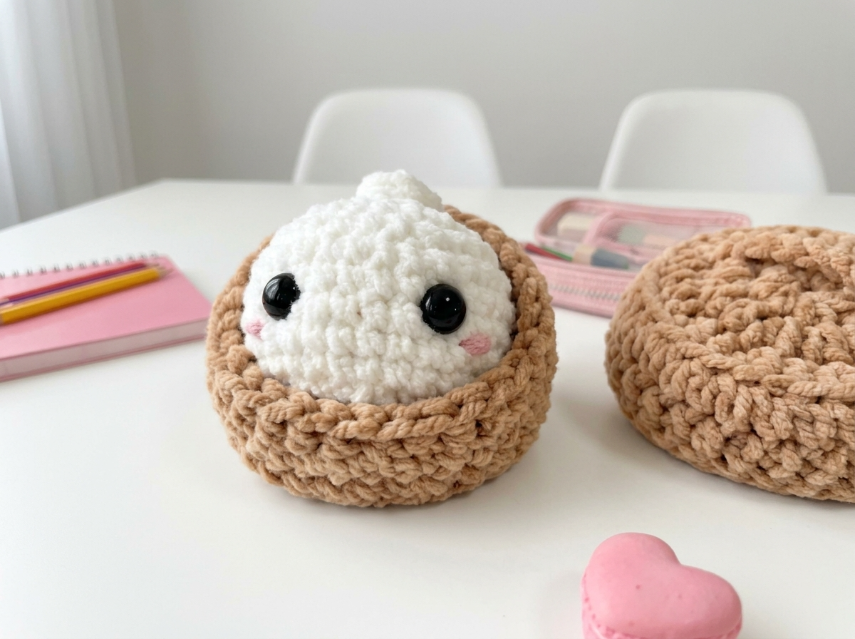
Cozy Nesting Character Amigurumi – Complete Step-by-Step Pattern
1. Gathering Your Supplies
To achieve that soft, plush look with good stitch definition, a soft cotton or acrylic blend yarn works beautifully.
- Yarn: Worsted weight (Size 4) yarn.
- White: Approx. 50g (for the character)
- Beige/Tan: Approx. 100g (for the basket and lid)
- Pink: Tiny amount (for the cheeks)
- Black: Small amount for eyes (or use 10-12mm safety eyes)
- Hook: 3.5 mm or 4.0 mm (choose the size that gives you a firm, stuff-proof gauge).
- Notions:
- Poly-fil stuffing
- Tapestry needle
- Scissors
- Stitch markers
- 10-12mm safety eyes (optional, or embroider)
- Pink embroidery floss or yarn (for cheeks)
What you'll master: Creating a character amigurumi, working a basket with lid, and adding cute facial details.
2. Abbreviations & Special Techniques
Let's quickly review a few terms. If you're new to any of these, don't worry—you'll be a pro by the time you finish!
- MR: Magic ring
- ch: Chain
- sc: Single crochet
- inc: Increase (2 sc in one stitch)
- dec: Decrease (2 sc crocheted together invisibly)
- sl st: Slip stitch
- BLO: Back loop only
- st(s): Stitch(es)
3. The White Character (Head & Body)
We'll work from the top down, creating a round, plush character.
- R1 (White): 6 sc in MR (6)
- R2: 6 inc (12)
- R3: (1 sc, inc) x 6 (18)
- R4: (2 sc, inc) x 6 (24)
- R5: (3 sc, inc) x 6 (30)
- R6: (4 sc, inc) x 6 (36)
- R7-10: 36 sc (36) [4 rows]
- Eye Placement: If using safety eyes, insert them between R7 and R8, spaced about 8-9 stitches apart.
- R11: (4 sc, dec) x 6 (30)
- R12: (3 sc, dec) x 6 (24)
- R13: (2 sc, dec) x 6 (18)
- Stuffing: Stuff the head firmly with poly-fil.
- R14: (1 sc, dec) x 6 (12)
- R15-18: 12 sc (12) [4 rows]
- This creates the neck area.
- R19: (1 sc, inc) x 6 (18)
- R20: (2 sc, inc) x 6 (24)
- R21: (3 sc, inc) x 6 (30)
- R22-25: 30 sc (30) [4 rows]
- Stuffing: Continue stuffing the body firmly.
- R26: (3 sc, dec) x 6 (24)
- R27: (2 sc, dec) x 6 (18)
- R28: (1 sc, dec) x 6 (12)
- Finishing: Fasten off, leaving a long tail. Stuff firmly, then weave the tail through the front loops of the remaining stitches and pull tight to close.
What you'll master: Shaping a character with distinct head and body sections.
4. The Basket Base (Beige)
This forms the bottom of the basket where your character will sit.
- R1 (Beige): 6 sc in MR (6)
- R2: 6 inc (12)
- R3: (1 sc, inc) x 6 (18)
- R4: (2 sc, inc) x 6 (24)
- R5: (3 sc, inc) x 6 (30)
- R6: (4 sc, inc) x 6 (36)
- R7: (5 sc, inc) x 6 (42)
- R8: (6 sc, inc) x 6 (48)
- Finishing: Do not fasten off. We will continue with the basket walls.
What you'll master: Creating a flat circular base.
5. The Basket Walls (Beige)
Now we'll build up the sides of the basket.
- R9-16: 48 sc (48) [8 rows]
- This creates the height of the basket walls.
- R17 (Edge): Working in BLO: 48 sc (48)
- This creates a defined edge for the basket.
- Finishing: Fasten off, leaving a long tail for sewing if needed.
What you'll master: Working in rounds to create vertical walls and using BLO for definition.
6. The Basket Lid (Beige)
The lid should fit snugly over the basket opening.
- R1 (Beige): 6 sc in MR (6)
- R2: 6 inc (12)
- R3: (1 sc, inc) x 6 (18)
- R4: (2 sc, inc) x 6 (24)
- R5: (3 sc, inc) x 6 (30)
- R6: (4 sc, inc) x 6 (36)
- R7: (5 sc, inc) x 6 (42)
- R8: (6 sc, inc) x 6 (48)
- R9-11: 48 sc (48) [3 rows]
- This creates the rim that fits over the basket.
- R12: 48 sc in BLO (48)
- This creates a defined edge.
- R13-15: 48 sc (48) [3 rows]
- Finishing: Fasten off, leaving a tail.
What you'll master: Creating a fitted lid with a defined rim.
7. Assembly & The Magic of Details
Now for the most rewarding part: bringing your character to life!
- Position the Character: Place your white character inside the basket. It should sit snugly with just the head peeking out.
- Add the Eyes: If you haven't already inserted safety eyes, embroider two large black circles or use French knots for the eyes. Position them on R7-8, spaced evenly.
- The Cheeks: Using pink yarn or embroidery floss, add two small pink blush marks on the cheeks, just below and slightly outward from the eyes. You can use a few straight stitches or a small satin stitch oval.
- Optional Nose: If desired, add a tiny pink or black nose between and slightly below the eyes using a few small stitches.
- Secure the Character (Optional): If you want the character to be permanently nestled in the basket, you can use a few hidden stitches to secure the bottom of the character to the basket base.
- Test the Lid: Place the lid on top of the basket. It should fit snugly over the rim.
What you'll master: Multi-step assembly and adding expressive facial features.
Final Section: Where to Go from Here
Congratulations! You've just crafted an adorable Cozy Nesting Character with a functional basket. This project is incredibly satisfying and makes a wonderful decorative piece, a unique storage solution for small items like jewelry or buttons, or a heartwarming gift.
From here, try experimenting with different character designs! You could make a bunny with long ears, a bear with round ears, or even a penguin with black and white coloring. You could also create different colored baskets to match your decor, or add a small handle to the lid for easier removal. Happy crocheting, and enjoy your beautiful new handmade creation!