September 13, 2026
Miles Morales Style Spider-Boy Amigurumi – A Superhero Crochet Pattern
Swing into action with this adorable, stealthy Spider-Boy! Featuring a classic black suit with red accents on the hands and feet, a signature red hood, and large expressive mask eyes, this pattern is a fun and rewarding project for intermediate crafters. Perfect for fans of the multiverse!
Jump to pattern instructions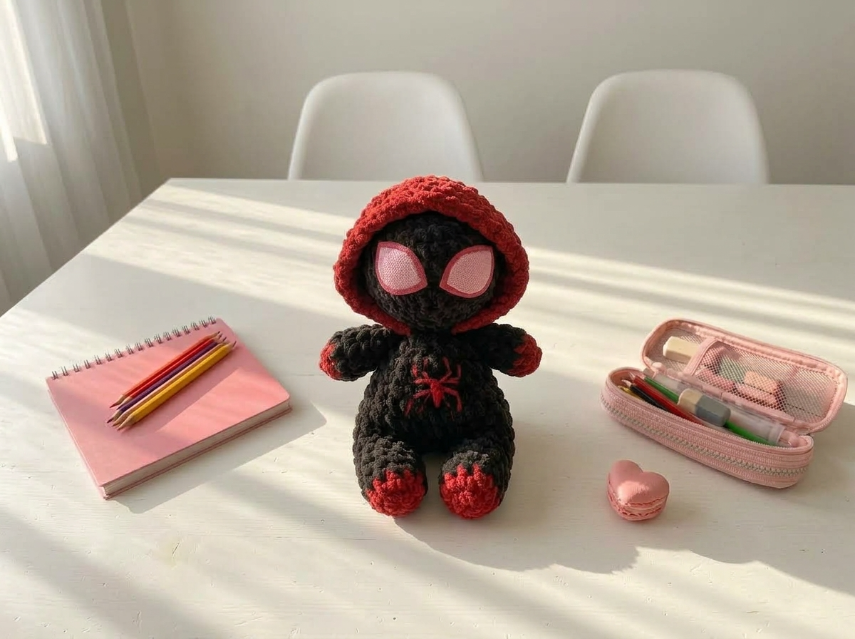
Miles Morales Style Spider-Boy – Complete Step-by-Step Pattern
1. Gathering Your Supplies
To get that sleek superhero look, smooth cotton yarn is best for crisp stitch definition.
- Yarn: Worsted weight cotton or acrylic blend (e.g., YarnArt Jeans, Catania).
- Black: Main color for body, head, arms, and legs.
- Red: For the hood, shoes, gloves/cuffs, and spider emblem.
- White: For the eyes (or white felt).
- Hook: 2.5 mm or 3.0 mm (choose the size that gives you a tight, stuff-proof gauge).
- Notions:
- Poly-fil stuffing
- Tapestry needle
- Scissors
- Stitch markers
- White Felt: For the large mask eyes (highly recommended for that sharp comic book look).
- Red Embroidery Floss: For the spider emblem on the chest.
What you'll master: Color changing techniques, assembling multi-part dolls, and adding character-defining details.
2. Abbreviations & Special Techniques
- MR: Magic ring
- ch: Chain
- sc: Single crochet
- inc: Increase (2 sc in one stitch)
- dec: Decrease (2 sc crocheted together invisibly)
- sl st: Slip stitch
- BLO: Back loop only
3. The Head (Black)
The head is a simple sphere that will be partially covered by the hood.
- R1: 6 sc in MR (6)
- R2: 6 inc (12)
- R3: (1 sc, inc) x 6 (18)
- R4: (2 sc, inc) x 6 (24)
- R5: (3 sc, inc) x 6 (30)
- R6-10: 30 sc (30) [5 rows]
- R11: (3 sc, dec) x 6 (24)
- R12: (2 sc, dec) x 6 (18)
- Stuffing: Stuff the head firmly.
- R13: (1 sc, dec) x 6 (12)
- R14: 6 dec (6)
- Finishing: Fasten off, leaving a long tail. Weave the tail through the front loops to close the hole.
What you'll master: Standard spherical shaping.
4. The Body (Black)
A sturdy, pear-shaped body to support our hero.
- R1: 6 sc in MR (6)
- R2: 6 inc (12)
- R3: (1 sc, inc) x 6 (18)
- R4: (2 sc, inc) x 6 (24)
- R5-9: 24 sc (24) [5 rows]
- R10: (2 sc, dec) x 6 (18)
- R11-12: 18 sc (18) [2 rows]
- Finishing: Fasten off, leaving a long tail for sewing. Stuff firmly.
What you'll master: Structured torso shaping.
5. Legs & Shoes (Black & Red)
We start with the red shoes and transition to black legs.
- R1 (Red): 6 sc in MR (6)
- R2: 6 inc (12)
- R3: (1 sc, inc) x 6 (18)
- This forms the red shoe.
- R4 (Black): 18 sc in BLO (18)
- The BLO row creates a ridge that defines the top of the shoe.
- R5-10: 18 sc (18) [6 rows]
- Finishing: Fasten off, leaving a long tail. Stuff the leg lightly. Make 2.
What you'll master: Clean color changes and using BLO for definition.
6. Arms & Gloves (Black & Red)
Similar to the legs, we start black and add red cuffs.
- R1 (Black): 6 sc in MR (6)
- R2: 6 inc (12)
- R3-5: 12 sc (12) [3 rows]
- R6 (Red): 12 sc in BLO (12)
- R7-8: 12 sc (12) [2 rows]
- Finishing: Fasten off, leaving a long tail. Do not stuff (or stuff very lightly). Make 2.
What you'll master: Creating uniform, lightly stuffed appendages.
7. The Hood (Red)
This piece covers the top of the head and neck, giving the doll its signature look. It's worked as a tube closed at the top.
- R1: 6 sc in MR (6)
- R2: 6 inc (12)
- R3: (1 sc, inc) x 6 (18)
- R4: (2 sc, inc) x 6 (24)
- R5: (3 sc, inc) x 6 (30)
- R6: (4 sc, inc) x 6 (36)
- R7-11: 36 sc (36) [5 rows]
- Finishing: Fasten off, leaving a long tail for sewing. Do not stuff.
What you'll master: Creating a conical shape that fits over another piece.
8. Assembly & The Magic of Details
Now for the most rewarding part: bringing your Spider-Boy to life!
- Legs to Body: Sew the two legs to the bottom of the body, spacing them evenly so the doll can sit.
- Arms to Body: Sew the arms to the upper sides of the body.
- Head to Body: Sew the head securely to the top of the body.
- The Hood: Place the red hood over the top of the head. It should cover the top half of the head and drape down the back of the neck. Sew the bottom edge of the hood to the neck/shoulders of the body to secure it. You can also tack it to the sides of the head so it stays in place.
- The Eyes:
- Cut two large, angled oval shapes out of white felt (refer to the photo for the shape—they are wider at the top and pointy at the bottom corners).
- Sew or glue them onto the face, positioned centrally.
- Optional: Use black embroidery floss to outline the eyes for extra definition.
- The Spider Emblem: Using red embroidery floss and a needle, embroider a small spider on the center of the chest. A simple "star" shape with legs works perfectly!
- Center body: A small vertical line or oval.
- Legs: 4 legs curving out to the left, 4 legs curving out to the right.
What you'll master: Multi-step structural assembly and adding character-defining surface details.
Final Section: Where to Go from Here
Congratulations! By completing this Miles Morales Style Spider-Boy, you've practiced foundational shaping, color blocking, and the art of adding personality through accessories and embroidery.
From here, you could adapt this pattern to make other Spider-Verse characters! Change the colors to red and blue for the classic Peter Parker, or black and gold for a different variant. You could even make a tiny web-shooter accessory for his wrist. Happy crocheting, and remember: anyone can wear the mask! ️