September 9, 2026
Hello Kitty Style Amigurumi Doll – A Cute & Classic Crochet Pattern
Bring this iconic, sweet-faced character to life! Featuring a classic white head, a cute pink dress, a signature bow, and adorable little paw pads, this pattern is a delightful, intermediate-friendly project perfect for gifting or adding a touch of kawaii charm to your collection.
Jump to pattern instructions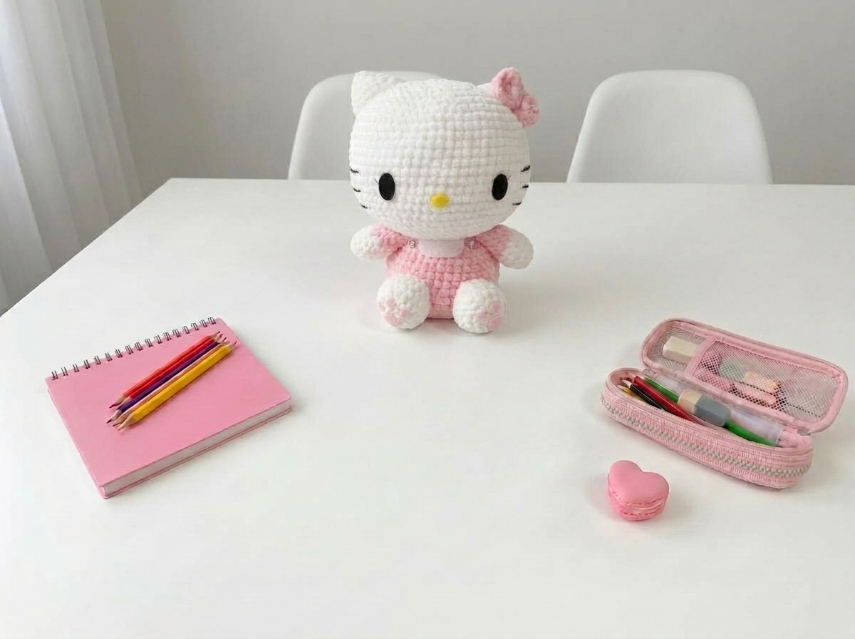
Hello Kitty Style Amigurumi Doll – Complete Step-by-Step Pattern
1. Gathering Your Supplies
To get that clean, crisp look with perfect stitch definition, a smooth cotton or cotton-blend yarn is highly recommended.
- Yarn: Worsted weight cotton or acrylic blend (e.g., YarnArt Jeans, Catania, or similar, approx. 160m / 50g). You will need:
- White: For the head, body base, arms, and legs (approx. 100g)
- Pink: For the dress, bow, and paw pads (approx. 50g)
- Black: A tiny amount for the eyes and whiskers (or use safety eyes)
- Yellow: A tiny amount for the nose
- Hook: 2.5 mm or 3.0 mm (choose the size that gives you a tight, stuff-proof gauge).
- Notions:
- 10-12 mm black safety eyes (or black embroidery floss)
- Poly-fil stuffing
- Tapestry needle
- Scissors
- Stitch markers
What you'll master: Working with multiple colors, seamless shaping, and creating expressive, iconic facial features.
2. Abbreviations & Special Techniques
Let’s quickly review a few terms. If you're new to any of these, don't worry—you'll be a pro by the time we reach the bow!
- MR: Magic ring
- ch: Chain
- sc: Single crochet
- inc: Increase (2 sc in one stitch)
- dec: Decrease (2 sc crocheted together invisibly)
- sl st: Slip stitch
- BLO / FLO: Back loop only / Front loop only
3. The Head (White)
The head is worked from the top down, creating a perfectly round, slightly wide shape characteristic of this cute character.
- R1: 6 sc in MR (6)
- R2: 6 inc (12)
- R3: (1 sc, inc) x 6 (18)
- R4: (2 sc, inc) x 6 (24)
- R5: (3 sc, inc) x 6 (30)
- R6: (4 sc, inc) x 6 (36)
- R7: (5 sc, inc) x 6 (42)
- R8: (6 sc, inc) x 6 (48)
- R9-15: 48 sc (48) [7 rows]
- Eye Placement: If using safety eyes, insert them between R11 and R12, spaced exactly 8-9 stitches apart.
- R16: (6 sc, dec) x 6 (42)
- R17: (5 sc, dec) x 6 (36)
- R18: (4 sc, dec) x 6 (30)
- Stuffing: Begin stuffing the head firmly, making sure it's evenly filled and round.
- R19: (3 sc, dec) x 6 (24)
- R20: (2 sc, dec) x 6 (18)
- Finishing: Fasten off, leaving a long tail. Do NOT close the hole yet—we'll attach the body first!
What you'll master: Spiral increase/decrease sequences and achieving a flawless, spherical shape.
4. The Body & Dress (Pink)
The body is worked from the neck down, creating a cute, chubby shape that supports the head perfectly.
- R1 (White - Neck): 6 sc in MR (6)
- R2: 6 inc (12)
- R3: (1 sc, inc) x 6 (18)
- R4: (2 sc, inc) x 6 (24)
- R5 (Change to Pink): 24 sc (24)
- R6: (3 sc, inc) x 6 (30)
- R7-10: 30 sc (30) [4 rows]
- R11: (3 sc, dec) x 6 (24)
- R12-13: 24 sc (24) [2 rows]
- R14: (2 sc, dec) x 6 (18)
- Stuffing: Stuff the body firmly, especially the bottom so it can sit upright.
- Finishing: Fasten off, leaving a tail for sewing.
What you'll master: Structured torso shaping and strategic stuffing.
5. Arms & Legs (White with Pink Pads)
These are kept small, simple, and stubby to match the sweet, minimalist aesthetic of the doll.
Arms (Make 2, White):
- R1: 6 sc in MR (6)
- R2-4: 6 sc (6) [3 rows]
- Finishing: Fasten off, leaving a long tail for sewing. Do not stuff.
Legs (Make 2, White):
- R1: 6 sc in MR (6)
- R2: 6 inc (12)
- R3-5: 12 sc (12) [3 rows]
- R6: (4 sc, dec) x 2 (10)
- R7-9: 10 sc (10) [3 rows]
- Finishing: Fasten off, leaving a long tail. Stuff lightly.
Paw Pads (Make 4, Pink):
- Instructions: 6 sc in MR. Fasten off, leaving a tail. Sew these onto the bottom of the feet and the palms of the hands.
What you'll master: Creating uniform, lightly stuffed appendages and adding cute, contrasting details.
6. Ears & Bow
Ears (Make 2, White):
- R1: 6 sc in MR (6)
- R2: (1 sc, inc) x 3 (9)
- R3: 9 sc (9)
- Finishing: Fasten off, leaving a tail. Fold the base slightly to create a triangular shape.
Bow (Pink):
- Center: 6 sc in MR. Fasten off.
- Loops (Make 2): Ch 10. Sc in 2nd ch from hook, hdc, 7 dc. Fasten off, leaving a long tail.
- Assembly: Wrap the center piece around the base of the two loops and sew securely. Attach to the left ear (or right, depending on your preference!).
What you'll master: Creating layered pieces for dimension and assembling multi-part accessories.
7. Assembly & The Magic of Embroidery
Now for the most rewarding part: bringing your doll's personality to life!
- Head to Body: Sew the completed head securely to the top of the pink body.
- Limbs: Sew the arms to the upper sides of the body, and the legs to the bottom front, spacing them evenly so the doll sits nicely.
- Ears & Bow: Sew the ears to the top corners of the head. Attach the pink bow to the base of one ear.
- The Face: This is where the magic happens!
- Nose: Embroider a tiny yellow oval right in the center, just below and between the eyes.
- Whiskers: Using black embroidery floss, stitch 3 straight lines on each side of the nose (2-3 stitches long, spaced evenly).
- Optional: If you didn't use safety eyes, embroider two small black ovals for the eyes.
What you'll master: Multi-step structural assembly and expressive surface embroidery.
Final Section: Where to Go from Here
Congratulations! By completing this Hello Kitty Style Amigurumi Doll, you've practiced foundational spiral shaping, multi-color assembly, and the delicate art of facial embroidery. This project is a fantastic confidence-builder and makes an absolutely heartwarming gift for a child, a friend, or even yourself!
From here, try experimenting with different color combinations to create a whole "kawaii" collection. You could make a blue version with a denim dress, a yellow version with a sunflower dress, or even a spooky version for Halloween with a black dress and pumpkin bow. Happy crocheting, and enjoy your beautiful new handmade friend!