October 1, 2026
Duckling Friends
Two little pond pals are ready to waddle right into your heart. One is a snowy white duckling with a tiny tuft of fluff on top, and the other is a handsome mallard with a deep green head, a warm brown chest, and a creamy tummy. Both have big shiny eyes, bright orange beaks, and stubby little feet. They are worked in squishy chunky yarn, so they grow fast and feel wonderful to hold. Grab something warm to sip, and let us make a pair of cuddly friends.
Jump to pattern instructions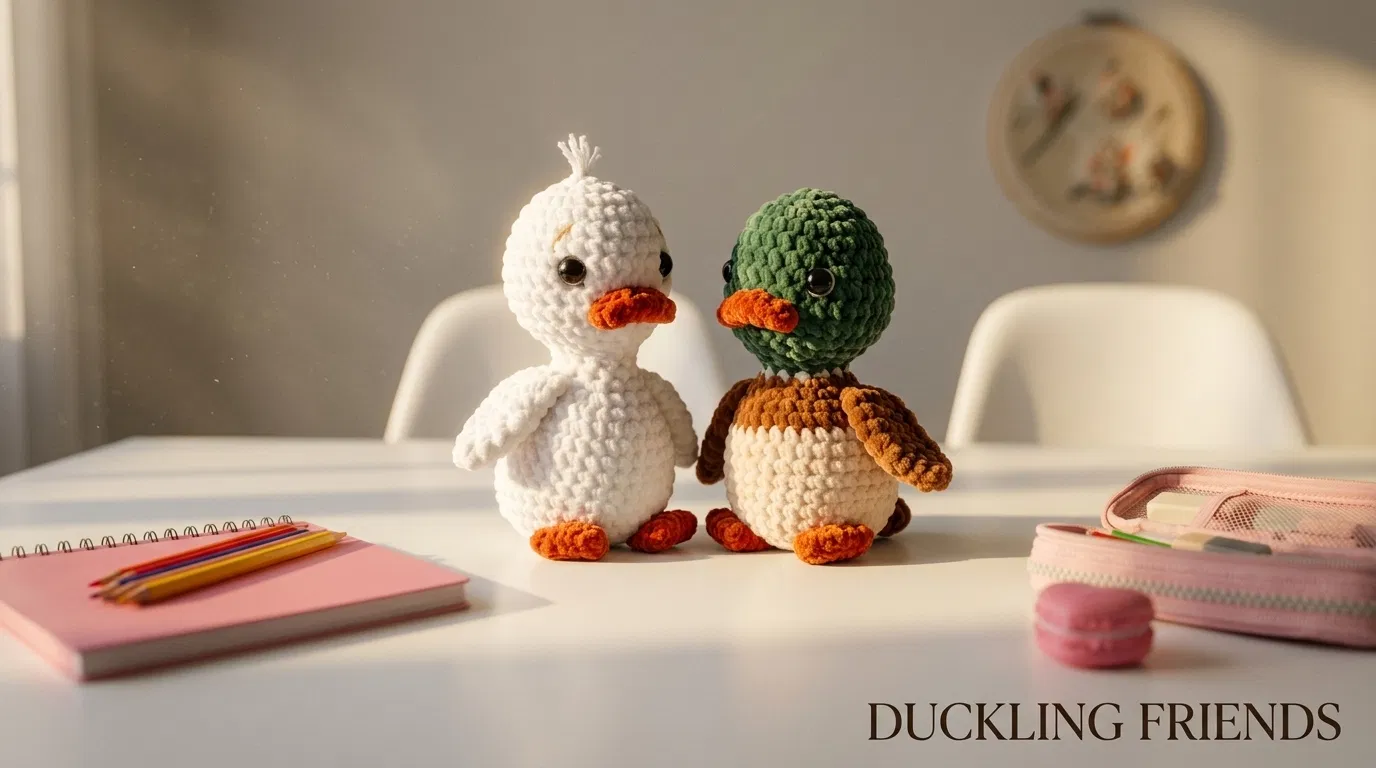
Duckling Friends
Difficulty: Beginner friendly (a great project for practicing amigurumi shaping and color changes)
Finished Size: Each duckling is about 6 inches tall.
Time to Complete: 3 to 4 hours for both ducklings.
What You Will Need
Yarn:
- White (for the white duckling's head, body, and wings)
- Deep green (for the mallard's head)
- Cream (for the mallard's tummy)
- Brown (for the mallard's chest and wings)
- Orange (for the beaks and feet)
- Light tan (optional, for the tiny eyebrow stitch)
- Tip: The photo shows a soft, fluffy chenille or velvet style yarn, which gives that plush look. If you use it, a 4.0 to 4.5 mm hook works well. You can also use regular DK or worsted cotton with a 3.0 to 3.5 mm hook for a firmer, neater look. Dark velvet yarn is hard to see, so work in good light and count your stitches often.
Tools:
- 4.0 mm (G/6) or 4.5 mm (7) crochet hook for chunky velvet yarn
- 8 mm black safety eyes (4 total), or black yarn for embroidered eyes
- Poly-fil or fiberfill stuffing
- Yarn needle with a large eye for sewing and weaving in ends
- Stitch markers
- Sharp scissors
- Straight pins for placing the pieces before sewing
The Basics (US Terms)
- MR = magic ring
- sc = single crochet
- inc = increase (work 2 single crochets into the same stitch)
- dec = decrease (work 2 single crochets together, invisible decrease is best)
- sl st = slip stitch
- All pieces are worked in continuous rounds. Use a stitch marker to mark the first stitch of each round.
- The White Duckling and the Mallard use the same pattern. Only the colors change, so follow the color notes in each part.
Let Us Get Started
Each duckling is made of a head, a body, a beak, two wings, and two feet. Make one set in white, and one set in green, brown, and cream.
Part 1: The Head (Make 2)
Worked with white yarn for the White Duckling, and green yarn for the Mallard.
- Round 1: Work 6 sc into a magic ring. (6 stitches)
- Round 2: Inc in every stitch around. (12 stitches)
- Round 3: (1 sc, inc) repeat 6 times. (18 stitches)
- Round 4: (2 sc, inc) repeat 6 times. (24 stitches)
- Rounds 5 to 9: Work 1 sc in every stitch around. (24 stitches) If you are using safety eyes, place them now between rounds 6 and 7, about 8 stitches apart. Secure them tightly on the inside.
- Round 10: (2 sc, dec) repeat 6 times. (18 stitches)
- Round 11: (1 sc, dec) repeat 6 times. (12 stitches)
- Stuff the head firmly so it is nice and round.
- Round 12: Dec 6 times. (6 stitches)
- Cut the yarn, leaving a long tail. Pull the tail through the front loops of the last 6 stitches and pull tight to close. Weave in the end.
Part 2: The White Duckling's Body
Worked with white yarn.
- Round 1: Work 6 sc into a magic ring. (6 stitches)
- Round 2: Inc in every stitch around. (12 stitches)
- Round 3: (1 sc, inc) repeat 6 times. (18 stitches)
- Round 4: (2 sc, inc) repeat 6 times. (24 stitches)
- Round 5: (3 sc, inc) repeat 6 times. (30 stitches)
- Rounds 6 to 11: Work 1 sc in every stitch around. (30 stitches)
- Round 12: (3 sc, dec) repeat 6 times. (24 stitches)
- Round 13: (2 sc, dec) repeat 6 times. (18 stitches)
- Round 14: (1 sc, dec) repeat 6 times. (12 stitches)
- Stuff the body firmly, making sure the bottom is nice and round so the duckling sits upright.
- Cut the yarn, leaving a long tail for sewing. Leave the 12 stitches open for attaching the head.
Part 3: The Mallard's Body
Worked with cream and brown yarn.
- Round 1 (cream): Work 6 sc into a magic ring. (6 stitches)
- Round 2 (cream): Inc in every stitch around. (12 stitches)
- Round 3 (cream): (1 sc, inc) repeat 6 times. (18 stitches)
- Round 4 (cream): (2 sc, inc) repeat 6 times. (24 stitches)
- Round 5 (cream): (3 sc, inc) repeat 6 times. (30 stitches)
- Rounds 6 to 9 (cream): Work 1 sc in every stitch around. (30 stitches)
- Rounds 10 to 11 (brown): Switch to brown on the first stitch of Round 10. Work 1 sc in every stitch around. (30 stitches) The brown makes the chest band, and the line between the colors should sit about two thirds of the way up the body.
- Round 12 (brown): (3 sc, dec) repeat 6 times. (24 stitches)
- Round 13 (brown): (2 sc, dec) repeat 6 times. (18 stitches)
- Round 14 (brown): (1 sc, dec) repeat 6 times. (12 stitches)
- Stuff the body firmly, making sure the bottom is nice and round.
- Cut the yarn, leaving a long tail for sewing. Leave the 12 stitches open for attaching the head.
Part 4: The Beaks (Make 2)
Worked with orange yarn.
- Round 1: Work 6 sc into a magic ring. (6 stitches)
- Round 2: (1 sc, inc) repeat 3 times. (9 stitches)
- Round 3: Work 1 sc in every stitch around. (9 stitches)
- Cut the yarn, leaving a long tail for sewing. Do not stuff. Pinch the beak flat so it looks like a little rounded bill.
Part 5: The Wings (Make 4)
Worked with white yarn for the White Duckling, and brown yarn for the Mallard.
- Round 1: Work 6 sc into a magic ring. (6 stitches)
- Round 2: (1 sc, inc) repeat 3 times. (9 stitches)
- Rounds 3 to 6: Work 1 sc in every stitch around. (9 stitches)
- Round 7: (1 sc, dec) repeat 3 times. (6 stitches)
- Round 8: Work 1 sc in every stitch around. (6 stitches)
- Cut the yarn, leaving a long tail for sewing. Do not stuff. Pinch the wing flat so it looks like a small teardrop.
Part 6: The Feet (Make 4)
Worked with orange yarn.
- Round 1: Work 6 sc into a magic ring. (6 stitches)
- Round 2: (1 sc, inc) repeat 3 times. (9 stitches)
- Round 3: Work 1 sc in every stitch around. (9 stitches)
- Cut the yarn, leaving a long tail for sewing. Do not stuff. Pinch the foot flat so it looks like a tiny round webbed foot.
Assembly and Finishing
This is where your ducklings come to life. Take your time pinning the pieces in place before you sew.
Attaching the Heads:
- Pin the head on top of the open end of the body, tilting it slightly forward.
- Using the long tail from the body, whip stitch all the way around so the head feels firm and does not wobble. Add a bit more stuffing in the neck before closing, if needed.
Attaching the Beaks:
- Pin the beak on the front of each head, centered between the eyes and about 2 rounds below them.
- Sew it on all the way around, with the flat side facing down.
- For a cheeky look, angle the beak slightly to one side on the Mallard.
Attaching the Wings:
- Pin one wing on each side of each body, about 3 rounds below the neck.
- Sew only the top edge of each wing, so the tip can flap out a little.
- For the Mallard, make sure the brown wings sit on the brown part of the body.
Attaching the Feet:
- Pin two feet to the bottom front of each body, spaced about 5 stitches apart.
- Sew them on firmly so the ducklings can sit up straight.
Finishing Touches on the White Duckling:
- Tuft: Cut 3 or 4 strands of white yarn, each about 3 inches long. Fold them in half and pull the loop through the top center of the head with your hook. Pull the tails through the loop to make a small knot. Trim the ends to about 1 inch and gently fluff them.
- Eyebrow (optional): Using a little light tan yarn, embroider a tiny short stitch above one eye for a sweet, curious expression.
Finishing Touches on the Mallard:
- Make sure the line between the green head and the brown chest is neat. If any gap shows, use a few small stitches with brown yarn to close it.
- Weave in all remaining ends.
A Few Friendly Tips
- Keep it snug: Keep your tension tight and even. Loose stitches let the stuffing show through, especially with a fluffy yarn.
- Stuffing the neck: Stuff the neck area firmly. A firm neck keeps the head from drooping.
- Eye placement: Pin the eyes in place and look at them before you secure them. Wider-set eyes look sweeter, and closer-set eyes look sillier.
- Make it your own: Try a yellow duckling with an orange beak, a pink duck with a tiny bow, or a mallard with a little white neck ring.
- Size up: For bigger ducklings, use a thicker yarn and a larger hook with the same stitch counts.
- Safe for little ones: For babies and toddlers, embroider the eyes with black yarn instead of using safety eyes.
I hope you enjoy making these two sweet little friends. They are such a fun project and make the most wonderful handmade gifts.
If you run into any trouble or just want to share how your ducklings turned out, please reach out. I love seeing what you create.
Happy crocheting!