October 1, 2026
Sleepy Mint Turtle
Meet the dreamiest little turtle on the block. With a soft mint shell, a big round cream head, and one sweetly closed eye, this little guy looks like he is happily dozing in a sunny spot. He works up quickly with simple shapes, and he makes a lovely desk buddy or a cuddly gift. Put the kettle on, grab your softest cotton yarn, and let us make a sleepy friend together.
Jump to pattern instructions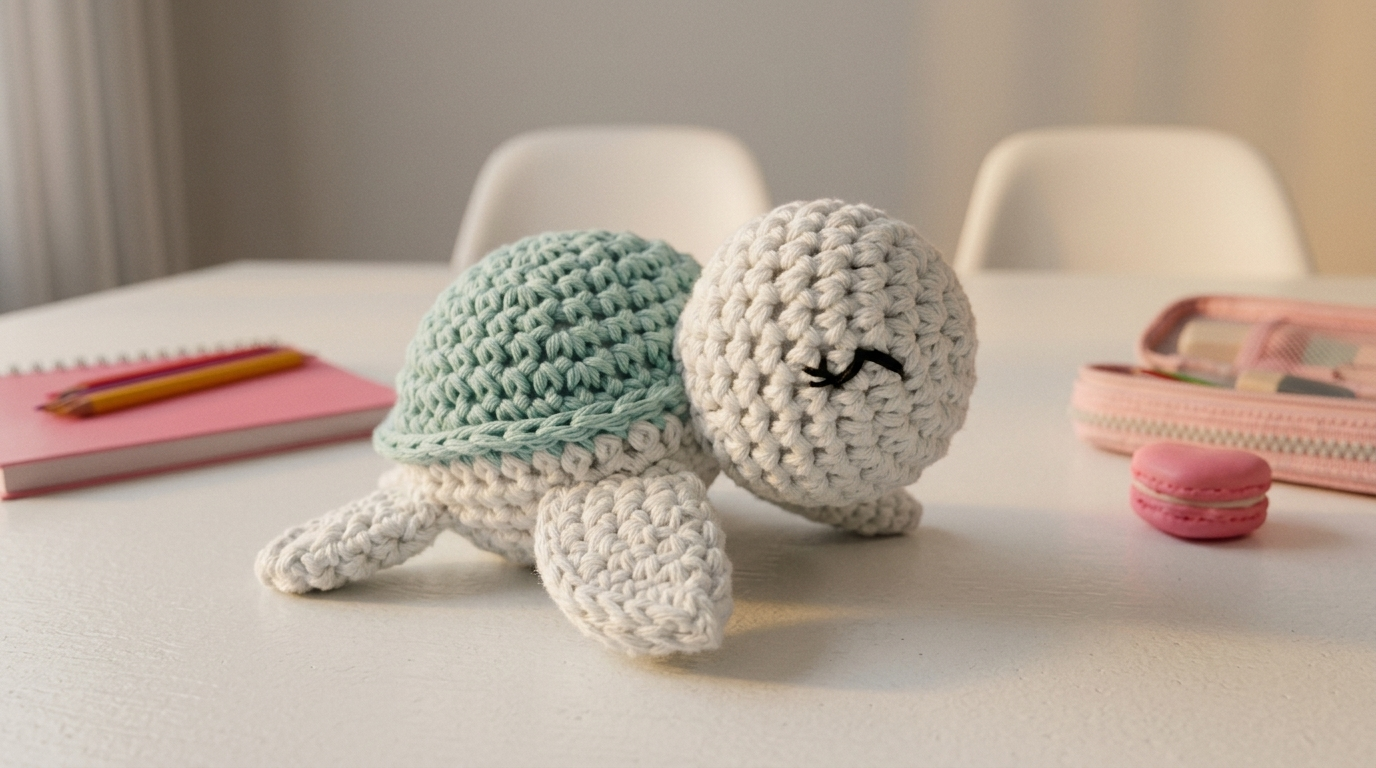
Sleepy Mint Turtle
Difficulty: Beginner friendly (a great project for practicing amigurumi shaping and sewing pieces together)
Finished Size: About 6 inches long and 4 inches tall.
Time to Complete: 3 to 4 hours.
What You Will Need
Yarn:
- Cream or off-white (for the head, body, and flippers)
- Mint green (for the shell)
- Black (for the embroidered eyes)
- Tip: Use a DK or light worsted weight cotton yarn. Cotton gives the stitches that crisp, chunky texture you see in the photo.
Tools:
- 3.5 mm (E/4) crochet hook. Go down a size if your stuffing peeks through.
- Poly-fil or fiberfill stuffing
- Yarn needle with a large eye for sewing and weaving in ends
- Stitch markers
- Sharp scissors
- Straight pins for placing the pieces before sewing
- Optional: a little pink yarn or blush for tiny cheeks
The Basics (US Terms)
- MR = magic ring
- sc = single crochet
- inc = increase (work 2 single crochets into the same stitch)
- dec = decrease (work 2 single crochets together, invisible decrease is best)
- sl st = slip stitch
- BLO = back loop only
- FLO = front loop only
- All pieces are worked in continuous rounds. Use a stitch marker to mark the first stitch of each round.
Let Us Get Started
We will make four types of pieces, the head, the body, the shell, and the flippers, and then sew them together.
Part 1: The Head
Worked with cream yarn.
- Round 1: Work 6 sc into a magic ring. (6 stitches)
- Round 2: Inc in every stitch around. (12 stitches)
- Round 3: (1 sc, inc) repeat 6 times. (18 stitches)
- Round 4: (2 sc, inc) repeat 6 times. (24 stitches)
- Round 5: (3 sc, inc) repeat 6 times. (30 stitches)
- Rounds 6 to 11: Work 1 sc in every stitch around. (30 stitches)
- Round 12: (3 sc, dec) repeat 6 times. (24 stitches)
- Round 13: (2 sc, dec) repeat 6 times. (18 stitches)
- Stuff the head firmly so it is nice and round.
- Round 14: (1 sc, dec) repeat 6 times. (12 stitches)
- Round 15: Dec 6 times. (6 stitches)
- Cut the yarn, leaving a long tail. Pull the tail through the front loops of the last 6 stitches and pull tight to close. Weave in the end.
Part 2: The Body
Worked with cream yarn.
- Round 1: Work 6 sc into a magic ring. (6 stitches)
- Round 2: Inc in every stitch around. (12 stitches)
- Round 3: (1 sc, inc) repeat 6 times. (18 stitches)
- Round 4: (2 sc, inc) repeat 6 times. (24 stitches)
- Round 5: (3 sc, inc) repeat 6 times. (30 stitches)
- Rounds 6 to 8: Work 1 sc in every stitch around. (30 stitches)
- Stuff the body lightly with a thin layer of stuffing. It should stay a little flat so the turtle sits nicely.
- Cut the yarn, leaving a long tail for sewing. Leave the top open for now, since the shell will be sewn on here.
Part 3: The Shell
Worked with mint green yarn.
- Round 1: Work 6 sc into a magic ring. (6 stitches)
- Round 2: Inc in every stitch around. (12 stitches)
- Round 3: (1 sc, inc) repeat 6 times. (18 stitches)
- Round 4: Work 1 sc in every stitch around. (18 stitches)
- Round 5: (2 sc, inc) repeat 6 times. (24 stitches)
- Round 6: Work 1 sc in every stitch around. (24 stitches)
- Round 7: (3 sc, inc) repeat 6 times. (30 stitches)
- Rounds 8 to 10: Work 1 sc in every stitch around. (30 stitches)
- Round 11: Work 1 sc in the BLO of every stitch around. (30 stitches) This leaves a little ridge around the edge of the shell, just like in the photo.
- Round 12: Work 1 sc in every stitch around. (30 stitches)
- Fasten off with a slip stitch, leaving a long tail for sewing. Do not stuff yet.
- Shell rim (optional): Join a slightly lighter mint yarn to the front loops left by Round 11. Work 1 sl st in each front loop around, then fasten off. This gives the shell its pretty rounded rim.
Part 4: The Flippers (Make 4)
Worked with cream yarn.
- Round 1: Work 6 sc into a magic ring. (6 stitches)
- Round 2: (1 sc, inc) repeat 3 times. (9 stitches)
- Round 3: Work 1 sc in every stitch around. (9 stitches)
- Round 4: (2 sc, inc) repeat 3 times. (12 stitches)
- Rounds 5 to 6: Work 1 sc in every stitch around. (12 stitches)
- Round 7: (2 sc, dec) repeat 3 times. (9 stitches)
- Stuff very lightly, just enough to give shape.
- Round 8: (1 sc, dec) repeat 3 times. (6 stitches)
- Cut the yarn, leaving a long tail for sewing. Pull the tail through the front loops of the last 6 stitches, pull tight, and press the flipper flat.
Assembly and Finishing
This is where your little turtle comes to life. Take your time pinning before you sew.
Embroidering the Face:
- Before attaching the head, use black yarn to embroider the closed, sleepy eyes on the front of the head, about 8 stitches apart and a few rounds below the center.
- Make each eye a small curved line, like a gentle smile turned upside down, with two or three tiny lashes at the outer corner. Pull the yarn gently so the stitches sit flat.
- If you like, add two tiny pink cheeks just below the eyes.
Making the Body:
- Stuff the shell lightly with a thin layer of stuffing so it keeps its dome shape.
- Place the shell on top of the body, matching the open edges. Both should have 30 stitches, so match them up evenly.
- Using the mint tail and a whip stitch, sew the shell to the body all the way around, going through the back loops of the body edge. Add a bit more stuffing before closing the last few stitches if needed.
Attaching the Flippers:
- Pin two flippers to the front sides of the body, just under the shell, angled slightly forward.
- Pin the other two flippers to the back sides, angled slightly backward. These can sit a little lower and further apart.
- Sew all four on firmly with the long tails.
Attaching the Head:
- Pin the head to the front of the body, tucked slightly under the edge of the shell, and tilted a little forward for a sleepy look.
- Sew all the way around the head so it is secure. Weave in all remaining ends.
A Few Friendly Tips
- Keep it snug: Keep your tension tight and even. Loose stitches let the stuffing show through, and tight stitches make the shape smooth and sturdy.
- Sleepy expression: Pin the eyes on first and look at them before stitching. Lower eyes make a cuter, sleepier face.
- Make it your own: Try a pink, lilac, or sunny yellow shell. Add a tiny pointed tail on the back for extra charm.
- Size up: For a bigger turtle, use chunky yarn and a larger hook with the same stitch counts.
- Safe for little ones: Since the face is embroidered, this turtle is safe for small children. Just make sure all ends are woven in well.
I hope you enjoy making this sleepy little friend. He is such a sweet project and makes the most wonderful handmade gift.
If you run into any trouble or just want to share how your turtle turned out, please reach out. I love seeing what you create.
Happy crocheting!