October 2, 2026
Hazel the Pony
Saddle up for a very sweet little friend. Hazel has a warm chestnut-brown coat, a flowing straw-colored mane and tail, crisp white socks, and a white blaze down her face. A tiny orange halter finishes her off, so she looks ready for a gentle trot around the pasture. She is made from simple shapes and stands up all on her own, which makes her a lovely shelf pal or a gift for any horse lover. Pour something warm, pick your favorite coat color, and let us make a pony.
Jump to pattern instructions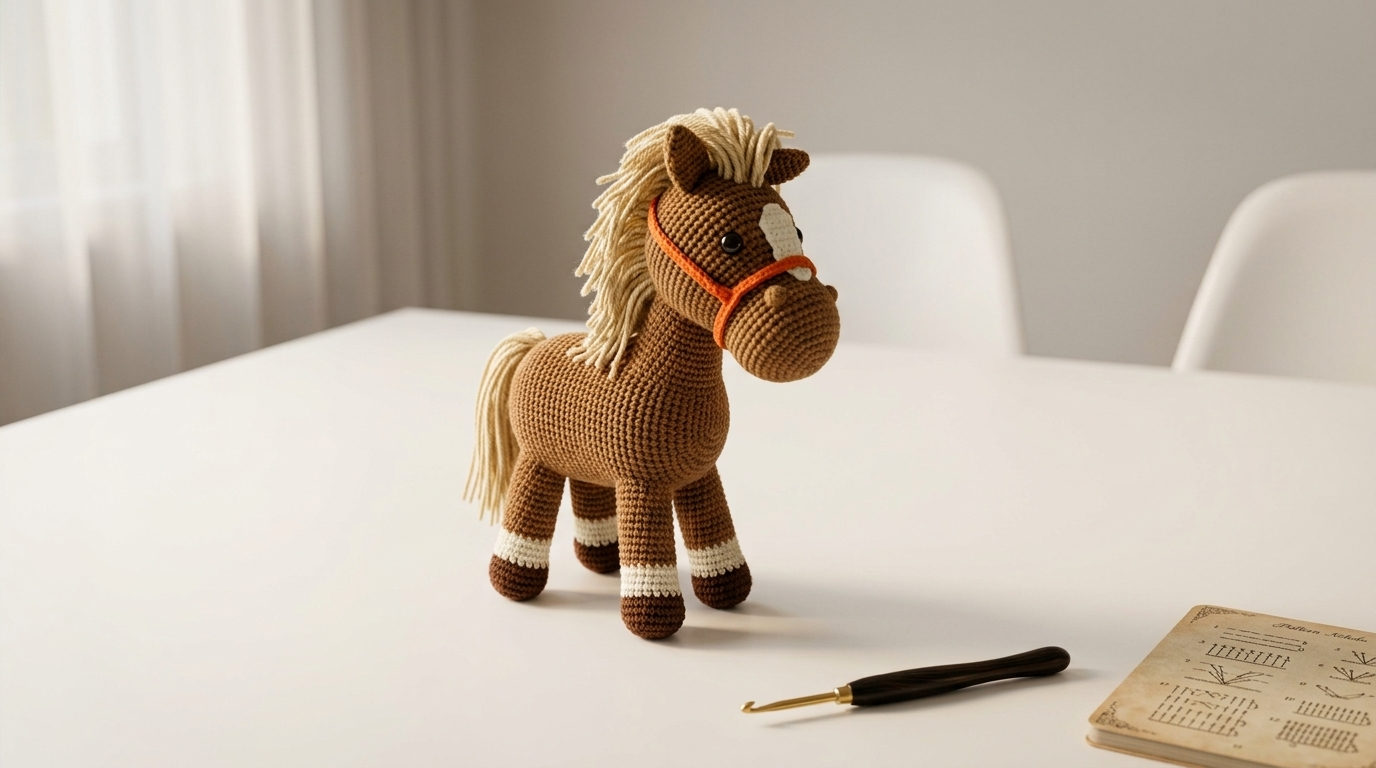
Hazel the Pony
Difficulty: Intermediate (basic stitches, but there are lots of small parts to shape and sew on)
Finished Size: About 8 inches (20 cm) tall and 7 inches (18 cm) long in DK weight yarn.
Time to Complete: 6 to 8 hours.
What You Will Need
Yarn:
- Chestnut brown (B), for the body, neck, head, muzzle, ears, and legs
- Dark brown (D), for the hooves and the nostrils
- Cream or white (W), for the socks and the blaze
- Straw or light beige (S), for the mane and tail
- Orange (O), for the halter
- Tip: Use a DK weight cotton or cotton blend yarn. Cotton gives crisp, tidy stitches that hide the stuffing and give the pony a neat, polished look. Use a smaller hook than usual so your stitches stay tight.
Tools:
- 2.5 mm (C/2) or 3.0 mm (D/3) crochet hook
- 8 mm black safety eyes (1 pair), or black yarn for embroidered eyes
- Poly-fil or fiberfill stuffing
- Yarn needle with a large eye for sewing and embroidering
- Stitch markers
- Sharp scissors
- Straight pins for placing the pieces before sewing
- Optional: a small piece of cardboard, about 4 inches (10 cm) wide, for wrapping the mane yarn
The Basics (US Terms)
- MR = magic ring
- ch = chain
- sc = single crochet
- inc = increase (work 2 single crochets into the same stitch)
- dec = decrease (work 2 single crochets together, invisible decrease is best)
- sl st = slip stitch
- BLO = back loop only
- B, D, W, S, O = brown, dark brown, white, straw, orange
- All pieces are worked in continuous rounds. Use a stitch marker to mark the first stitch of each round.
- When changing colors, pull the new color through on the last stitch of the previous round.
Let Us Get Started
Hazel is made of a head, a muzzle, a neck, a body, four legs, two ears, and a blaze. Then add the mane, tail, and halter.
Part 1: The Head
Worked with brown yarn.
- Round 1: Work 6 sc into a magic ring. (6 stitches)
- Round 2: Inc in every stitch around. (12 stitches)
- Round 3: (1 sc, inc) repeat 6 times. (18 stitches)
- Round 4: (2 sc, inc) repeat 6 times. (24 stitches)
- Rounds 5 to 9: Work 1 sc in every stitch around. (24 stitches) If you are using safety eyes, place them now between rounds 6 and 7, about 10 stitches apart, on the sides of the head. Secure them tightly on the inside.
- Round 10: (2 sc, dec) repeat 6 times. (18 stitches)
- Round 11: (1 sc, dec) repeat 6 times. (12 stitches)
- Stuff the head firmly so it is nice and round.
- Round 12: Dec 6 times. (6 stitches)
- Cut the yarn, leaving a long tail for sewing. Pull the tail through the front loops of the last 6 stitches and pull tight to close.
Part 2: The Muzzle
Worked with brown yarn.
- Round 1: Work 6 sc into a magic ring. (6 stitches)
- Round 2: Inc in every stitch around. (12 stitches)
- Round 3: (1 sc, inc) repeat 6 times. (18 stitches)
- Round 4: (2 sc, inc) repeat 6 times. (24 stitches)
- Rounds 5 to 7: Work 1 sc in every stitch around. (24 stitches)
- Round 8: (2 sc, dec) repeat 6 times. (18 stitches)
- Round 9: (1 sc, dec) repeat 6 times. (12 stitches)
- Stuff the muzzle firmly so it is nice and round.
- Round 10: Dec 6 times. (6 stitches)
- Cut the yarn, leaving a long tail for sewing. Pull the tail through the front loops of the last 6 stitches and pull tight to close.
Part 3: The Neck
Worked with brown yarn.
- Round 1: Work 6 sc into a magic ring. (6 stitches)
- Round 2: Inc in every stitch around. (12 stitches)
- Round 3: (1 sc, inc) repeat 6 times. (18 stitches)
- Rounds 4 to 11: Work 1 sc in every stitch around. (18 stitches)
- Stuff the neck firmly, so it can hold up the head.
- Cut the yarn, leaving a long tail for sewing. Leave the end open.
Part 4: The Body
Worked with brown yarn.
- Round 1: Work 6 sc into a magic ring. (6 stitches)
- Round 2: Inc in every stitch around. (12 stitches)
- Round 3: (1 sc, inc) repeat 6 times. (18 stitches)
- Round 4: (2 sc, inc) repeat 6 times. (24 stitches)
- Round 5: (3 sc, inc) repeat 6 times. (30 stitches)
- Rounds 6 to 15: Work 1 sc in every stitch around. (30 stitches)
- Round 16: (3 sc, dec) repeat 6 times. (24 stitches)
- Round 17: (2 sc, dec) repeat 6 times. (18 stitches)
- Stuff the body firmly, making sure it is nice and round.
- Round 18: (1 sc, dec) repeat 6 times. (12 stitches)
- Round 19: Dec 6 times. (6 stitches)
- Cut the yarn, leaving a long tail. Pull the tail through the front loops of the last 6 stitches and pull tight to close. Weave in the end.
Part 5: The Legs (Make 4)
Worked with dark brown, white, and brown yarn. Start at the hoof.
- Round 1 (D): Work 6 sc into a magic ring. (6 stitches)
- Round 2 (D): Inc in every stitch around. (12 stitches)
- Round 3 (D): Work 1 sc in the BLO of every stitch around. (12 stitches) This leaves a little ridge, which gives the hoof its rounded shape.
- Rounds 4 to 5 (W): Work 1 sc in every stitch around. (12 stitches) This is the white sock.
- Round 6 (B): (2 sc, dec) repeat 3 times. (9 stitches)
- Rounds 7 to 13 (B): Work 1 sc in every stitch around. (9 stitches)
- Stuff firmly, packing the stuffing down into the hoof first.
- Cut the yarn, leaving a long tail for sewing. Leave the end open.
Part 6: The Ears (Make 2)
Worked with brown yarn. Start at the tip.
- Round 1: Work 6 sc into a magic ring. (6 stitches)
- Round 2: Work 1 sc in every stitch around. (6 stitches)
- Round 3: (1 sc, inc) repeat 3 times. (9 stitches)
- Round 4: Work 1 sc in every stitch around. (9 stitches)
- Cut the yarn, leaving a long tail for sewing. Do not stuff. Pinch the ear flat so it looks like a small pointed ear.
Part 7: The Blaze
Worked with white yarn.
- Foundation: Ch 6.
- Round 1: Sc in the 2nd ch from the hook and in the next 3 chains. Work 3 sc in the last chain. Turn to work along the other side of the chain, and sc in the next 3 loops. Work 2 sc in the last loop. (12 stitches)
- Join with a sl st and fasten off, leaving a long tail for sewing. Gently shape it into a small oval.
Part 8: The Halter
Worked with orange yarn. All pieces are chains.
- Noseband: Ch 26. Join with a sl st to the first chain to make a ring. Fasten off and weave in the ends.
- Crown strap: Ch 22. Fasten off, leaving a tail at each end for sewing.
- Cheek straps (make 2): Ch 12. Fasten off, leaving a tail at each end for sewing.
Assembly and Finishing
This is where Hazel comes to life. Take your time pinning before you sew.
Finishing the Head:
- Pin the muzzle on the lower front of the head, so it sticks out and covers the bottom half of the face.
- Sew the muzzle on all the way around with the long tail. Add a bit of stuffing under it if needed, to make it look nice and round.
- With dark brown yarn, embroider two small nostrils on the front of the muzzle, about 4 stitches apart.
- Pin the blaze on the forehead, between the eyes, running from the top of the head down to the muzzle. Sew it on with the tail, going around the edge with small stitches.
Adding the Ears:
- Pin the ears on top of the head, about 6 stitches apart, with the pointed tips facing up and slightly forward.
- Sew them on along the base, using small stitches, so the ears stay upright.
Attaching the Neck and the Head:
- Pin the open end of the neck on the front of the body, near the top, and tilted slightly forward, so it rises up like a horse's neck.
- Sew the neck on all the way around with the long tail. Add a little more stuffing if it is floppy.
- Pin the head to the top of the neck, tilted slightly forward and down, so Hazel looks curious.
- Sew the head on all the way around with the tail. Sew firmly, so the head does not droop.
Attaching the Legs:
- Pin the 4 legs to the underside of the body, with the front legs near the neck and the back legs near the rear. Space them about 2 inches (5 cm) apart, so Hazel stands up straight.
- Sew each leg on firmly, going around twice. Check that she stands before you finish sewing.
Making the Mane:
- Cut about 40 pieces of straw yarn, each about 6 inches (15 cm) long. A piece of cardboard makes this quick. Wrap the yarn around it and cut along one edge.
- Fold each piece in half. Using a crochet hook, pull the loop through a stitch along the center line of the back of the neck, from between the ears down to the shoulders. Pull the tails through the loop, and tighten.
- Add a few strands to the forehead, between the ears, for a little forelock.
- Trim the ends to the same length, or leave them uneven for a wild, natural look. If you like, brush the strands with a pet brush or a comb to fluff them.
Making the Tail:
- Cut about 20 pieces of straw yarn, each about 7 inches (18 cm) long.
- Fold them in half, and pull the loop through the back of the body, near the bottom. Pull the tails through the loop and tighten. Add a few more strands in the same spot to make it full.
- Trim the ends and fluff them with a comb.
Adding the Halter:
- Slide the noseband over the muzzle, about 3 rounds from the front, and adjust it so it sits snug.
- Sew the crown strap across the top of the head, behind the ears and in front of the mane. Sew each end to the sides of the head, just behind the eyes.
- Sew one end of each cheek strap to the crown strap, just behind each eye. Sew the other end to the side of the noseband.
- Weave in all remaining ends.
A Few Friendly Tips
- Keep it snug: Keep your tension tight and even. Loose stitches let the stuffing show through, and tight stitches make the pony look neat and polished.
- Firm neck: Stuff the neck very firmly, and sew it on in a few places. A firm neck keeps the head from drooping.
- Standing strong: If Hazel tips over, sew the legs a little further apart and add more stuffing to the legs and body. A little extra stuffing in the hooves also helps.
- Eye placement: Pin the eyes in place and look at them from a few angles. Eyes on the sides of the head look more like a real horse, and eyes closer together look cuter and more cartoon-like.
- Make it your own: Try a gray dapple pony, a black stallion with a white blaze, a palomino with a cream mane, or a pink unicorn with a little horn.
- Size up: For a bigger horse, use chunky yarn and a larger hook, with the same stitch counts.
- Safe for little ones: For babies and toddlers, skip the safety eyes and embroider the eyes with black yarn. Sew the mane on with extra stitches, or crochet it instead.
I hope you enjoy making this sweet little pony. She is such a fun project and makes a wonderful handmade gift for anyone who loves horses.
If you run into any trouble or just want to share how your pony turned out, please reach out. I love seeing what you create.
Happy crocheting!