September 13, 2026
Pastel Baby Set – Ribbed Hoodie, Bloomers & Booties
Create the ultimate cozy handmade gift with this adorable baby set! Featuring a soft pink ribbed hoodie, textured green bloomers with a cute purple flower accent, and matching pink booties, this project is a beautiful mix of textures and colors. Perfect for keeping little ones warm and stylish.
Jump to pattern instructions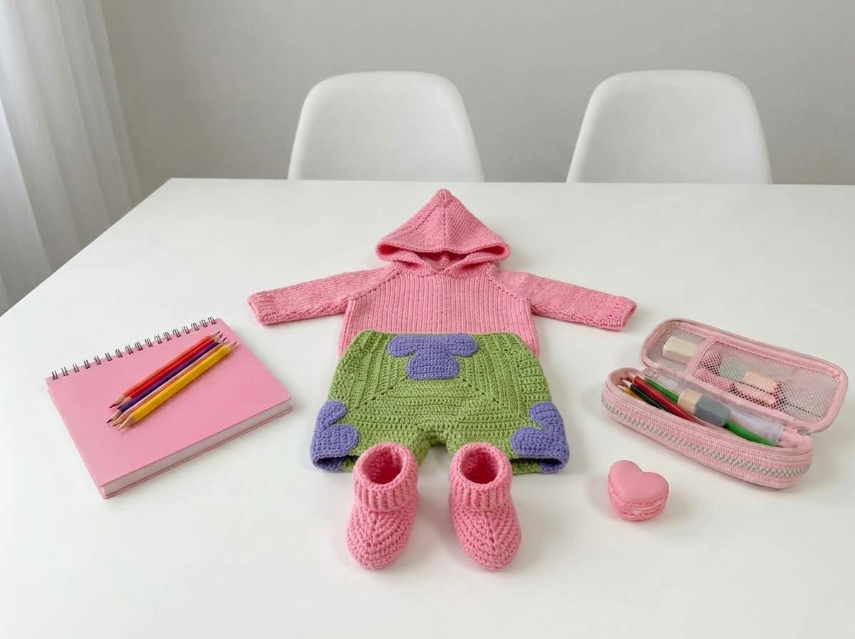
Pastel Baby Set – Complete Step-by-Step Pattern
1. Gathering Your Supplies
To achieve that soft, squishy look perfect for baby skin, a high-quality cotton or acrylic-cotton blend yarn is best.
- Yarn: Worsted weight (Size 4) or DK weight (Size 3) baby yarn.
- Pink: Approx. 150g (for the hoodie and booties)
- Green: Approx. 100g (for the bloomers)
- Purple: Small amount (for the knee patches and flower)
- Hooks: 3.5 mm and 4.0 mm (choose the size that gives you a firm but stretchy fabric).
- Notions: Tapestry needle for weaving in ends and sewing, scissors, stitch markers, and 2 small buttons (optional, for the hoodie).
- Finished Size: Approx. 3-6 months (can be easily adjusted by adding more rows).
What you'll master: Working the "Half Double Crochet in the 3rd Loop" for a knitted ribbed effect, color blocking, and assembling a multi-piece garment.
2. Abbreviations & Special Techniques
Let’s quickly review a few terms. The magic of this set lies in the ribbed texture!
- ch: Chain
- sc: Single crochet
- hdc: Half double crochet
- sl st: Slip stitch
- inc: Increase (2 hdc in one stitch)
- dec: Decrease (hdc 2 together)
- HDC 3rd Loop: This is the magic stitch! Instead of inserting your hook under the top two loops (the V), insert it under the horizontal bar that sits behind the V (the third loop). This pushes the top V forward, creating a ribbed texture on the front and a smooth look on the back.
3. The Pink Ribbed Hoodie
We’ll start with the body, working in rounds to create that beautiful vertical ribbing.
The Body:
- R1 (Pink): Ch 40 (adjust for size). Join with a sl st to form a ring, being careful not to twist.
- R2: Ch 2 (counts as first hdc). HDC in the 3rd loop of each stitch around. Join with a sl st to the top of the ch-2.
- R3-30: Repeat R2 until the body measures about 25 cm from the underarm.
- Finishing: Fasten off.
The Hood:
- Setup: Fold the top of the body in half. Join pink yarn at one shoulder seam.
- R1: Ch 2. HDC in the 3rd loop across to the other shoulder. Ch 2, turn.
- R2-20: Ch 2, turn. HDC in the 3rd loop across.
- Finishing: Fold the hood in half and whip stitch the top seam closed.
The Sleeves:
- Instructions: Join pink yarn at the underarm. Ch 2. HDC in the 3rd loop evenly around the armhole (approx. 30 sts). Join with a sl st.
- R2-15: Ch 2. HDC in the 3rd loop around. Join.
- Cuff: For the last 2 rows, switch to standard HDC (working into the top two loops) to create a smooth, stretchy cuff. Fasten off.
What you'll master: Creating seamless tubes and using the 3rd loop for a professional, knitted look.
4. The Green & Purple Bloomers
These cute shorts are worked flat in rows and then seamed up the legs.
The Main Body (Green):
- R1 (Green): Ch 30. HDC in the 3rd loop of the 2nd ch from the hook and each ch across. Ch 1, turn. (29 sts)
- R2-20: Ch 1, turn. HDC in the 3rd loop across.
- Leg Separation: At the end of R20, do not turn. Chain 15, sl st into the 15th stitch of the current row to form the first leg hole. Chain 15 again, sl st into the beginning of the row to form the second leg hole. Fasten off.
The Knee Patches (Purple):
- Instructions: With purple yarn, join to the bottom edge of one leg hole. Work 3 rows of standard HDC around the leg opening to create a solid purple band. Repeat for the other leg.
The Flower Appliqué (Purple):
- Center: MR, 6 sc. Fasten off.
- Petals: Join purple yarn to the center. Ch 3, 2 dc, ch 3, sl st in the same stitch. Skip 1 stitch. Repeat 5 times around the center. Fasten off and sew to the back (or front) of the bloomers.
What you'll master: Creating leg holes and adding cute, contrasting appliqués.
5. The Pink Booties
A simple, classic bootie to keep those little toes warm.
- R1 (Pink): Ch 10. Sc in the 2nd ch from the hook and each ch across. Work 3 sc in the last stitch. Working down the opposite side of the chain: sc in each ch, 2 sc in the last stitch. Join with a sl st. (22 sts)
- R2: Ch 2. 2 hdc in the next 2 sts, 7 hdc, (2 hdc in the next st) x 3, 7 hdc, 2 hdc in the next 2 sts. Join. (28 sts)
- R3: Ch 2. HDC in each st around. Join. (28 sts)
- R4 (Toe Shaping): Ch 2. 7 hdc, (hdc 2 tog) x 6, 7 hdc. Join. (22 sts)
- R5 (Cuff): Ch 2. HDC in the back loop only (BLO) of each st around. Join. (22 sts)
- R6-8: Ch 2. HDC in each st around. Join. Fasten off.
What you'll master: Shaping a 3D foot and creating a stretchy cuff.
6. Assembly & Finishing
Now for the magic moment where your baby set comes together!
- Weave in Ends: Take your time weaving in all those loose ends on the inside of the garments.
- Sew the Bloomers: Fold the green bloomers in half at the crotch. Whip stitch the inner leg seams and the side seams securely.
- Attach the Flower: Sew the purple flower securely to the bloomers.
- Final Touches: If desired, sew two small buttons to the front of the hoodie to hold the hood in place when it's down. Give everything a gentle steam block to even out the stitches.
What you'll master: Multi-step structural assembly and adding professional, personalized finishing touches.
Final Section: Where to Go from Here
Congratulations! You’ve just crafted a beautiful, handmade Pastel Baby Set. This project is incredibly satisfying because it combines simple stitches with clever texturing to create a high-end looking outfit.
From here, try experimenting with different color combinations! You could make a "gender-neutral" version with mustard yellow and grey, or a "winter" version with deep red and forest green. Happy crocheting, and enjoy your beautiful new handmade staple! 🧸