October 5, 2026
Wanda the Little Witch
Wanda is a tiny witch with big curly hair, a pointy black hat with a floppy bent tip, and a little orange bow at the top. She wears a swishy black dress with a purple scalloped hem, puffy purple sleeves with ruffled cuffs, and striped orange and black stockings. Her broom stands right next to her, ready for a Halloween flight. She is made from simple shapes, with a gathered skirt and a head full of crochet curls. Pour something warm, grab your spookiest yarn, and let us make a very stylish witch.
Jump to pattern instructions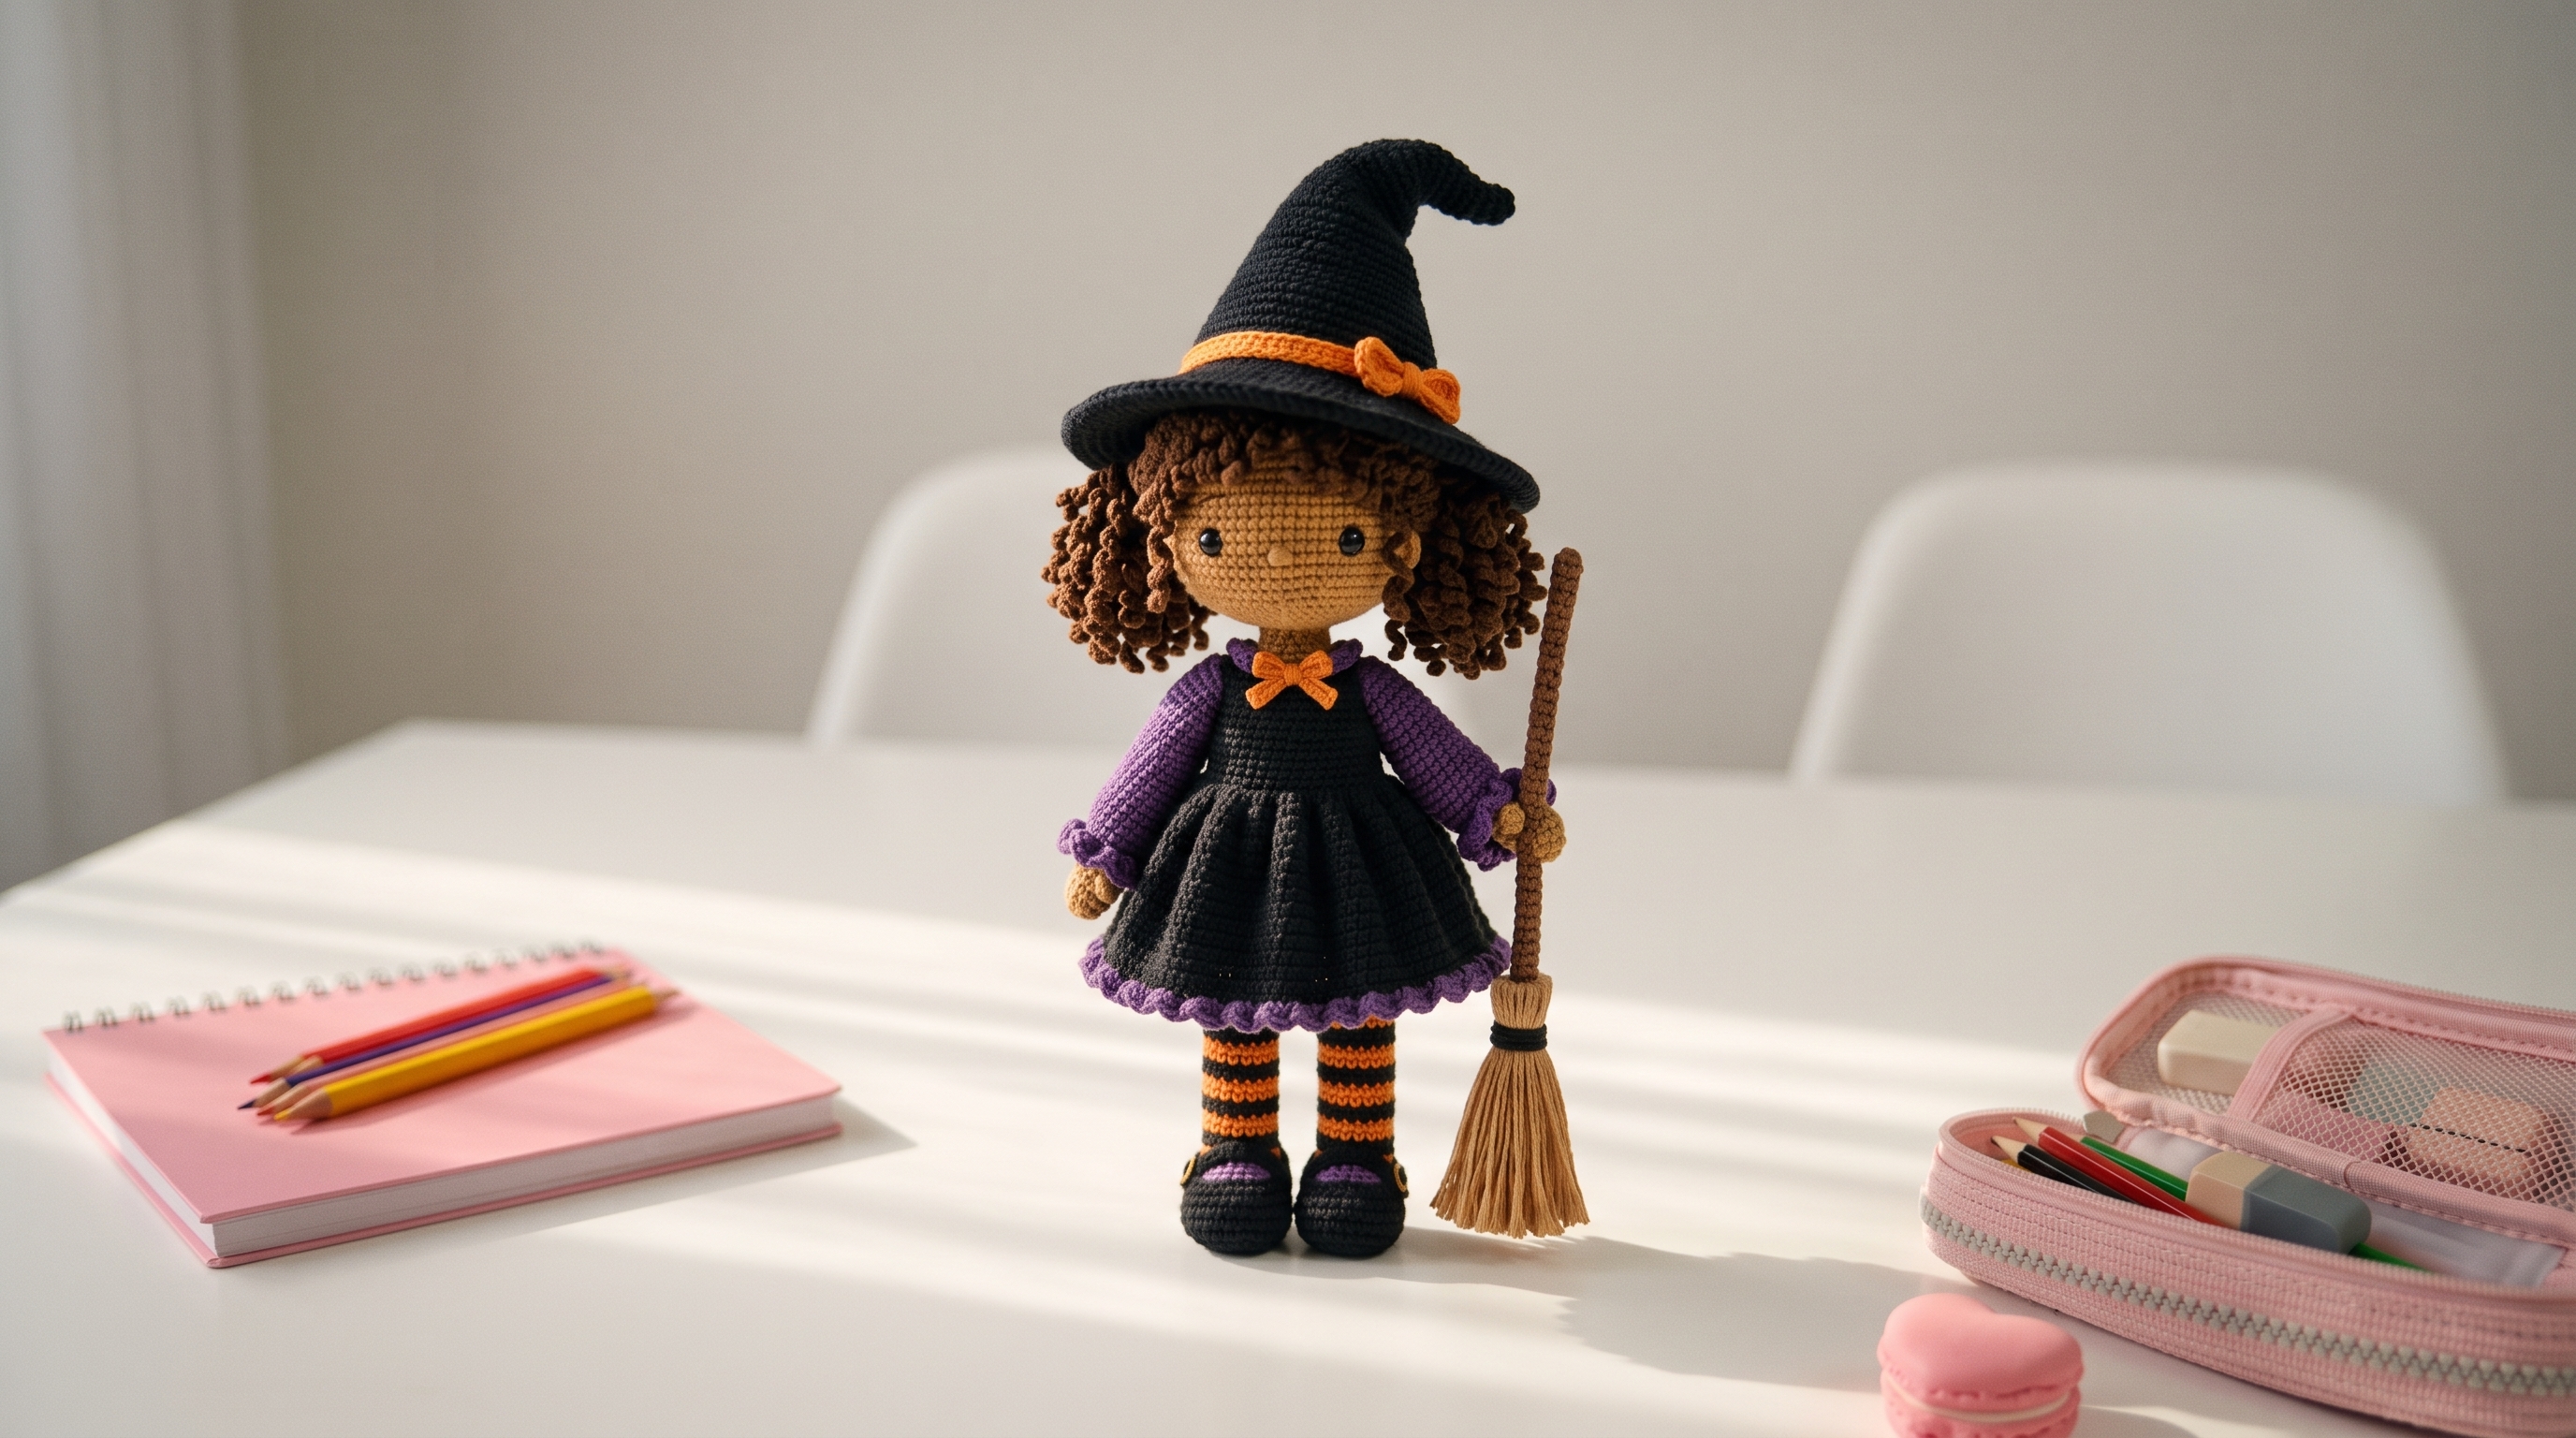
Wanda the Little Witch
Difficulty: Intermediate (basic stitches, but lots of small pieces and sewing)
Finished Size: About 8 inches (20 cm) tall without the hat, and about 10.5 inches (27 cm) with the hat, in DK weight yarn.
Time to Complete: 8 to 10 hours.
What You Will Need
Yarn:
- Warm tan or caramel (T), for the head, neck, and hands
- Black (K), for the dress, shoes, hat, and stocking stripes
- Purple (P), for the sleeves, the hem, and the shoe straps
- Orange (O), for the stocking stripes, the bows, and the hat band
- Chocolate brown (H), for the hair and the broom handle
- Straw or light brown (S), for the broom bristles
- Tip: Use a DK weight 100% cotton yarn. Cotton gives crisp stitches and holds the shape of the skirt and the hat. Use a smaller hook than usual, so the stuffing does not show through.
Tools:
- 2.5 mm (C/2) crochet hook
- 6 mm black safety eyes or black beads (1 pair)
- Poly-fil or fiberfill stuffing
- Yarn needle with a large eye for sewing and embroidering
- Dark brown embroidery thread, for the smile
- Stitch markers
- Sharp scissors
- Straight pins
- Optional: a pipe cleaner for the broom handle, a little blush for the cheeks, and a piece of cardboard for the bristles
The Basics (US Terms)
- MR = magic ring
- ch = chain
- sc = single crochet
- dc = double crochet
- inc = increase (work 2 single crochets into the same stitch)
- dec = decrease (work 2 single crochets together, invisible decrease is best)
- sl st = slip stitch
- BLO = back loop only
- FLO = front loop only
- T, K, P, O, H, S = tan, black, purple, orange, brown, straw
- Unless stated otherwise, pieces are worked in continuous rounds. Use a stitch marker to mark the first stitch of each round.
- When changing colors, pull the new color through on the last stitch of the previous round.
Let Us Get Started
Wanda is made of a head, a body with a gathered skirt, two striped legs, two puffy-sleeved arms, a hat, a head of curls, two bows, and a broom.
Part 1: The Head
Worked with tan yarn.
- Round 1: Work 6 sc into a magic ring. (6 stitches)
- Round 2: Inc in every stitch around. (12 stitches)
- Round 3: (1 sc, inc) repeat 6 times. (18 stitches)
- Round 4: (2 sc, inc) repeat 6 times. (24 stitches)
- Round 5: (3 sc, inc) repeat 6 times. (30 stitches)
- Rounds 6 to 11: Work 1 sc in every stitch around. (30 stitches) If you are using safety eyes, place them now between rounds 9 and 10, about 8 stitches apart. Secure them tightly on the inside.
- Round 12: (3 sc, dec) repeat 6 times. (24 stitches)
- Round 13: (2 sc, dec) repeat 6 times. (18 stitches)
- Stuff the head firmly so it is nice and round.
- Round 14: (1 sc, dec) repeat 6 times. (12 stitches)
- Cut the yarn, leaving a long tail for sewing. Leave the 12 stitches open for attaching the head to the body.
Part 2: The Body
Worked with black yarn, then tan for the neck. Start at the bottom.
- Round 1 (K): Work 6 sc into a magic ring. (6 stitches)
- Round 2: Inc in every stitch around. (12 stitches)
- Round 3: (1 sc, inc) repeat 6 times. (18 stitches)
- Round 4: (2 sc, inc) repeat 6 times. (24 stitches)
- Rounds 5 to 7: Work 1 sc in every stitch around. (24 stitches)
- Round 8: (2 sc, dec) repeat 6 times. (18 stitches)
- Round 9 (waist): Work 1 sc in the BLO of every stitch around. (18 stitches) This leaves a row of front loops, which you will use for the skirt in Part 5.
- Rounds 10 to 12: Work 1 sc in every stitch around. (18 stitches)
- Stuff the body firmly, making sure the bottom is flat.
- Round 13 (T): Change to tan. (1 sc, dec) repeat 6 times. (12 stitches)
- Rounds 14 to 15 (T): Work 1 sc in every stitch around. (12 stitches)
- Stuff the neck firmly. Cut the yarn, leaving a long tail for sewing. Leave the 12 stitches open for attaching the head.
Part 3: The Legs (Make 2)
Worked with black and orange yarn. Start at the sole of the shoe.
- Round 1 (K): Work 6 sc into a magic ring. (6 stitches)
- Round 2: Inc in every stitch around. (12 stitches)
- Round 3: (1 sc, inc) repeat 6 times. (18 stitches)
- Round 4: Work 1 sc in the BLO of every stitch around. (18 stitches) This ridge makes the edge of the sole.
- Rounds 5 to 6: Work 1 sc in every stitch around. (18 stitches)
- Round 7: (1 sc, dec) repeat 6 times. (12 stitches)
- Stuff the shoe firmly, packing the stuffing into the toe first.
- Rounds 8 to 9 (O): Work 1 sc in every stitch around. (12 stitches)
- Rounds 10 to 11 (K): Work 1 sc in every stitch around. (12 stitches)
- Rounds 12 to 13 (O): Work 1 sc in every stitch around. (12 stitches)
- Rounds 14 to 15 (K): Work 1 sc in every stitch around. (12 stitches)
- Rounds 16 to 17 (O): Work 1 sc in every stitch around. (12 stitches)
- Rounds 18 to 19 (K): Work 1 sc in every stitch around. (12 stitches)
- Stuff firmly. Cut the yarn, leaving a long tail for sewing. Leave the end open. Carry the unused color loosely up the inside of the leg, or cut and weave in the ends for a neater stripe.
The shoe strap (make 2, in purple):
- Ch 9. Fasten off, leaving a tail at each end for sewing.
Part 4: The Arms (Make 2)
Worked with tan and purple yarn. Start at the hand.
- Round 1 (T): Work 6 sc into a magic ring. (6 stitches)
- Round 2: (1 sc, inc) repeat 3 times. (9 stitches)
- Round 3: Work 1 sc in every stitch around. (9 stitches)
- Round 4: (1 sc, dec) repeat 3 times. (6 stitches)
- Round 5: Work 1 sc in every stitch around. (6 stitches)
- Stuff the hand with a tiny bit of stuffing.
- Round 6 (P): Inc in every stitch around. (12 stitches) This round makes the ruffled cuff.
- Round 7: (1 sc, dec) repeat 4 times. (8 stitches)
- Rounds 8 to 13: Work 1 sc in every stitch around. (8 stitches)
- Stuff the sleeve very lightly.
- Cut the yarn, leaving a long tail for sewing. Leave the end open.
Part 5: The Gathered Skirt
Worked onto the body, with black and purple yarn.
- Hold the body with the bottom facing up and the neck pointing down toward you, so you can see the front loops left by Round 9.
- Round 1: Join black in any front loop of Round 9. Ch 1, then work an inc in each of the 18 front loops. (36 stitches)
- Round 2: (1 sc, inc) repeat 18 times. (54 stitches)
- Rounds 3 to 9: Work 1 sc in every stitch around. (54 stitches)
- Round 10 (hem, P): Change to purple. Skip 2 stitches, work 5 dc in the next stitch, skip 2 stitches, sl st in the next stitch. Repeat from * 9 times. (9 scallops)
- Fasten off and weave in the ends. The skirt hangs down over the hips, covering the bottom of the body. The purple scallops make the hem.
Part 6: The Witch Hat
Worked with black and orange yarn. Start at the tip.
- Round 1 (K): Work 6 sc into a magic ring. (6 stitches)
- Rounds 2 to 3: Work 1 sc in every stitch around. (6 stitches)
- Round 4: (1 sc, inc) repeat 3 times. (9 stitches)
- Rounds 5 to 6: Work 1 sc in every stitch around. (9 stitches)
- Round 7: (2 sc, inc) repeat 3 times. (12 stitches)
- Rounds 8 to 9: Work 1 sc in every stitch around. (12 stitches)
- Round 10: (3 sc, inc) repeat 3 times. (15 stitches)
- Rounds 11 to 12: Work 1 sc in every stitch around. (15 stitches)
- Round 13: (4 sc, inc) repeat 3 times. (18 stitches)
- Rounds 14 to 15: Work 1 sc in every stitch around. (18 stitches)
- Round 16: (2 sc, inc) repeat 6 times. (24 stitches)
- Round 17: Work 1 sc in every stitch around. (24 stitches)
- Round 18: (3 sc, inc) repeat 6 times. (30 stitches)
- Rounds 19 to 20 (O): Work 1 sc in every stitch around. (30 stitches) This is the orange hat band.
- Round 21 (K): (4 sc, inc) repeat 6 times. (36 stitches)
- Round 22: (5 sc, inc) repeat 6 times. (42 stitches)
- Round 23: (6 sc, inc) repeat 6 times. (48 stitches)
- Round 24: (7 sc, inc) repeat 6 times. (54 stitches)
- Round 25: (8 sc, inc) repeat 6 times. (60 stitches)
- Round 26: Work 1 sc in every stitch around. (60 stitches)
- Join with a sl st to the next stitch and fasten off. Weave in the ends.
- Do not stuff the hat. Press the brim flat. Bend the top 2 inches (5 cm) of the cone over to one side, and tack the bend in place from the inside with a few small stitches, so the tip flops over. For a stiffer cone, stuff the tip with a pinch of stuffing, or slide in a pipe cleaner.
Part 7: The Hair
Worked with brown yarn.
The hair cap:
- Round 1: Work 6 sc into a magic ring. (6 stitches)
- Round 2: Inc in every stitch around. (12 stitches)
- Round 3: (1 sc, inc) repeat 6 times. (18 stitches)
- Round 4: (2 sc, inc) repeat 6 times. (24 stitches)
- Round 5: (3 sc, inc) repeat 6 times. (30 stitches)
- Round 6: Work 1 sc in every stitch around. (30 stitches)
- Join with a sl st and fasten off, leaving a long tail for sewing.
The curls (make about 40):
- Ch 12.
- Work 2 sc in the 2nd ch from the hook and in each chain across. (22 stitches)
- Fasten off, leaving a tail for sewing. The chain will twist into a spiral curl on its own. Make a few at a time while watching a show. For tighter curls, ch 8, and for longer curls, ch 16.
Part 8: The Bows (Make 2)
Worked with orange yarn.
Hat bow (larger):
- Ch 16. Fasten off, leaving a 4 inch (10 cm) tail at each end.
- Fold the chain in half, so the 2 ends meet in the middle, and wrap the tails twice around the center, pulling tight to make a bow. Tie off on the back, leaving the tails for sewing.
Collar bow (smaller):
- Ch 11. Fasten off, leaving a 4 inch (10 cm) tail at each end.
- Make the bow the same way as the hat bow.
Part 9: The Broom
Worked with brown and straw yarn.
The handle (brown):
- Round 1: Work 6 sc into a magic ring. (6 stitches)
- Rounds 2 to 16: Work 1 sc in every stitch around. (6 stitches)
- Slide a pipe cleaner folded in half into the handle, or fill it very firmly with a little stuffing. Fasten off, leaving a tail, and sew the end closed.
The bristles (straw):
- Wrap straw yarn about 30 times around a piece of cardboard that is 3 inches (7.5 cm) tall.
- Slide the loops off, and tie them tightly in the middle with a piece of black yarn.
- Cut the loops at the bottom, so you have 60 strands, each 3 inches (7.5 cm) long, and fold the bundle in half.
- Place the bottom of the broom handle in the center of the bundle, with the black tie at the top, and the strands hanging down around it.
- Wrap black yarn around the bundle about 1/2 inch (1.2 cm) below the top, pulling tight, and tie off.
- Trim the bristles evenly to 2.5 inches (6 cm), and fluff them.
Assembly and Finishing
This is where Wanda comes to life. Take your time pinning before you sew.
Making the Face:
- With a few tiny straight stitches in tan yarn, build up a small nose between the eyes, about 2 rounds below them, working the stitches over each other so they make a little raised bump.
- With dark brown embroidery thread, embroider a tiny smile below the nose, about 4 stitches wide.
- If you like, brush a little blush on each cheek, or add a few tiny pink stitches.
Adding the Hair:
- Pin the hair cap on the head, with the back of the cap covering the back of the head, and the front edge about 4 rounds above the eyes.
- Sew it on all the way around with small stitches.
- Starting at the bottom edge of the cap, sew the curls on in rows, working up toward the top of the head. Sew each curl by the end of the chain, using the tail, and let them hang. Make the curls overlap, so no cap shows between them.
- Add a few curls to the front of the cap for bangs, and sew them over the forehead, but not over the eyes.
Attaching the Head:
- Pin the head on the neck, with the open ends together, and with the face tilted very slightly forward.
- Sew them together all the way around with the long tail, using a whip stitch. Add a bit more stuffing in the neck before you close, if needed.
- Sew the collar bow to the front of the neck, just below the chin.
Attaching the Legs:
- Pin the legs to the bottom of the body, about 3 stitches apart, with the toes pointing forward.
- Sew each leg on firmly, going around twice. Check that Wanda can stand before you finish sewing.
- Sew a purple strap across the front of each shoe, about 1/2 inch (1.2 cm) from the top.
Attaching the Arms:
- Pin the arms on the sides of the body, at the shoulders, with the open ends toward the body.
- Sew each arm on firmly, angling the left arm slightly forward, so the hand can hold the broom.
Adding the Hat:
- Place the hat on the head, tilted slightly to one side, so the brim sits just above the eyebrows.
- Sew the hat to the head with a few small stitches around the inside of the cone, going through the hair.
- Sew the larger bow to the front of the orange band.
Holding the Broom:
- Slide the broom handle next to the right hand, with the bristles on the floor.
- Sew the hand to the handle with a few small stitches, so the broom stays upright. Weave in all remaining ends.
A Few Friendly Tips
- Keep it snug: Keep your tension tight and even. Loose stitches let the stuffing show through, and tight stitches make the doll look neat and polished.
- Firm neck: Stuff the neck firmly, and sew the head on in a few places. A firm neck keeps the head from drooping.
- Standing strong: If Wanda tips over, sew the legs a little further apart, and add more stuffing to the shoes and the bottom of the body. A weighted base, like a little bag of poly pellets in the bottom of the body, also helps.
- Make it your own: Choose any skin and hair tones you like, such as a deep brown with black curls, or a pale tan with red hair. Try a green dress, a pink hat, or a cat on her shoulder.
- Size up: For a bigger doll, use worsted weight yarn and a 3.5 mm hook, with the same stitch counts.
- Safe for little ones: For babies and toddlers, skip the safety eyes and embroider the eyes with black yarn. Sew the hair, hat, and bows on with extra stitches, and leave off the broom.
I hope you enjoy making this stylish little witch. She is such a fun project and makes a wonderful handmade gift or Halloween decoration.
If you run into any trouble or just want to share how your doll turned out, please reach out. I love seeing what you create.
Happy crocheting and happy Halloween!