October 2, 2026
Berry Sweet Pouch
This little strawberry bag is sweet enough to eat. Soft lilac fabric is dotted with tiny cream seeds, and a sage green top with pointy leaf-shaped points makes it look like it just came off the vine. A leafy strap folds over the front and fastens with a wooden toggle, with two perky green leaves standing up on top. It is a roomy little bag for snacks, makeup, knitting notions, or a few small treasures, and it works up quickly in chunky stitches. Pour something warm, pick your favorite berry shades, and let us stitch something sweet.
Jump to pattern instructions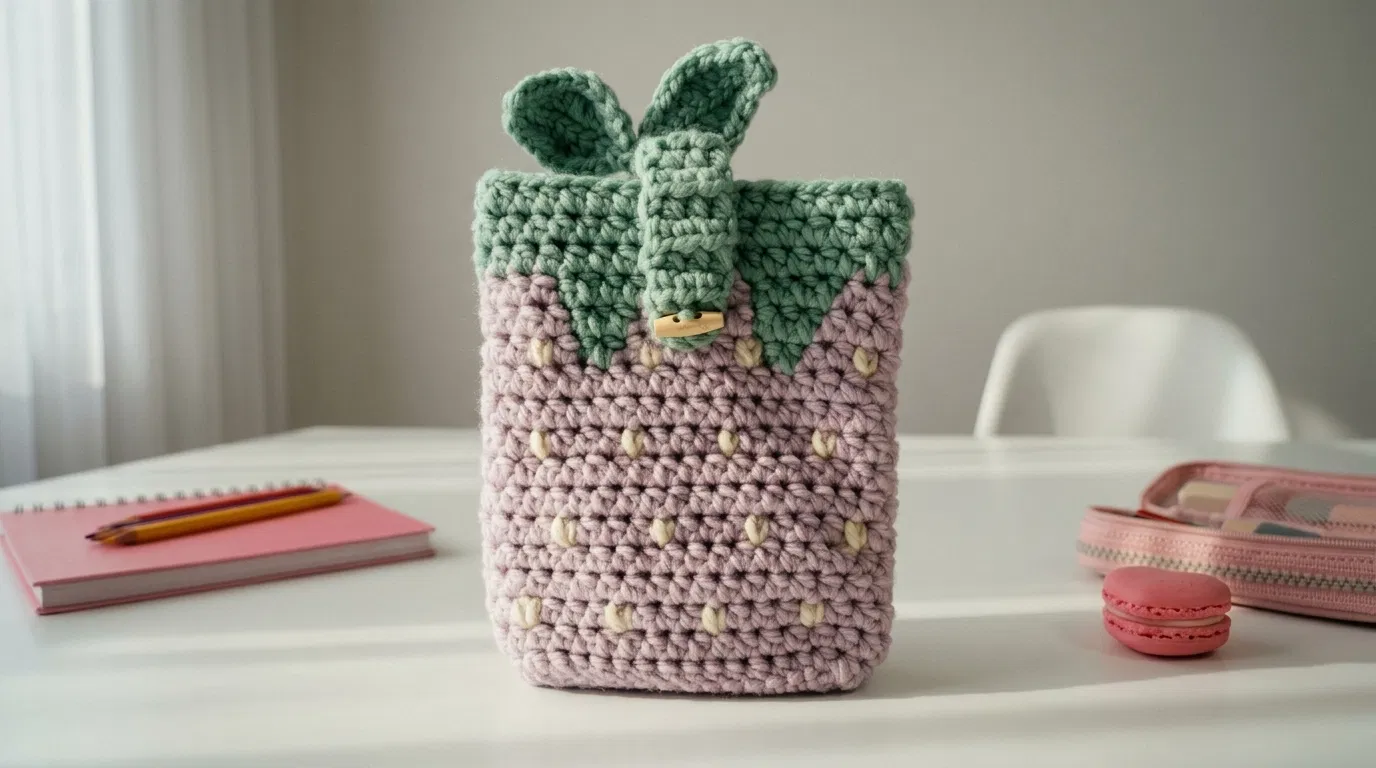
Berry Sweet Pouch
Difficulty: Easy to intermediate (basic stitches, simple color changes, and a little embroidery)
Finished Size: About 6 inches (15 cm) wide, 3.5 inches (9 cm) deep, and 7 inches (18 cm) tall, not including the leaves.
Time to Complete: 4 to 5 hours.
What You Will Need
Yarn:
- Lilac or dusty pink (L), about 160 yards (146 m), for the body of the bag
- Sage green (G), about 90 yards (82 m), for the top, the strap, and the leaves
- Cream (C), a small scrap of about 10 yards (9 m), for the seeds
- Tip: Use a worsted weight cotton or cotton blend yarn. Cotton makes a firm, sturdy fabric that holds the bag's shape. A smaller hook than usual keeps the stitches tight, so the bag does not sag when it is filled.
Tools:
- 4.5 mm (7) crochet hook. Go down a size if you want a firmer bag.
- 1 wooden toggle button, about 1 inch (2.5 cm) long
- Yarn needle with a large eye for sewing and embroidering
- Stitch markers (you will need 5 or 6)
- Sharp scissors
- Straight pins
- Optional: a piece of cardboard or plastic canvas cut to 5.5 x 2.5 inches (14 x 6 cm) for the base
- Optional: fabric and a sewing needle and thread for a lining
Gauge: 14 stitches and 16 rows in single crochet = 4 x 4 inches (10 x 10 cm). Gauge is not critical for a bag, but a tighter fabric means a sturdier bag.
The Basics (US Terms)
- ch = chain
- sc = single crochet
- hdc = half double crochet
- dc = double crochet
- inc = increase (work 2 single crochets into the same stitch)
- sl st = slip stitch
- BLO = back loop only
- L, G, C = lilac, green, cream
- The bag is worked in continuous rounds. Use a stitch marker to mark the first stitch of each round, and move it up as you go.
- The strap is worked flat in rows. Ch 1 at the start of each row does not count as a stitch.
Color Change Basics
The green wedges are worked by carrying the color you are not using along the top of the stitches and crocheting over it, which keeps it hidden inside the fabric and makes the front neat.
- Change colors on the last stitch before the new color. Work until 2 loops remain on the hook, then pull the new color through to finish the stitch.
- Lay the unused yarn along the top of the stitches of the round below, and work the next stitches over it.
- Keep the tension even. If the carried yarn is too tight, the fabric will pucker.
- Weave in the beginning and ending tails as you go, so you are not left with lots of ends at the end.
Let Us Get Started
We will make the bag, then the strap, then two leaves, and then add the seeds and sew everything together.
Part 1: The Base
Worked with lilac yarn.
- Foundation: Ch 13.
- Round 1: Sc in the 2nd ch from the hook and in the next 10 chains. Work 3 sc in the last chain. Turn to work along the other side of the chain, and sc in the next 10 loops. Work 2 sc in the last loop. (26 stitches) You now have 2 long sides of 10 stitches each and 2 rounded ends of 3 stitches each.
- Round 2: Inc in each of the 3 stitches at the first end (6 stitches). Sc in the next 10 stitches. Inc in each of the 3 stitches at the other end (6 stitches). Sc in the next 10 stitches. (32 stitches)
- Round 3: Work (1 sc, inc) 3 times across the first end (9 stitches). Sc in the next 10 stitches. Work (1 sc, inc) 3 times across the other end (9 stitches). Sc in the next 10 stitches. (38 stitches)
- Round 4: Work (2 sc, inc) 3 times across the first end (12 stitches). Sc in the next 10 stitches. Work (2 sc, inc) 3 times across the other end (12 stitches). Sc in the next 10 stitches. (44 stitches)
- Round 5: Work (3 sc, inc) 3 times across the first end (15 stitches). Sc in the next 10 stitches. Work (3 sc, inc) 3 times across the other end (15 stitches). Sc in the next 10 stitches. (50 stitches)
- Round 6: Work (4 sc, inc) 3 times across the first end (18 stitches). Sc in the next 10 stitches. Work (4 sc, inc) 3 times across the other end (18 stitches). Sc in the next 10 stitches. (56 stitches) Place a stitch marker at the start of each round, and keep track of which stitches are the ends and which are the sides.
Part 2: The Body
Worked with lilac yarn, then green.
- Round 7: Sc in the BLO of every stitch around. (56 stitches) This makes the ridge that turns the base up into the sides of the bag.
- Rounds 8 to 23: Sc in every stitch around, in lilac. (56 stitches)
- The green wedges (Rounds 24 to 30): Work each round as 4 repeats of the pattern in the table. Each repeat is 14 stitches, and the green stitches make a triangle that grows wider on every round. Carry the unused color as described in the color change basics.
| Round | One repeat (14 stitches), worked 4 times | |---|---| | 24 | 6 L, 1 G, 7 L | | 25 | 5 L, 3 G, 6 L | | 26 | 4 L, 5 G, 5 L | | 27 | 3 L, 7 G, 4 L | | 28 | 2 L, 9 G, 3 L | | 29 | 1 L, 11 G, 2 L | | 30 | 13 G, 1 L |
- Rounds 31 to 35: Sc in every stitch around, in green. (56 stitches)
- Join with a sl st to the next stitch and fasten off. Weave in all ends, including the lilac and green carried tails. The green wedges give the bag its strawberry top, and the solid green band is the leafy cap.
Part 3: The Strap
Worked flat with green yarn.
- Foundation: Ch 6.
- Row 1: Sc in the 2nd ch from the hook and in each chain across. (5 stitches)
- Rows 2 to 30: Ch 1, turn. Sc in each stitch across. (5 stitches)
- Row 31 (buttonhole): Ch 1, turn. Sc in the first stitch, ch 2, skip 2 stitches, sc in the last 2 stitches. (5 stitches)
- Row 32: Ch 1, turn. Sc in the first stitch, 2 sc in the ch-2 space, sc in the last 2 stitches. (5 stitches)
- Rows 33 to 34: Ch 1, turn. Sc in each stitch across. (5 stitches)
- Fasten off, leaving a long tail for sewing. The strap should be about 8.5 inches (22 cm) long. You will trim or add rows to fit when you place it on the bag.
Part 4: The Leaves (Make 2)
Worked with green yarn.
- Foundation: Ch 11.
- Top side: Sl st in the 2nd ch from the hook, sc in the next ch, hdc in the next ch, dc in the next 4 chains, hdc in the next ch, sc in the next ch, 3 sc in the last ch.
- Bottom side: Turn to work along the other side of the chain. Sc in the next ch, hdc in the next ch, dc in the next 4 chains, hdc in the next ch, sc in the next ch, sl st in the last loop.
- Fasten off, leaving a long tail for sewing. Each leaf is about 3 inches (7.5 cm) long.
The Seeds
Worked with cream yarn and a yarn needle, on the lilac part of the bag.
- Count stitches from your start-of-round marker, which marks stitch 1 of each round.
- Seed rows: Add seeds on Rounds 9, 12, 15, 18, and 21.
- Rounds 9, 15, and 21: Add a seed in stitches 1, 5, 9, 13, and so on, every 4th stitch. (14 seeds per round)
- Rounds 12 and 18: Add a seed in stitches 3, 7, 11, 15, and so on, every 4th stitch. (14 seeds per round) Staggering the seeds makes them look scattered naturally.
- To make each seed: Thread the cream yarn on the needle. Bring the needle up at the bottom of the stitch, and make two short slanted stitches that meet at the bottom, like a little heart or V. Pull the stitches snug, but do not pucker the fabric. Pass the yarn under the stitches on the inside to move to the next seed, and weave in the ends at the end.
Assembly and Finishing
This is where your strawberry comes together. Take your time pinning before you sew.
Shaping the Base:
- Weave in all remaining ends.
- Optional: slide the cardboard or plastic canvas into the bottom of the bag to keep the base flat. You can cover it with a scrap of fabric.
Attaching the Strap:
- Find the center of one long side of the bag, which will be the front. Place the strap upside down on the back long side, in the center, so the end with the 5 stitch tail goes inside the bag.
- Sew the first 4 rows of the strap to the inside top edge of the back with the long tail, working through the green top. Sew firmly, since the strap carries the closure.
- Fold the strap over the top of the bag and let it hang down the front. Pin the buttonhole end about 3.5 inches (9 cm) below the top edge, near the tips of the wedges. Trim or add rows so the buttonhole sits where you like it.
Adding the Button:
- Mark where the buttonhole falls on the front of the bag.
- Sew the wooden toggle button on the front at that spot, with a few strong stitches through the bag's fabric.
- Slide the toggle through the buttonhole and turn it sideways to close.
Attaching the Leaves:
- Pin the two leaves to the top of the strap where it folds over the rim, with the pointed tips facing up and slightly outward, like a little bow.
- Sew the base of each leaf firmly to the strap with the tails.
- Weave in all remaining ends.
A Few Friendly Tips
- Keep it snug: Work your stitches tightly and evenly. Tight stitches make a sturdier bag that keeps its shape when it is full.
- Strong seeds: If you plan to carry heavy things in the bag, work a second stitch through each seed so it stays flat.
- Wedge tension: Keep your carried yarn a little loose. If the fabric puckers where the green meets the lilac, loosen the carried yarn and gently stretch the fabric when you block.
- Lining: For a longer-lasting bag, sew a fabric lining. Cut two rectangles of cotton fabric, sew them into a tube, and hand sew the lining into the bag along the green top. This also keeps small items from poking through.
- Making it a shoulder bag: Make a long chain or a flat strap of green yarn about 24 inches (60 cm) long, and sew the ends to the inside of the bag at the sides.
- Size up: For a bigger bag, use a chunky yarn and a larger hook, and add 2 more stitches to the sides in Round 1 (chain 15), and add 3 stitches for each extra inch.
- Make it your own: Try a classic red strawberry, a pink raspberry, a blueberry in blue with a purple top, or a yellow pineapple with green leaves.
- Care: Spot clean or hand wash gently, and lay flat to dry. If you have added a cardboard base, remove it before washing.
I hope you enjoy making this sweet little strawberry bag. It is such a fun project and makes a wonderful handmade gift.
If you run into any trouble or just want to share how your bag turned out, please reach out. I love seeing what you create.
Happy crocheting!