September 18, 2026
Sunflower Granny Square Tote Bag – A Cheerful Crochet Project
Carry a little bit of sunshine wherever you go with this vibrant Sunflower Tote Bag! Constructed from classic granny squares featuring a rich brown center, bright yellow petals, and a crisp white border, this bag is a fun and modular project. It’s perfect for spring and summer outings, markets, or beach days.
Jump to pattern instructions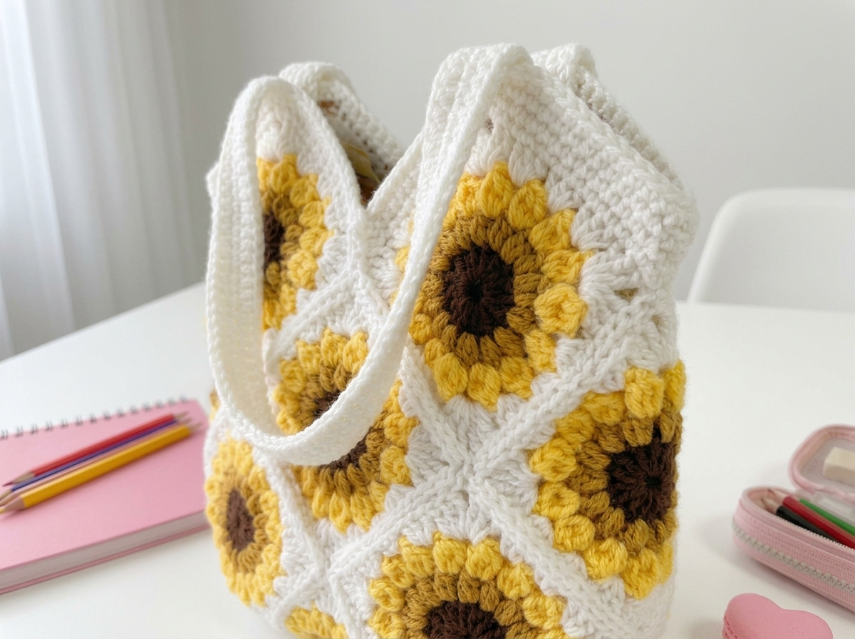
Sunflower Granny Square Tote Bag – Complete Step-by-Step Pattern
1. Gathering Your Supplies
To make this bag sturdy enough to hold your essentials, a durable cotton or acrylic blend yarn is best.
- Yarn: Worsted weight (Size 4) yarn.
- Brown: For the flower centers (approx. 50g).
- Yellow: For the petals (approx. 150g).
- White: For the borders, handles, and bag structure (approx. 200g).
- Hook: 4.0 mm (US G/6) or 4.5 mm (US 7).
- Notions: Tapestry needle for sewing squares, scissors, and stitch markers.
- Finished Size: Approximately 35 cm wide x 35 cm tall (14" x 14"), depending on the number of squares used.
What you'll master: Creating uniform granny squares, sewing motifs together seamlessly, and constructing a lined or unlined tote bag.
2. Abbreviations & Special Techniques
Let’s quickly review a few terms. If you're new to granny squares, don't worry—they are the building blocks of crochet!
- MR: Magic ring
- ch: Chain
- sc: Single crochet
- dc: Double crochet
- sl st: Slip stitch
- sp: Space (the gap between stitches)
- Cluster: 3 dc worked into the same space.
3. The Sunflower Square (Make 20–30)
This is the main component of the bag. We will create a flower center and square it off with white borders.
Round 1 (Brown - Center):
- Instructions: MR. Ch 3 (counts as first dc). 11 dc into the ring. Sl st to top of ch-3 to join. (12 dc)
- Finishing: Do not fasten off yet, or cut and join Yellow.
Round 2 (Yellow - Petals):
- Instructions: Join Yellow yarn to any stitch.
- Pattern: Ch 3, 2 dc in same st (this is a cluster), ch 3, sl st in next st. Repeat this all the way around. You should have 12 "petal" loops.
- Finishing: Sl st to join. Fasten off Yellow.
Round 3 (White - Squaring Off):
- Instructions: Join White yarn to any ch-3 space.
- Corner: (3 sc, ch 2, 3 sc) in the first ch-3 space.
- Side: 3 sc in the next ch-3 space.
- Pattern: Repeat [Corner, Side] all the way around.
- Round 4 (White - Expanding): Ch 3 (counts as dc). 2 dc in same corner space. Ch 1. 3 dc in next corner space.
- Sides: 3 dc in the side spaces.
- Corners: (3 dc, ch 2, 3 dc).
- Finishing: Sl st to join. Fasten off. You now have a perfect square!
What you'll master: Color changing and transforming a circle into a square.
4. Assembling the Bag Body
We will sew the squares together to create a long rectangular panel, which will then be folded or sewn into a tube.
- Layout: Arrange your squares in a grid. For a medium tote, try 5 squares wide x 4 squares high (20 squares total).
- Sewing: Lay two squares right sides together (or back to back for a flat seam). Using your tapestry needle and White yarn, whip stitch the edges together.
- Construction:
- Sew the squares into 4 long horizontal rows of 5 squares each.
- Stack the rows and sew them together vertically to create one large rectangular fabric.
- Fold the rectangle in half (bringing the short ends together) and sew the side seam. You now have a tube!
What you'll master: Modular assembly and creating a seamless fabric from motifs.
5. The Bottom Base
To close the bottom of the bag, you can either sew more squares together or crochet a circle.
Option A: Square Bottom
- Sew 5 squares together in a row, then attach another row of 5 to create a 5x5 square (or a cross shape that fits the tube). Sew this to the bottom of your bag tube.
Option B: Crochet Circle (Easier)
- Instructions: With White yarn, MR 6 sc. R2: 12 sc. R3: 18 sc... continue increasing by 6 sc each round until the circle matches the diameter of your bag tube.
- Assembly: Sew the circle to the bottom opening of the bag tube using a whip stitch.
What you'll master: Creating a sturdy base for a bag.
6. The Handles
The bag needs sturdy straps. We will make two long white strips.
- Instructions: With White yarn, Ch 60 (or measure over your shoulder for desired length).
- Row 1: Sc in the 2nd ch from the hook and each ch across.
- Row 2-4: Ch 1, turn. Sc in each st across.
- Finishing: Fasten off, leaving long tails.
- Attachment: Fold the strap into a loop. Sew the ends securely to the inside top rim of the bag, about 10-12 cm from the side seams. Reinforce these stitches well!
What you'll master: Creating durable straps and attaching them securely.
7. Finishing Touches
- Weave in Ends: You will have many ends from the squares. Take your time weaving them in on the back side of the work.
- Lining (Optional): For a professional finish, sew a fabric lining (cotton or canvas) inside the bag to prevent small items from falling through the granny square holes.
- Blocking: Gently steam the bag to help the squares lay flat and the handles hang straight.
What you'll master: Professional finishing techniques.
Final Section: Where to Go from Here
Congratulations! You’ve just crafted a bright and cheerful Sunflower Tote Bag. This project is a fantastic way to use up yarn scraps and create a functional piece of art.
From here, try experimenting with different flower colors! You could make a "Daisy" bag with white petals and yellow centers, or a "Lavender" bag with purple squares. You could even add a tassel to the zipper or a cute pom-pom charm. Happy crocheting, and enjoy your sunny new accessory!