September 18, 2026
Eternal Spring Bouquet – A Crochet Flower Arrangement
Capture the beauty of spring that never fades! This stunning bouquet features delicate white lilies, vibrant purple crocuses, and clusters of lavender buds, all wrapped in rustic kraft paper and soft purple tissue. It’s a perfect intermediate project for creating a lasting gift or a beautiful home centerpiece.
Jump to pattern instructions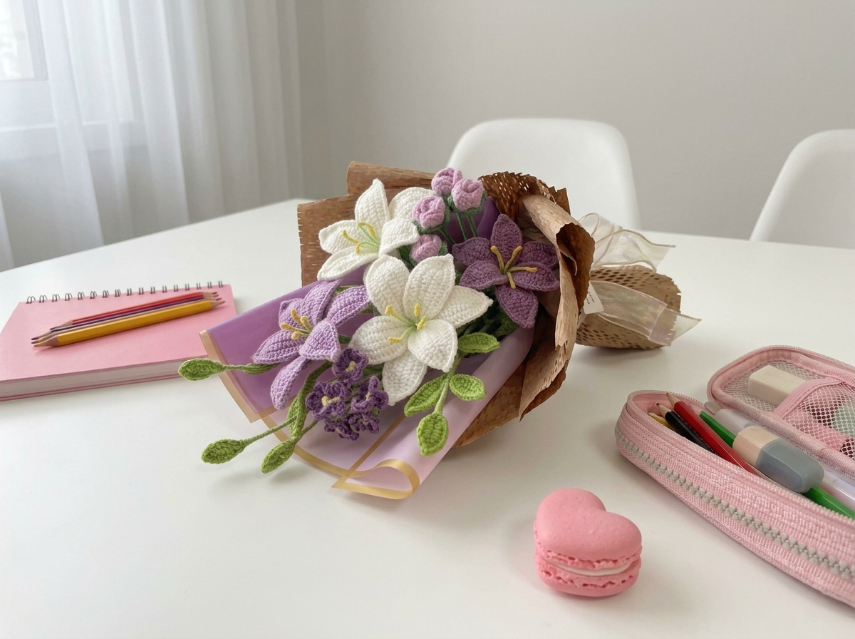
Eternal Spring Bouquet – Complete Step-by-Step Pattern
1. Gathering Your Supplies
To make these flowers look realistic and hold their shape, you will need floral wire in addition to your yarn.
- Yarn: Fine cotton yarn (e.g., YarnArt Jeans, Catania, or similar lace/sport weight).
- White: For the large lilies (approx. 30g).
- Purple (Dark): For the medium flowers and bud clusters (approx. 30g).
- Lavender (Light Purple): For the wrapping paper accent or additional flowers (approx. 20g).
- Green: For stems and leaves (approx. 50g).
- Yellow: For the stamens/pistils (tiny amount).
- Hook: 2.0 mm or 2.5 mm (small hook for fine detail).
- Notions:
- Floral Wire: 22 gauge or 24 gauge (essential for bending stems).
- Floral Tape: Green tape to wrap the wire stems.
- Wrapping Materials: Brown kraft paper, light purple tissue paper, and ribbon (as seen in the photo).
- Tapestry needle, scissors.
What you'll master: Creating realistic flower shapes, wiring stems, and arranging a professional-looking bouquet.
2. Abbreviations & Special Techniques
- MR: Magic ring
- ch: Chain
- sc: Single crochet
- hdc: Half double crochet
- dc: Double crochet
- tr: Treble crochet
- sl st: Slip stitch
- Bobble St: (Yarn over, insert hook, pull up loop) 3 times in same stitch. Yarn over, pull through all loops.
3. The White Lily (Large Flower)
This is the statement flower of the bouquet.
Petals (Make 6 per flower):
- Instructions: With White yarn, Ch 6.
- Row 1: Sc in 2nd ch from hook, hdc in next, dc in next, 3 tr in the last ch (this forms the tip). Working down the opposite side of the chain: dc in next, hdc in next, sc in last. Sl st to join.
- Finishing: Fasten off, leaving a long tail.
Center & Assembly:
- Center: MR with Yellow yarn. 6 sc. Fasten off.
- Stamens: Cut 3 pieces of yellow yarn (10cm each). Fold in half. Loop them through the center of the white petals (before sewing petals together) to create the yellow stalks seen in the photo.
- Assembly: Arrange the 6 white petals around the yellow center. Sew them together at the base.
What you'll master: Creating large, shaped petals.
4. The Purple Flower (Medium)
Similar to the lily but smaller and with 5-6 petals.
Petals (Make 6 per flower):
- Instructions: With Purple yarn, Ch 5.
- Row 1: Sc in 2nd ch, hdc, dc, 3 dc in tip, dc, hdc, sc. Sl st to join.
- Finishing: Fasten off.
Assembly:
- Sew petals around a small yellow center (MR 4 sc).
What you'll master: Scaling down a pattern.
5. The Lavender Bud Cluster (Hyacinth Style)
This adds texture and volume to the bouquet.
- Instructions: With Purple yarn, MR 4 sc. Do not fasten off.
- Row 1: Ch 2, work a Bobble St in the same MR. Ch 1, sl st in MR.
- Repeat: Work 4-5 Bobble Stitches into the same Magic Ring to create a cluster of little buds.
- Finishing: Fasten off, leaving a long tail. Make 3-4 of these clusters.
What you'll master: Creating textured clusters.
6. The Leaves & Stems
Leaves (Make 10-12):
- Instructions: With Green yarn, Ch 12.
- Row 1: Sc in 2nd ch, hdc in next 2, dc in next 4, hdc in next 2, sc in last.
- Row 2: Working down the opposite side: sc, hdc, dc (4 times), hdc (2 times), sc. Sl st to join.
- Finishing: Fasten off.
Stems (The Wiring Process): This is crucial for the bouquet look!
- Cut a piece of floral wire approx. 20-30 cm long.
- Take your finished flower head (e.g., the White Lily).
- Insert the wire through the center base of the flower.
- Wrap the wire tightly with Green yarn (or green floral tape) starting from the base of the flower head down the wire.
- Alternative: You can crochet a long chain (Ch 30) and sew the wire inside the chain, but wrapping yarn around the wire is usually sturdier for bouquets.
What you'll master: Integrating non-crochet materials for structure.
7. Assembly & Wrapping
Now for the magic moment where your flowers become a gift!
- Arrange: Lay out your flowers. You want the tall White Lilies in the back/center, the Purple Flowers in the middle, and the Bud Clusters and Leaves filling the gaps.
- Bind: Gather the stems together. Wrap them tightly with floral tape or string to hold the shape. The stems should flare out slightly at the bottom like a cone.
- The Wrapping (As seen in photo):
- Layer 1: Take a sheet of brown kraft paper. Crumple it slightly for texture. Place it behind the bouquet.
- Layer 2: Take a sheet of light purple paper (or tissue paper). Fold it into a fan shape and place it in front of the brown paper.
- Layer 3: Add a strip of mesh or ribbon if desired.
- Secure: Wrap the bottom of the paper tightly around the stems and tie with a ribbon or twine.
What you'll master: Floral arrangement and packaging.
Final Section: Where to Go from Here
Congratulations! You’ve just crafted a beautiful Eternal Spring Bouquet. This project is incredibly rewarding because the result looks so professional and lasts forever.
From here, try experimenting with different flower types! You could add yellow daisies, pink roses, or blue hydrangeas. You could also change the wrapping paper colors to match a specific holiday—red and green for Christmas, or pastels for Easter. Happy crocheting, and enjoy your beautiful garden!