September 17, 2026
Kawaii Christmas Tree Car – A Festive Amigurumi Pattern
Roll into the holiday season with this adorable Kawaii Christmas Tree Car! Featuring a cute, smiling pot on wheels, a fluffy textured green tree, and festive red ornaments, this project is the perfect blend of cozy home decor and playful character design. It’s an intermediate-friendly project that makes a wonderful centerpiece or gift.
Jump to pattern instructions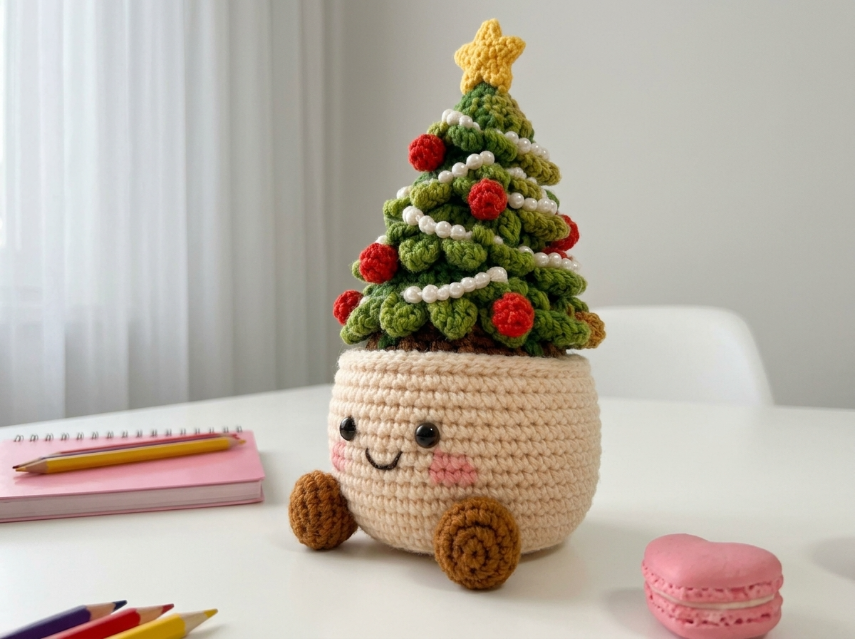
Kawaii Christmas Tree Car – Complete Step-by-Step Pattern
1. Gathering Your Supplies
To get that cute, sturdy look, a smooth cotton or acrylic blend yarn is best.
- Yarn: Worsted weight (Size 4) yarn. You will need small amounts of:
- Cream/Beige: For the pot body (approx. 50g).
- Green: For the tree (approx. 50g).
- Brown: For the wheels/feet and tree trunk base (small amount).
- Red: For the ornaments (tiny amount).
- Yellow: For the star (tiny amount).
- White: For the garland (tiny amount or use small pearl beads).
- Pink: For the cheeks (tiny amount).
- Black: For the eyes and mouth (tiny amount).
- Hook: 3.0 mm or 3.5 mm (choose a size that gives you a tight, stuff-proof gauge).
- Notions:
- 10-12 mm black safety eyes.
- Poly-fil stuffing.
- Tapestry needle.
- Scissors.
- Stitch markers.
- Optional: Small pearl beads for the garland.
What you'll master: Creating a character with wheels, working textured stitches for the tree, and assembling a multi-part holiday scene.
2. Abbreviations & Special Techniques
Let’s quickly review a few terms. The tree texture is key here!
- MR: Magic ring
- ch: Chain
- sc: Single crochet
- dc: Double crochet
- sl st: Slip stitch
- inc: Increase (2 sc in one stitch)
- dec: Decrease (2 sc crocheted together invisibly)
- Bobble St (5-dc cluster): Yarn over, insert hook, pull up a loop. Repeat 4 more times in the same stitch (9 loops on hook). Yarn over and pull through all 9 loops. Ch 1 to lock.
3. The Pot Body (Cream)
This forms the cute "car" base.
- R1: 6 sc in MR (6)
- R2: 6 inc (12)
- R3: (1 sc, inc) x 6 (18)
- R4: (2 sc, inc) x 6 (24)
- R5: (3 sc, inc) x 6 (30)
- R6: (4 sc, inc) x 6 (36)
- R7-12: 36 sc (36) [6 rows]
- Note: This creates the round, pot-like shape.
- R13: 36 sc in BLO (36)
- Note: This creates a ridge for the top edge.
- R14: 36 sc (36)
- Finishing: Fasten off, leaving a long tail. Stuff firmly.
What you'll master: Creating a sturdy, round container shape.
4. The Wheels (Brown, Make 2)
These look like little wooden wheels or feet.
- R1: 6 sc in MR (6)
- R2: 6 inc (12)
- R3: (1 sc, inc) x 6 (18)
- R4: 18 sc (18)
- Finishing: Fasten off, leaving a long tail. Do not stuff. Flatten slightly.
What you'll master: Creating flat, circular appliqués.
5. The Christmas Tree (Green)
To get that fluffy, pine-needle look, we will use Bobble Stitches.
- R1: 6 sc in MR (6)
- R2: 6 inc (12)
- R3: (1 sc, Bobble St) x 6 (12 sts + 6 bobbles)
- Note: Alternate sc and bobbles to create texture.
- R4: (2 sc, Bobble St) x 6 (18 sts + 6 bobbles)
- R5: (3 sc, Bobble St) x 6 (24 sts + 6 bobbles)
- R6: (4 sc, Bobble St) x 6 (30 sts + 6 bobbles)
- R7: (5 sc, Bobble St) x 6 (36 sts + 6 bobbles)
- R8: (6 sc, Bobble St) x 6 (42 sts + 6 bobbles)
- Note: You can stop here for a shorter tree, or continue increasing for a taller one.
- Decreasing Rounds (to close the top):
- R9: (5 sc, dec) x 6 (36)
- R10: (4 sc, dec) x 6 (30)
- R11: (3 sc, dec) x 6 (24)
- Stuffing: Stuff the tree firmly now.
- R12: (2 sc, dec) x 6 (18)
- R13: (1 sc, dec) x 6 (12)
- Finishing: Fasten off, weave tail through remaining stitches to close the top.
What you'll master: Working textured bobble stitches in the round.
6. The Decorations
Red Ornaments (Make 6-8):
- Instructions: MR, 6 sc. Fasten off. (Tiny red balls).
The Star (Yellow):
- Instructions: Ch 2. (Sc, ch 3, sc, ch 3) in the same chain to create a point. Repeat 5 times around to form a star shape. Or simply crochet a flat star shape.
- Alternative: Use a small yellow felt star.
The Garland (White):
- Instructions: Chain 30-40 stitches. If using beads, thread them onto the chain as you go.
7. Assembly & The Magic of Details
Now for the most rewarding part: bringing your Kawaii Tree Car to life!
-
The Face:
- Attach safety eyes to the front of the pot (Cream body), spaced about 6-8 stitches apart.
- Embroider a cute "U" shaped smile in black yarn below the eyes.
- Use pink yarn to embroider small oval cheeks under the eyes.
-
Attach Wheels: Sew the brown wheels to the bottom sides of the pot. Position them so the pot looks like it's rolling.
-
The Tree Trunk (Optional): If your tree has a flat bottom, you can sew a small brown circle to the base before putting it in the pot, or just stuff it in securely.
-
Insert Tree: Place the green tree into the top of the pot. Sew it down securely around the base so it doesn't fall out.
-
Decorate:
- Sew the red ornaments randomly onto the green tree.
- Wrap the white garland chain around the tree in a spiral and tack it down with a few stitches.
- Sew the yellow star to the very top of the tree.
What you'll master: Multi-step assembly and festive styling.
Final Section: Where to Go from Here
Congratulations! You’ve just crafted a delightful Kawaii Christmas Tree Car. This project is incredibly charming and perfect for holiday decor.
From here, try experimenting with different colors! You could make a "Winter Wonderland" version with a white tree and blue ornaments, or a "Candy Cane" version with red and white stripes. You could even make a whole fleet of tree cars in different sizes! Happy crocheting, and happy holidays!