September 13, 2026
Pastel Flower Power Coasters – A Quick & Cheerful Crochet Pattern
Protect your surfaces in style with these adorable flower-shaped coasters! Featuring a solid center and a charming scalloped petal edge, this stack of pastel coasters is the perfect way to add a pop of spring to your coffee table. They work up in minutes, are completely beginner-friendly, and make fantastic handmade gifts.
Jump to pattern instructions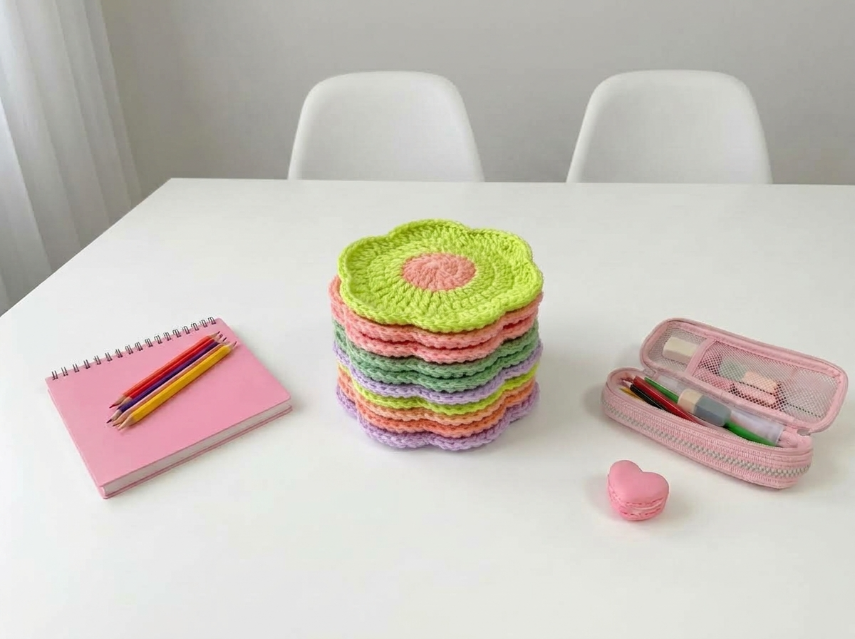
Pastel Flower Power Coasters – Complete Step-by-Step Pattern
1. Gathering Your Supplies
For coasters, cotton yarn is the absolute best choice. It’s absorbent, heat-resistant, and holds its shape beautifully without melting if you set a hot mug on it.
- Yarn: Worsted weight (Size 4) or DK weight (Size 3) 100% cotton yarn (e.g., YarnArt Jeans, Lily Sugar'n Cream, or similar). You will need small scraps of various pastel colors (pink, green, yellow, orange, purple).
- Hook: 3.5 mm (US E/4) or 4.0 mm (US G/6). Choose a hook size that gives you a firm, tight fabric so drinks don't seep through easily.
- Notions: Tapestry needle for weaving in ends, and scissors.
- Finished Size: Approximately 10-11 cm (4 inches) in diameter.
What you'll master: Creating perfect flat circles, working a decorative shell/petal edge, and rapid-fire repetitive stitching for a satisfying, quick make.
2. Abbreviations & Special Techniques
Let’s quickly review a few terms. If you're new to any of these, don't worry—you'll be a pro by the time your coffee is ready!
- MR: Magic ring
- ch: Chain
- sc: Single crochet
- hdc: Half double crochet
- dc: Double crochet
- inc: Increase (2 sc in one stitch)
- sl st: Slip stitch
3. The Center Circle (Solid Base)
We start with a classic magic ring to ensure there’s no hole in the middle of your coaster.
- R1: 6 sc in MR (6)
- R2: 6 inc (12)
- R3: (1 sc, inc) x 6 (18)
- R4: (2 sc, inc) x 6 (24)
- R5: (3 sc, inc) x 6 (30)
- Pro Tip: If you want a slightly smaller coaster (for espresso cups), stop at R4. For a standard mug, R5 is perfect.
- Finishing: Do not fasten off yet! We will work the petals directly onto this last round.
What you'll master: Spiral increase sequences and maintaining a flat, ripple-free circle.
4. The Scalloped Petal Edge
Now for the magic moment where your circle turns into a flower! We will work into the stitches of the previous round.
- Petal 1: Sl st in the first stitch. Ch 3 (counts as first part of petal). Work 2 dc into the same stitch. Ch 3. Sl st into the next stitch.
- Petal 2: Ch 3. Work 2 dc into the next stitch. Ch 3. Sl st into the following stitch.
- Repeat: Continue this pattern around the entire circle: (Ch 3, 2 dc in next st, ch 3, sl st in next st).
- Finishing: You should end up with 15 lovely, ruffled petals. Sl st into the first sl st to join. Fasten off, leaving a tail.
What you'll master: Creating textured, 3D edges and working shell stitches.
5. Assembly & Finishing
- Weave in Ends: Using your tapestry needle, weave the starting tail securely into the back of the center circle. Weave the finishing tail along the back of the petals to hide it completely.
- Block (Optional): If your coaster looks a little curly or uneven, dampen it with water, lay it flat on a towel, and gently pin the petals into shape. Let it dry completely. This gives it that professional, crisp look seen in the photo!
What you'll master: Professional finishing techniques for a polished final product.
Final Section: Where to Go from Here
Congratulations! You’ve just crafted a beautiful, functional Flower Power Coaster. This project is incredibly satisfying because it works up so quickly—you can easily make a full set of six in an afternoon!
From here, try experimenting with different color combinations! You could make a "rainbow" set using every color of the yarn, or a "monochrome" set using different shades of blue for a calming ocean vibe. You could even chain them together to create a whimsical flower garland for a nursery or party decoration. Happy crocheting, and enjoy your colorful new table accessories! 🌸