September 14, 2026
Daisy Mesh Tote Bag – A Whimsical Crochet Project
Carry spring with you everywhere! This charming mesh tote features a delicate openwork body adorned with three-dimensional daisy flowers, playful green tassels, and daisy-decorated straps. Perfect for a day at the market or a picnic in the park, this intermediate-level project combines functional design with romantic floral embellishments.
Jump to pattern instructions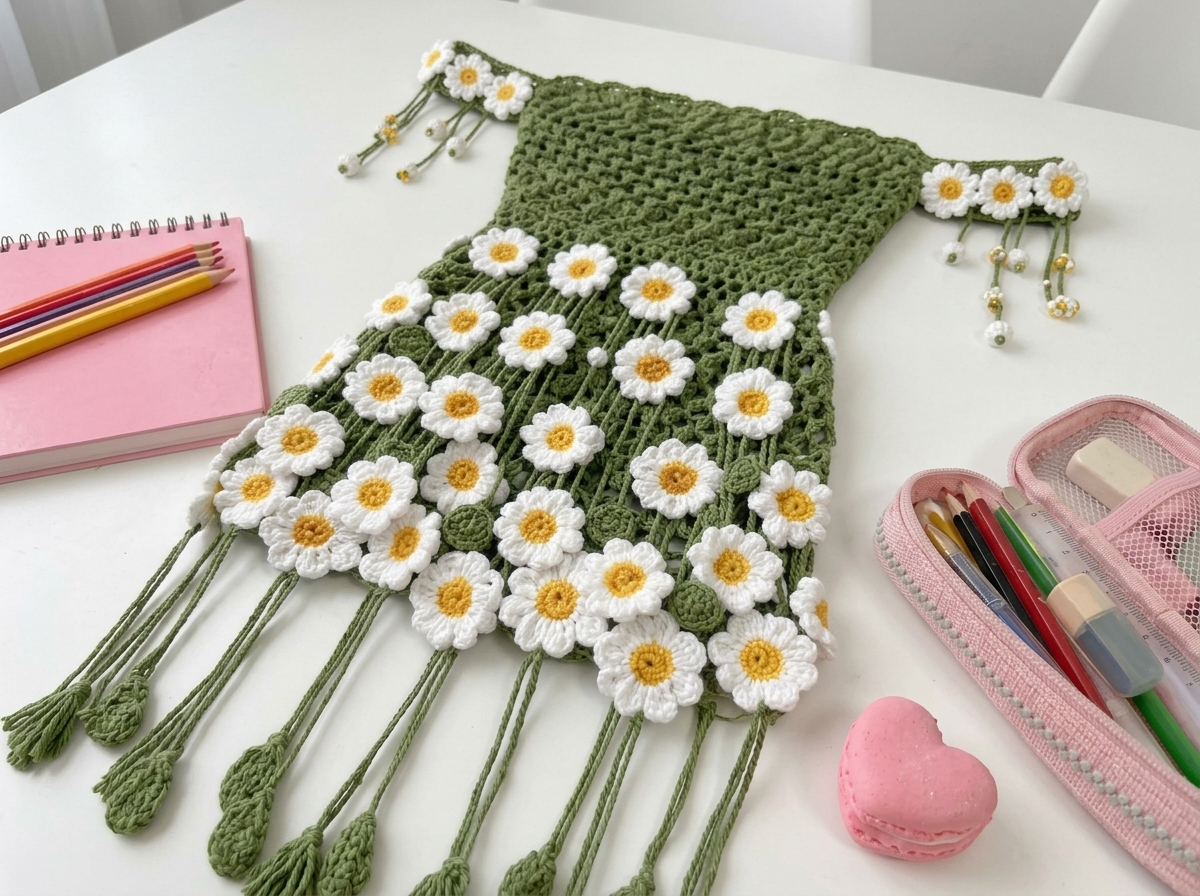
Daisy Mesh Tote Bag – Complete Step-by-Step Pattern
1. Gathering Your Supplies
To create this whimsical bag, you'll need yarn in three colors and a hook that creates a firm yet flexible fabric.
- Yarn: Worsted weight cotton or cotton blend yarn (e.g., YarnArt Jeans, Catania, or similar, approx. 160m / 50g).
- Sage Green: Approx. 200g (for the bag body, straps, and tassels)
- White: Approx. 100g (for the daisy petals)
- Yellow: Small amount (for the daisy centers)
- Hook: 3.5 mm or 4.0 mm (choose the size that gives you a firm mesh that still has good drape).
- Notions:
- Tapestry needle for weaving in ends and sewing
- Scissors
- Stitch markers
- Small beads (optional, for the daisy centers on the straps)
- Finished Size: Approximately 30 cm wide x 35 cm tall (12" x 14"), not including straps or tassels.
What you'll master: Creating mesh fabric, crocheting 3D flowers, and assembling a functional, embellished accessory.
2. Abbreviations & Special Techniques
Let's quickly review a few terms. If you're new to any of these, don't worry—you'll be a pro by the time you finish your first daisy!
- ch: Chain
- sc: Single crochet
- dc: Double crochet
- tr: Treble crochet (triple crochet)
- sl st: Slip stitch
- sp: Space
- st(s): Stitch(es)
- Mesh Stitch: (dc, ch 1, skip 1 st) - creates the openwork net pattern
- Daisy Petal: A small, rounded petal created with a cluster of stitches
- Tassel: A decorative fringe element made from chains and clusters
3. The Mesh Bag Body (Sage Green)
We'll start by creating the main body of the bag using a simple mesh stitch that creates a beautiful, breathable net.
- Foundation Chain: Ch 60 (adjust for desired width).
- Row 1: Dc in the 4th ch from the hook (counts as first dc + ch 1), skip 1 ch, dc in next ch. Repeat from * across. You should have 30 dc stitches with ch-1 spaces between them.
- Row 2: Ch 3 (counts as first dc), turn. Dc in the first ch-1 space, ch 1, dc in next ch-1 space. Repeat from * across, ending with dc in the top of the turning ch from the previous row.
- Rows 3-40: Repeat Row 2 until the piece measures approximately 35 cm (14 inches) from the foundation chain.
- Finishing: Fasten off, leaving a long tail for sewing the side seam.
What you'll master: Creating consistent mesh fabric and maintaining even tension in openwork patterns.
4. The Straps (Sage Green, Make 2)
Each strap will be decorated with daisies along its length.
- Foundation Chain: Ch 50 (adjust for desired strap length).
- Row 1: Sc in the 2nd ch from the hook and each ch across. (49 sc)
- Row 2: Ch 1, turn. Sc in each st across. (49 sc)
- Rows 3-4: Repeat Row 2.
- Finishing: Fasten off, leaving long tails for sewing. You will attach daisies to these straps later.
What you'll master: Creating sturdy, flat straps for bag construction.
5. The Daisy Flowers (Make 30-40)
These 3D daisies are the star of the show! We'll make them in two parts: the white petals and the yellow center.
Daisy Petals (White, Make 30-40):
- R1: Ch 2. Sc in the 2nd ch from the hook, 3 hdc in the same st, 3 dc in the same st, ch 2, sl st in the same st. Fasten off, leaving a long tail for sewing.
- This creates one petal.
- Assembly: Make 6-8 petals per daisy. Arrange them in a circle and sew them together at the base, creating a flower shape.
Daisy Center (Yellow, Make 30-40):
- Instructions: Ch 2. 6 sc in the 2nd ch from the hook. Fasten off, leaving a tail.
- Assembly: Sew the yellow center to the middle of the white petals.
Alternative Quick Daisy:
- R1: MR. Ch 1, (sc, 3 hdc, sc, sl st) in MR x 6. Fasten off.
- R2: Join yellow yarn in the center. Ch 1, 6 sc in the center. Fasten off.
What you'll master: Creating dimensional flower appliqués and managing multiple small motifs.
6. The Tassels (Sage Green, Make 20-25)
These playful tassels add movement and charm to the bottom of the bag.
- Instructions: Ch 20 (adjust for desired tassel length).
- Row 1: Sc in the 2nd ch from the hook, hdc in next 3 ch, dc in next 5 ch, hdc in next 3 ch, sc in last ch.
- Finishing: Fasten off, leaving a long tail for attaching to the bag.
Alternative Tassel with Cluster:
- Instructions: Ch 25. Starting in the 2nd ch from the hook: sc, hdc, (dc, tr, dc) in next ch, hdc, sc. Fasten off.
What you'll master: Creating decorative fringe elements with varied stitch heights.
7. Assembly & The Magic of Embellishment
Now for the most rewarding part: bringing your daisy bag to life!
- Form the Bag: Fold the mesh rectangle in half with right sides together. Using your long tail and a tapestry needle, whip stitch the side seams from the bottom up, leaving the top open.
- Attach the Straps: Pin the straps to the inside top edge of the bag, positioning them evenly (about 8-10 cm from each side seam). Sew them securely, going through all layers multiple times for strength.
- Add the Daisy Flowers: This is where the magic happens! Pin your daisies to the front of the bag in a scattered, natural-looking pattern. Start from the bottom and work your way up, clustering more daisies near the bottom and fewer near the top. Sew each daisy securely.
- Decorate the Straps: Attach 3-4 smaller daisies to each strap, spacing them evenly. You can also add small beads to the strap daisies for extra sparkle!
- Attach the Tassels: Sew the tassels to the bottom edge of the bag, spacing them evenly. They should hang freely, creating a beautiful fringe effect.
- Final Touches: Weave in all loose ends. If desired, you can add a fabric lining to the inside of the bag for extra structure and to prevent small items from falling through the mesh.
What you'll master: Multi-step structural assembly and strategic placement of decorative elements.
Final Section: Where to Go from Here
Congratulations! You've just crafted a whimsical, one-of-a-kind Daisy Mesh Tote Bag. This project is a beautiful way to practice your mesh crochet, flower-making, and embellishment skills.
From here, try experimenting with different flower types! You could make a "sunflower" version with yellow petals and brown centers, a "lavender" version with purple flowers, or even mix different flower types for a wildflower meadow effect. You could also adapt this pattern to make a smaller pouch, a beach bag, or even a decorative wall hanging. Happy crocheting, and enjoy your beautiful new handmade accessory!