September 14, 2026
Little Ducks Sweater – A Cute & Cozy Crochet Pattern
Keep little ones warm and smiling with this adorable blue sweater featuring a row of cheerful yellow ducks! Featuring a cozy half-double crochet fabric that mimics the look of knitting, along with stretchy ribbed cuffs and hem, this project is a fun, intermediate-friendly make perfect for spring or fall.
Jump to pattern instructions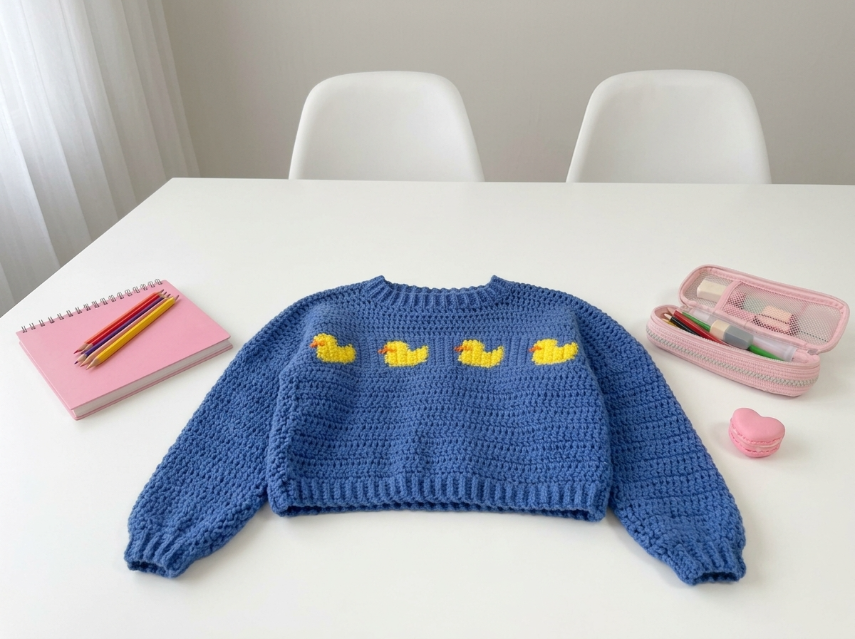
Little Ducks Sweater – Complete Step-by-Step Pattern
1. Gathering Your Supplies
To achieve that soft, squishy look perfect for a child's sweater, a soft acrylic or cotton blend yarn is best.
- Yarn: Worsted weight (Size 4) yarn.
- Blue: Approx. 300–400g (for the main body, sleeves, and ribbing).
- Yellow: Small amount (for the duck bodies).
- Orange: Tiny amount (for the duck beaks).
- Hook: 5.0 mm (US H/8) for the main body, and 4.5 mm (US 7) for the ribbing (to make it snug).
- Notions: Tapestry needle for weaving in ends and sewing, scissors, and stitch markers.
- Finished Size: Fits approx. 2–4 years (chest approx. 24 inches / 60 cm). See notes for sizing adjustments.
What you'll master: Creating a dense, knit-like fabric using half-double crochet, working seamless top-down construction, and creating cute appliqués.
2. Abbreviations & Special Techniques
Let’s quickly review a few terms. If you're new to any of these, don't worry—you'll be a pro by the time the ducks are lined up!
- ch: Chain
- sc: Single crochet
- hdc: Half double crochet
- dc: Double crochet
- sl st: Slip stitch
- inc: Increase (2 stitches in one stitch)
- dec: Decrease (2 stitches crocheted together)
- BLO: Back loop only (creates a stretchy ribbed effect)
- MR: Magic ring
3. The Neckband & Yoke
We start at the top with a stretchy ribbed neckband, then expand into the yoke.
- Neckband (4.5 mm hook, Blue): Ch 50 (adjust for head size). Join with a sl st to form a ring, being careful not to twist.
- R1: Ch 1. Sc in the BLO of each ch around. Join with a sl st. (50 sts)
- R2-4: Repeat R1. (This creates a nice, stretchy ribbed collar).
- Switch to 5.0 mm hook.
- R5 (Setup Round): Ch 2 (counts as first hdc). Hdc in each st around. Place markers to divide the yoke: 14 sts for Back, 10 sts for Right Sleeve, 14 sts for Front, 10 sts for Left Sleeve. (Place a marker in the first stitch of each section).
- R6 (Increase Round): Ch 2. Hdc in each st to 1 st before the marker, inc in next st, hdc in marked st, inc in next st. Repeat for all 4 markers. (4 sts increased).
- R7: Hdc in each st around (including the new increase sts).
- R8-14: Repeat R6 and R7 until the yoke measures about 6 inches from the neckband.
What you'll master: Creating seamless top-down construction and managing yoke increases.
4. The Body
Now we separate the sleeves and work the main body of the sweater.
- R15: Ch 2. Hdc across the back sts. Ch 4 (for the underarm). Skip the sleeve sts. Hdc across the front sts. Ch 4 (for the other underarm). Join with a sl st to the top of the ch-2.
- R16-30: Ch 2. Hdc in each st around (including the underarm ch sts).
- Pro Tip: For a longer sweater, add more rounds here!
- Finishing the Body: Fasten off the blue yarn.
What you'll master: Creating a seamless tube for the torso.
5. The Sleeves
We’ll pick up stitches at the underarm to create cozy, tapered sleeves.
- Setup: Join blue yarn at the center of the underarm ch.
- R1: Ch 2. Hdc evenly around the armhole (approx. 30-34 sts). Join with a sl st.
- R2-15: Ch 2. Hdc in each st around.
- Optional Taper: To make the sleeve narrower at the wrist, work a dec round every 5 rounds (e.g., R5, R10).
- Switch to 4.5 mm hook for the cuff.
- Cuff R1: Ch 1. Sc in the BLO of each st around. Join.
- Cuff R2-4: Repeat Cuff R1.
- Finishing: Fasten off and weave in ends. Repeat for the second sleeve.
What you'll master: Picking up stitches for sleeves and creating matching ribbed cuffs.
6. The Bottom Hem
To match the cuffs and neck, we add a ribbed hem to the bottom of the sweater.
- Setup: Join blue yarn (4.5 mm hook) to the bottom edge of the sweater body.
- R1: Ch 1. Sc in the BLO of each st around. Join.
- R2-4: Repeat R1.
- Finishing: Fasten off and weave in all loose ends securely.
What you'll master: Adding a professional, polished finish to the garment.
7. The Duck Appliqués (Make 4)
Now for the most fun part! We’ll create four little yellow ducks to march across the chest.
Duck Body (Yellow):
- Instructions: Ch 6.
- Row 1: Sc in the 2nd ch from the hook, hdc in the next, dc in the next, 3 dc in the last ch. Working down the opposite side of the starting chain: hdc in the next, sc in the next. Sl st to join. Fasten off, leaving a tail.
Duck Head (Yellow):
- Instructions: Attach yellow yarn to the top right side of the duck body (where the neck would be). Ch 3. Sc in the 2nd ch from the hook. Sl st into the next stitch on the body to secure the head. Fasten off.
Duck Beak (Orange):
- Instructions: Attach orange yarn to the front of the duck head. Ch 2. Sc in the 2nd ch from the hook. Sl st into the head to secure. Fasten off.
What you'll master: Creating small, detailed appliqués and managing multiple color changes.
8. Assembly & Finishing
Now for the magic moment where your sweater comes to life!
- Weave in Ends: Take your time weaving in all those loose ends on the inside of the sweater.
- Position the Ducks: Lay the sweater flat. Arrange your 4 yellow ducks in a straight line across the upper chest, just below the neckband. Pin them in place to ensure they are evenly spaced and level.
- Sew the Ducks: Using the long tails you left on each duck and a tapestry needle, whip stitch the ducks securely to the sweater. Make sure to catch the back of the duck and the sweater fabric so they don't flap around!
- Final Touches: Give the sweater a gentle steam block to even out the stitches and help the ribbing lay flat.
What you'll master: Multi-step structural assembly and adding playful, personalized details.
Final Section: Where to Go from Here
Congratulations! You’ve just crafted an adorable Little Ducks Sweater. This project is incredibly satisfying because it combines a simple, repetitive stitch with cute character details.
From here, try experimenting with different animal appliqués! You could make a row of little bears, a line of frogs, or even a flock of sheep. You could also change the yarn color to make a sweater for every season—a pastel pink for spring or a deep green for winter. Happy crocheting, and enjoy your beautiful new handmade staple!