September 13, 2026
Chocolate Chip Cookie Necklace – A Sweet & Whimsical Accessory
Craving something sweet without the calories? This adorable Chocolate Chip Cookie Necklace is the perfect treat! Featuring a string of realistic-looking, chunky cookies linked together, this project is a fun, quick make that adds a playful, kawaii touch to any outfit. It’s an excellent stash-buster and a great gift for cookie lovers.
Jump to pattern instructions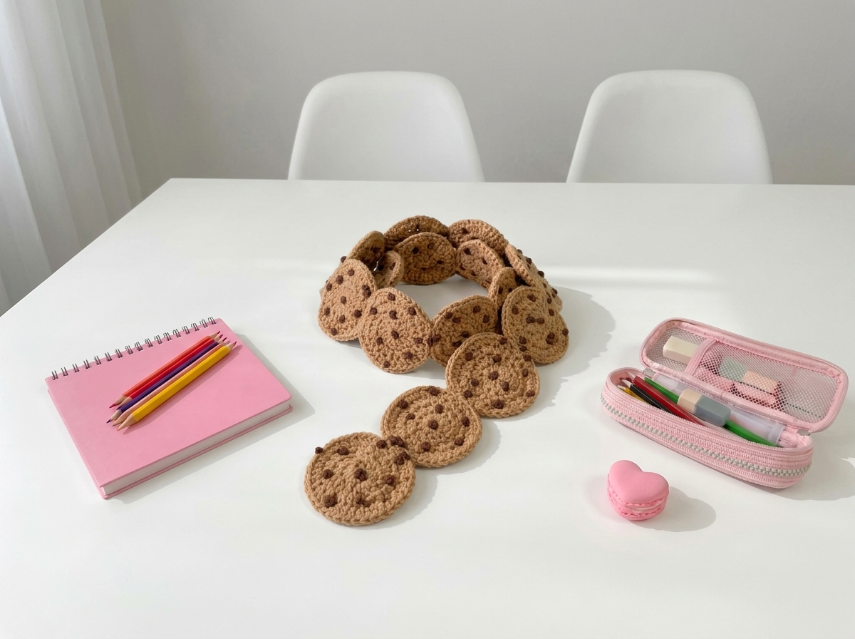
Chocolate Chip Cookie Necklace – Complete Step-by-Step Pattern
1. Gathering Your Supplies
To get that realistic "baked" look, we’ll use warm, toasty colors. A cotton or acrylic blend works great for durability.
- Yarn: Worsted weight (Size 4) yarn.
- Cookie Dough (Tan/Light Brown): Approx. 50g (you'll need enough for about 10-12 cookies).
- Chocolate Chips (Dark Brown): Small amount (scraps are perfect).
- Hook: 3.5 mm or 4.0 mm (choose a size that gives you a firm fabric so the cookies hold their shape).
- Notions: Tapestry needle for sewing, scissors, and a safety pin (optional, for holding the chain together while working).
- Finished Size: Each cookie is approx. 7-8 cm (3 inches) in diameter. The necklace length depends on how many cookies you link (approx. 10-12 cookies for a choker style).
What you'll master: Creating uniform motifs, working with multiple colors for detailing, and assembling a modular accessory.
2. Abbreviations & Special Techniques
Let’s quickly review a few terms. If you're new to any of these, don't worry—you'll be a pro by the time the "oven timer" dings!
- MR: Magic ring
- ch: Chain
- sc: Single crochet
- inc: Increase (2 sc in one stitch)
- sl st: Slip stitch
- French Knot: An embroidery stitch used to create small, raised dots (perfect for chocolate chips!).
3. The Cookie Base (Make 10–12)
We’ll start by baking a batch of plain "sugar cookies" using the tan yarn.
- R1: 6 sc in MR (6)
- R2: 6 inc (12)
- R3: (1 sc, inc) x 6 (18)
- R4: (2 sc, inc) x 6 (24)
- R5: (3 sc, inc) x 6 (30)
- R6: (4 sc, inc) x 6 (36)
- R7 (Optional Edge): To give the cookie a slightly "baked" edge, you can work a round of Reverse Single Crochet (Crab Stitch) or just a standard round of sc.
- Standard Edge: Sl st in each st around to finish neatly.
- Finishing: Fasten off, leaving a long tail (approx. 20 cm) for sewing the cookies together later. Weave in the starting end.
What you'll master: Creating perfect flat circles and consistent tension.
4. The Chocolate Chips
Now for the best part—the chocolate! You have two options for the chips: Embroidery (faster) or 3D Appliqué (chunkier, like the photo).
Option A: 3D Appliqué Chips (Recommended for the look in the photo)
- Instructions: With Dark Brown yarn, create tiny circles.
- Tiny Chip: MR, 4 sc in MR. Fasten off, leaving a tail. Make about 5-7 chips per cookie.
- Assembly: Sew these tiny dark brown circles randomly onto the tan cookie base. Scatter them unevenly for a realistic, homemade look!
Option B: French Knot Embroidery (Faster)
- Instructions: Thread your tapestry needle with Dark Brown yarn.
- Technique: Create French knots scattered across the surface of the tan cookie. Wrap the yarn around the needle 2-3 times before pulling through to make the "chip" pop out.
What you'll master: Adding texture and detail to flat motifs.
5. Assembly: Linking the Cookies
Now we turn our batch of cookies into a wearable necklace!
- Layout: Lay your finished cookies out on a table in a long, slightly curved line (to mimic the shape of a necklace). Overlap them slightly, like fish scales or shingles on a roof. The bottom cookie should be in the center, with cookies overlapping up the sides.
- Sewing: Using the long tails you left on each cookie (or a new piece of yarn), whip stitch the overlapping edges together.
- Tip: Sew through the "crust" (the outer edge) of the cookies so the stitches are hidden underneath.
- The Clasp (Optional): If you want to be able to take it off, you can sew a small button to one end and create a loop on the other end using a chain of stitches.
- Chain Loop: Ch 10, sl st back down the chain. Sew to the top cookie.
- Button: Sew a brown button to the opposite top cookie.
- Permanent Garland: If you just want a continuous loop (like a scarf or long necklace), simply sew the two ends of the cookie chain together to form a circle!
What you'll master: Modular assembly and creating flexible fabric from rigid shapes.
Final Section: Where to Go from Here
Congratulations! You’ve just baked up a batch of adorable Chocolate Chip Cookies that will never go stale. This project is incredibly satisfying and works up very quickly once you get into the rhythm of the circles.
From here, try experimenting with different "flavors"! You could make a "Matcha Cookie" with green yarn and red bean chips, or a "Birthday Cake Cookie" with white yarn and multi-colored sprinkles (using embroidery floss). You could even turn these cookies into a garland for a party or a cute keychain. Happy crocheting, and enjoy your sweet new accessory! 🍪