September 13, 2026
Puppy Love Trapper Hat – A Cozy & Playful Crochet Pattern
Keep those ears warm and your style on point with this adorable Puppy Love Trapper Hat! Featuring classic floppy black ears, a cute little snout, and fun braided ties with pom-pom ends, this hat is a whimsical and cozy project. Perfect for kids or adults who want to add a touch of playful charm to their winter wardrobe.
Jump to pattern instructions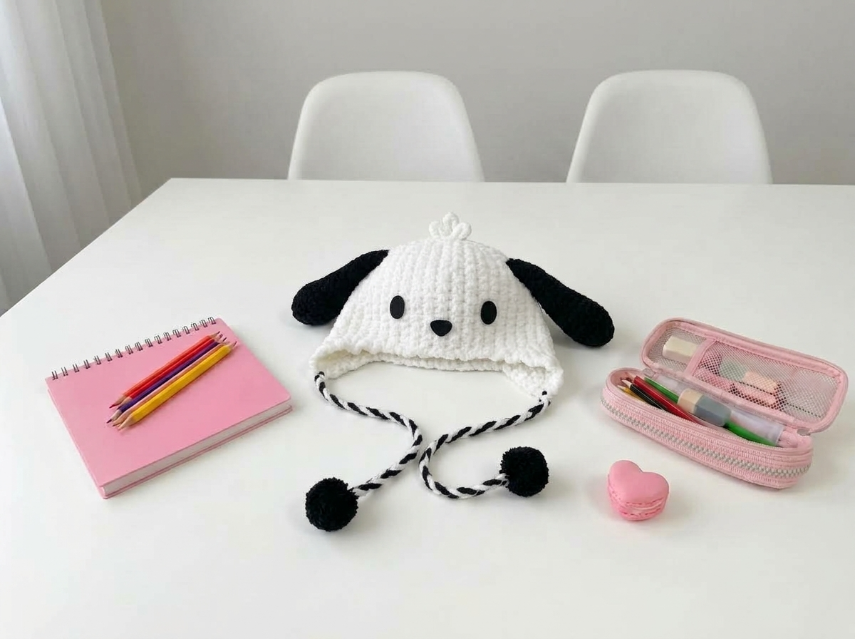
Puppy Love Trapper Hat – Complete Step-by-Step Pattern
1. Gathering Your Supplies
To get that structured yet soft look, a smooth worsted-weight acrylic or wool blend is perfect. It holds its shape well for the ears and keeps you warm!
- Yarn: Worsted weight (Size 4) yarn.
- White: Main color for the hat body and top tuft (approx. 150g).
- Black: For the ears, nose, eyes, ties, and pom-poms (approx. 50g).
- Hook: 5.0 mm (US H/8) or the size needed to achieve a firm, warm fabric.
- Notions: Tapestry needle for weaving in ends and sewing, scissors, stitch markers, and a pom-pom maker (or just use your fingers!).
- Finished Size: Adult Medium (fits approx. 54–58 cm head circumference). See notes for sizing adjustments.
What you'll master: Working a trapper hat construction, creating modular floppy ears, and making custom braided ties.
2. Abbreviations & Special Techniques
Let’s quickly review a few terms. If you're new to hat construction, don't worry—this pattern is very forgiving!
- MR: Magic ring
- ch: Chain
- sc: Single crochet
- inc: Increase (2 sc in one stitch)
- dec: Decrease (2 sc crocheted together invisibly)
- sl st: Slip stitch
- BLO: Back loop only
3. The Hat Base (White)
We start at the crown and work down in continuous rounds, then add the ear flaps at the end.
- R1: 6 sc in MR (6)
- R2: 6 inc (12)
- R3: (1 sc, inc) x 6 (18)
- R4: (2 sc, inc) x 6 (24)
- R5: (3 sc, inc) x 6 (30)
- R6: (4 sc, inc) x 6 (36)
- R7: (5 sc, inc) x 6 (42)
- R8: (6 sc, inc) x 6 (48)
- R9: (7 sc, inc) x 6 (54)
- R10: (8 sc, inc) x 6 (60)
- R11-18: 60 sc (60) [8 rows] (Adjust this number to fit your head depth before adding flaps).
- R19 (Ear Flap 1): Ch 1, turn. Sc in the next 15 stitches. Ch 1, turn. Sc in the next 13 stitches. Ch 1, turn. Sc in the next 11 stitches. Ch 1, turn. Sc in the next 9 stitches. Fasten off, leaving a long tail.
- R20 (Ear Flap 2): Skip 30 stitches on the hat base. Join white yarn to the next stitch. Ch 1, turn. Sc in the next 15 stitches. Repeat the decreasing rows as done for Flap 1. Fasten off.
What you'll master: Creating a seamless dome and attaching structured ear flaps.
4. The Floppy Ears (Black, Make 2)
These long, floppy ears give the hat its signature puppy look!
- R1: 6 sc in MR (6)
- R2: 6 inc (12)
- R3: (1 sc, inc) x 6 (18)
- R4: (2 sc, inc) x 6 (24)
- R5-12: 24 sc (24) [8 rows]
- R13: (2 sc, dec) x 6 (18)
- R14-15: 18 sc (18) [2 rows]
- Finishing: Fasten off, leaving a long tail for sewing. Do not stuff. Fold the base slightly to create a natural drape.
What you'll master: Creating uniform, un-stuffed appendages.
5. Facial Features & Top Tuft
Now for the magic moment where your hat gets its personality!
The Eyes & Nose:
- Eyes: Using black yarn and a tapestry needle, embroider two small, solid ovals or use safety eyes if preferred. Space them evenly on the front of the hat, just above where the ear flaps sit.
- Nose: Embroider a small, round black nose right in the center, just below and between the eyes.
The Top Tuft (White):
- Instructions: Ch 5. Sl st in the 2nd ch from the hook, hdc, dc, tr. Sl st to the top center of the hat. Fasten off and secure. This little curl adds the perfect finishing touch!
What you'll master: Surface embroidery and adding character-defining details.
6. The Braided Ties & Pom-Poms
No trapper hat is complete without cozy ties!
The Ties (Black & White):
- Instructions: Cut 6 long strands of yarn (3 black, 3 white), each about 1 meter long. Fold them in half and loop them through the bottom corner of one ear flap.
- Braiding: Braid the strands tightly all the way down. Tie a secure knot at the end. Repeat for the other ear flap.
The Pom-Poms (Black, Make 2):
- Instructions: Using a pom-pom maker or the two-cardboard-circle method, create two fluffy black pom-poms approx. 4 cm in diameter.
- Assembly: Tie the pom-poms securely to the ends of the braided ties. Trim them evenly to make them perfectly round!
What you'll master: Creating modular, mix-and-match accessories.
7. Assembly & Finishing
- Attach the Ears: Pin the black ears to the sides of the hat, positioning them so they flop down naturally over the ear flaps. Using your long tails and a tapestry needle, sew them securely in place.
- Weave in Ends: Take your time weaving in all those loose ends on the inside of the hat.
- Final Touches: Give the hat a gentle steam block to even out the stitches and help the brim hold its shape.
What you'll master: Multi-step structural assembly and adding professional, personalized finishing touches.
Final Section: Where to Go from Here
Congratulations! You’ve just crafted a stylish, playful Puppy Love Trapper Hat. This project is incredibly satisfying because it combines simple stitches with clever construction to create a high-end looking accessory.
From here, try experimenting with different color combinations! You could make a "brown puppy" version with tan yarn and brown ears, or even a "cat" version with pointy ears and whiskers. Happy crocheting, and enjoy your beautiful new handmade staple! 🐶