September 14, 2026
Hibiscus Flower Earrings – A Tropical Crochet Jewelry Pattern
Add a touch of tropical paradise to your jewelry collection with these stunning hibiscus flower earrings! Featuring delicate pink blossoms with yellow stamens, realistic green leaves, and tiny berry buds, these earrings are a show-stopping project. Perfect for intermediate crocheters ready to create wearable art.
Jump to pattern instructions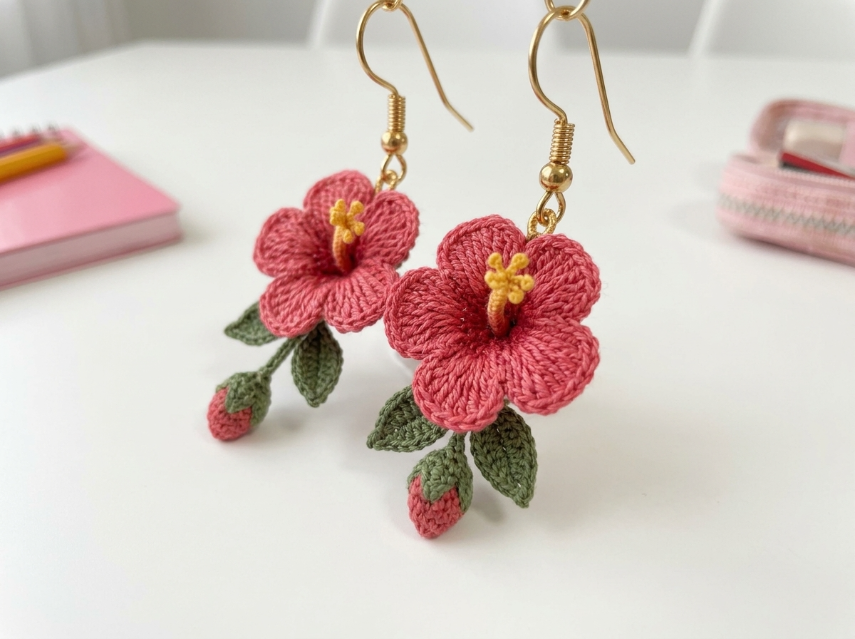
Hibiscus Flower Earrings – Complete Step-by-Step Pattern
1. Gathering Your Supplies
To create these delicate earrings, we'll use fine cotton yarn for crisp stitch definition and a lightweight finish.
- Yarn: Fine cotton or embroidery cotton (e.g., YarnArt Jeans, Catania, or similar lace/sport weight). You will need small amounts of:
- Pink/Coral: For the flowers and berries (approx. 10g)
- Yellow: For the flower stamens (tiny amount)
- Green: For the leaves and berry tops (approx. 10g)
- Hook: 1.5 mm or 2.0 mm (choose a small hook for tight, detailed stitches)
- Notions:
- 2 earring hooks (gold or silver)
- 2 jump rings
- Tapestry needle for sewing
- Scissors
- Stitch markers
- Fabric glue (optional, for securing ends)
- Finished Size: Each earring approx. 6-7 cm long (excluding hook)
What you'll master: Creating miniature 3D flowers, assembling multi-component jewelry, and working with fine details.
2. Abbreviations & Special Techniques
Let's quickly review a few terms. If you're new to any of these, don't worry—you'll be a pro by the time you finish your first flower!
- MR: Magic ring
- ch: Chain
- sc: Single crochet
- hdc: Half double crochet
- dc: Double crochet
- sl st: Slip stitch
- inc: Increase (2 sc in one stitch)
- dec: Decrease (2 sc crocheted together)
- st(s): Stitch(es)
3. The Hibiscus Flower (Make 2)
The signature feature of these earrings! We'll create a 5-petal flower with a dimensional center.
Petals (Make 5 per flower, Pink):
- R1: 4 sc in MR (4)
- R2: 4 inc (8)
- R3: (1 sc, inc) x 4 (12)
- R4: (2 sc, inc) x 4 (16)
- R5: Ch 3 (counts as first dc), dc in next 2 sts, hdc in next 2 sts, sc in next 2 sts, sl st in last 2 sts.
- Finishing: Fasten off, leaving a tail for sewing.
Assembly: Arrange the 5 petals in a circle and sew them together at the base, overlapping slightly to create a full flower shape.
Flower Center/Stamen (Yellow):
- Instructions: Ch 6. Sc in the 2nd ch from the hook, hdc in next ch, dc in next 2 ch, hdc in last ch. Fasten off, leaving a tail.
- Alternative: Make 5 tiny chains (ch 4 each) and sew them together in the center for a clustered stamen effect.
What you'll master: Creating dimensional flower petals and assembling multi-part blooms.
4. The Leaves (Make 4-6, Green)
These realistic leaves add the perfect finishing touch to your hibiscus earrings.
- R1: Ch 8. Sc in the 2nd ch from the hook, hdc in next 2 ch, dc in next 2 ch, hdc in next ch, sc in last ch.
- R2: Working down the opposite side of the starting chain: sc in next ch, hdc in next ch, dc in next 2 ch, hdc in next 2 ch, sc in last ch. Sl st to join.
- Finishing: Fasten off, leaving a tail for sewing.
What you'll master: Creating pointed leaf shapes with varied stitch heights.
5. The Berry Buds (Make 2, Pink & Green)
These adorable little buds add charm and balance to the earrings.
Berry Body (Pink):
- R1: 4 sc in MR (4)
- R2: 4 inc (8)
- R3-4: 8 sc (8) [2 rows]
- R5: (2 sc, dec) x 2 (6)
- Finishing: Fasten off, leaving a tail. Stuff very lightly.
Berry Top (Green):
- Instructions: With green yarn, ch 3. Sc in the 2nd ch from the hook, hdc in last ch. Fasten off, leaving a tail.
- Assembly: Sew the green top to the pink berry, creating a little cap.
What you'll master: Creating tiny 3D elements and two-tone color work.
6. Assembly & The Magic of Jewelry Making
Now for the most rewarding part: bringing your earrings to life!
-
Prepare the Components:
- Sew the yellow stamen to the center of each flower.
- Attach 2-3 leaves to the base of each flower.
- Attach 1 berry bud to each earring (either to a leaf or directly to the flower base).
-
Attach the Findings:
- Using your tapestry needle and a strong thread (or the flower's base thread), create a secure loop at the top of each flower.
- Attach a jump ring to this loop.
- Attach the earring hook to the jump ring.
-
Secure Everything:
- Weave in all loose ends carefully.
- Use a tiny drop of fabric glue on knots if needed (optional).
- Make sure all components are securely attached—these earrings will be worn and moved around!
-
Final Touches:
- Gently shape the petals and leaves with your fingers.
- Ensure both earrings are balanced and hang evenly.
What you'll master: Multi-component assembly and creating professional, wearable jewelry.
Final Section: Where to Go from Here
Congratulations! You've just crafted a stunning pair of Hibiscus Flower Earrings. These earrings are perfect for summer, beach vacations, or adding a pop of tropical color to any outfit.
From here, try experimenting with different flower types! You could make orchid earrings with purple and white yarn, sunflower earrings with yellow and brown, or even cherry blossom earrings with pale pink and white. You could also scale up the pattern to create a matching necklace or brooch. Happy crocheting, and enjoy your beautiful new handmade jewelry!