September 14, 2026
Banana Peel Hat – A Fun & Fruity Crochet Costume Hat
Go bananas with this adorable and whimsical Banana Peel Hat! Featuring a bright yellow dome, four long draping "peels" with a creamy white trim, and a cute little brown stem on top, this hat is perfect for Halloween, fruit-themed parties, or just adding a splash of fun to your winter wardrobe. It’s a beginner-friendly project that works up quickly!
Jump to pattern instructions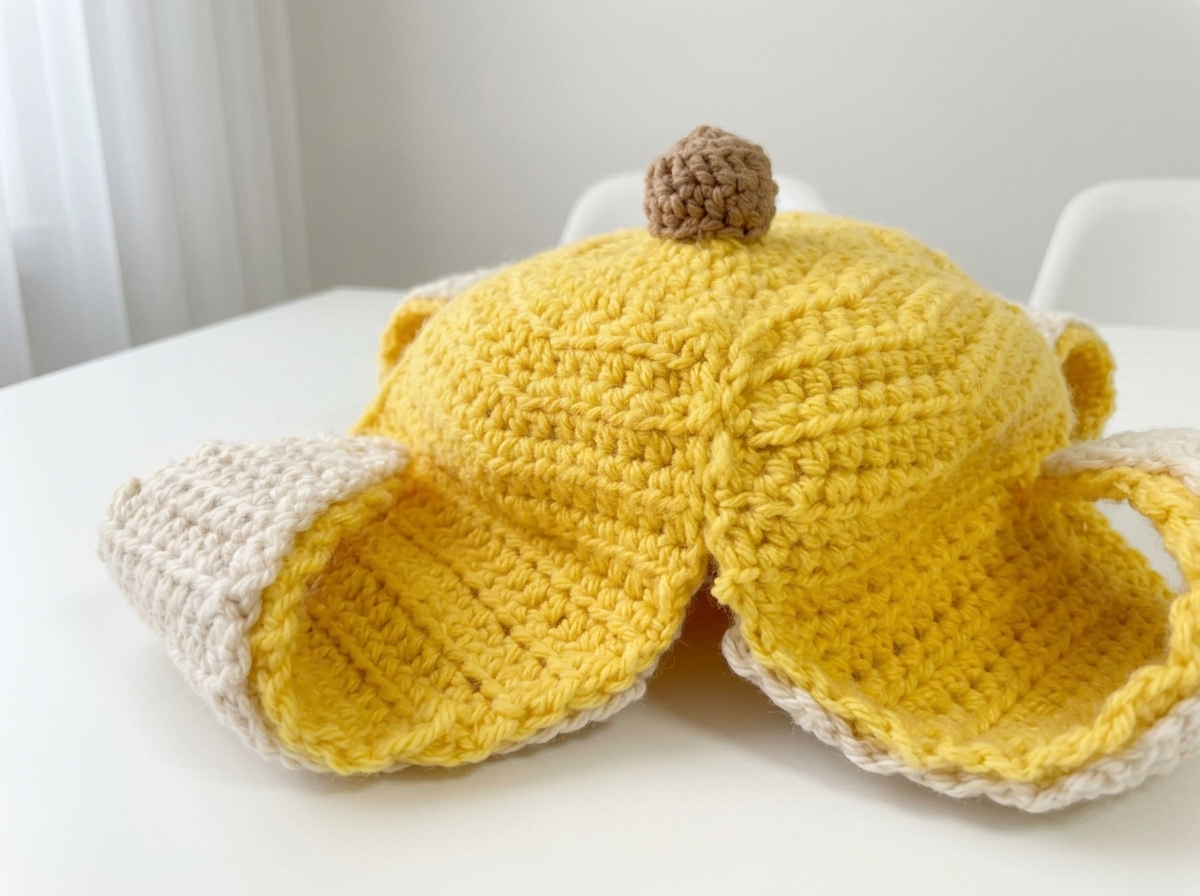
Banana Peel Hat – Complete Step-by-Step Pattern
1. Gathering Your Supplies
To get that soft, drapey look for the peels, a soft acrylic or cotton blend yarn works best. You want the fabric to be flexible enough to curl outwards!
- Yarn: Worsted weight (Size 4) yarn.
- Yellow: Approx. 150–200g (Main color for the hat and peels).
- White/Cream: Approx. 50g (For the trim).
- Brown: Small amount (for the stem).
- Hook: 5.0 mm (US H/8) or the size needed to achieve a soft, flexible fabric.
- Notions: Tapestry needle for weaving in ends and sewing, scissors, and a little bit of poly-fil stuffing (for the stem).
- Finished Size: Adult Medium (fits approx. 54–58 cm head circumference). The peels will drape down over the shoulders.
What you'll master: Working in the round, creating shaped flaps, and adding decorative borders.
2. Abbreviations & Special Techniques
Let’s quickly review a few terms. If you're new to any of these, don't worry—you'll be peeling through this pattern in no time!
- MR: Magic ring
- ch: Chain
- sc: Single crochet
- hdc: Half double crochet (gives a nice dense texture)
- inc: Increase (2 stitches in one stitch)
- sl st: Slip stitch
- st(s): Stitch(es)
3. The Little Stem (Brown)
Let’s start with the cute brown stem that sits on top of the banana!
- R1: 6 sc in MR (6)
- R2: 6 inc (12)
- R3-4: 12 sc (12) [2 rows]
- R5: 6 dec (6)
- Finishing: Stuff lightly with poly-fil to make it round. Fasten off, leaving a long tail for sewing.
What you'll master: Creating small, stuffed 3D shapes.
4. The Hat Crown (Yellow)
We start at the very top (under the stem) and work down to the ears.
- R1: 6 hdc in MR (6)
- R2: 6 inc (12)
- R3: (1 hdc, inc) x 6 (18)
- R4: (2 hdc, inc) x 6 (24)
- R5: (3 hdc, inc) x 6 (30)
- R6: (4 hdc, inc) x 6 (36)
- R7: (5 hdc, inc) x 6 (42)
- R8: (6 hdc, inc) x 6 (48)
- R9: (7 hdc, inc) x 6 (54)
- R10: (8 hdc, inc) x 6 (60)
- Check Fit: The circle should measure about 18-20 cm (7-8 inches) across. This covers the top of the head.
- R11-18: 60 hdc (60) [8 rows]
- Note: This section covers the sides of the head down to the ears.
What you'll master: Standard hat shaping and maintaining a flat circle.
5. The Banana Peels (The Flaps)
Now for the magic part! We are going to split the hat into 4 sections to create the long, draping peels.
- Setup: You should have 60 stitches. We will divide this by 4, so each peel will be 15 stitches wide.
- Peel 1:
- Work 15 hdc. Turn your work.
- Row 1: Ch 2 (counts as first hdc), hdc in each st across. (15 sts)
- Row 2-15: Ch 2, turn, hdc in each st across. (15 sts)
- Flaring the Peel (Optional): To make the peel look like it’s opening up, you can add increases at the edges for the last few rows. (e.g., Row 16: inc, hdc to last st, inc).
- Length: Work until the peel is about 25-30 cm (10-12 inches) long, or as long as you like!
- Finishing: Fasten off.
- Peels 2, 3, and 4:
- Skip the next 15 stitches on the hat base. Join yellow yarn to the next stitch.
- Repeat the process for Peel 1.
- Continue until you have 4 long flaps hanging down.
What you'll master: Working flat rows on a circular base and creating modular flaps.
6. The Creamy White Trim
This border gives the hat that realistic "inside of the banana" look and makes the peels pop!
- Instructions: Join the White yarn to the top corner of one peel (right next to the crown).
- Border: Work a round of Single Crochet (sc) evenly around the entire edge of the peel.
- Go down the side, across the bottom curve, and up the other side.
- Tip: Put 3 sc in the bottom corners to keep it flat and prevent curling (unless you want it to curl!).
- Repeat: Do this for all 4 peels.
- Finishing: Fasten off and weave in ends.
What you'll master: Adding a clean, professional border to shaped pieces.
7. Assembly & Finishing
Now for the final touches to make your banana complete!
- Attach the Stem: Take your brown stem piece. Using the long tail, sew it securely to the very center top of the hat (right in the middle of the Magic Ring).
- Weave in Ends: Take your time weaving in all those loose ends on the inside of the hat.
- Styling: Put the hat on! The peels should drape down over your shoulders. You can use bobby pins to pin the peels to your shirt if they keep slipping off.
What you'll master: Final assembly and styling a costume piece.
Final Section: Where to Go from Here
Congratulations! You’ve just crafted a hilarious and adorable Banana Peel Hat. This project is incredibly satisfying and perfect for last-minute costume needs.
From here, try experimenting with different colors! You could make a "Green Banana" hat using green yarn for an unripe look, or even a "Plantain" hat with black yarn for a very ripe (and funny!) effect. You could also add a face to the stem to make it a character. Happy crocheting, and stay a-peel-ing!