September 17, 2026
Witch Hat Raccoon Backpack – A Spooky-Cute Crochet Pattern
Meet this enchanting raccoon friend wearing a festive witch hat! With a soft gray body, classic masked face, striped tail, and a removable black hat with orange trim, this adorable amigurumi doubles as a functional backpack. Perfect for Halloween or year-round whimsy, this intermediate project combines character charm with practical design.
Jump to pattern instructions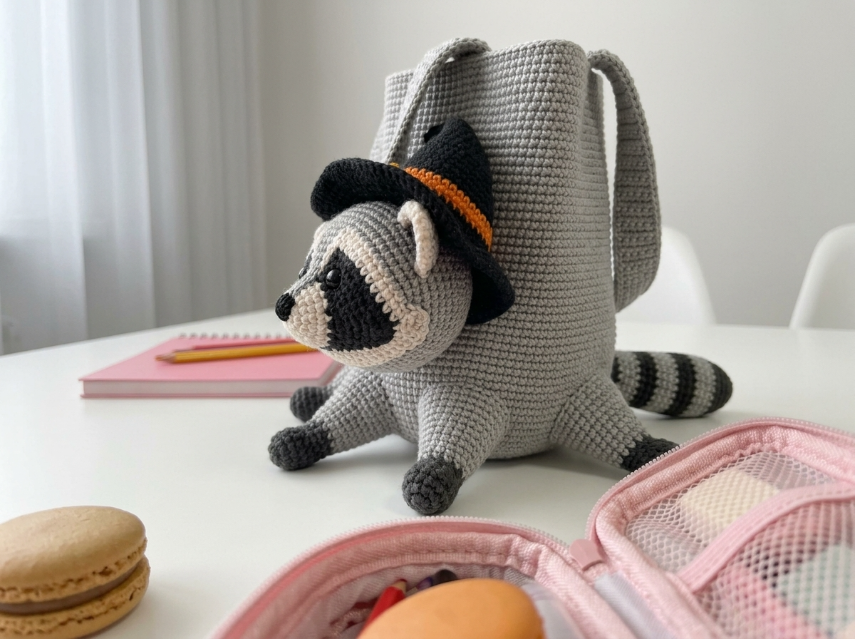
Witch Hat Raccoon Backpack – Complete Step-by-Step Pattern
1. Gathering Your Supplies
To create this sturdy yet soft raccoon backpack, we'll use a durable cotton blend yarn.
- Yarn: Worsted weight cotton or acrylic blend (e.g., YarnArt Jeans, Catania). You will need:
- Gray: Main body color (approx. 300-400g)
- Black: For mask, paws, and hat (approx. 100g)
- White/Cream: For muzzle and ear accents (small amount)
- Orange: For hat band and tail accents (small amount)
- Hook: 3.0 mm or 3.5 mm (choose size for tight, sturdy fabric)
- Notions:
- Poly-fil stuffing
- Tapestry needle
- Scissors
- Stitch markers
- 10-12 mm black safety eyes
- Optional: Backpack straps (or yarn to crochet them)
- Zipper or snap buttons (for opening)
- Finished Size: Approximately 25-30 cm (10-12 inches) tall
What you'll master: Creating a functional amigurumi backpack, working with multiple colors, and assembling character details.
2. Abbreviations & Special Techniques
- MR: Magic ring
- ch: Chain
- sc: Single crochet
- inc: Increase (2 sc in one stitch)
- dec: Decrease (2 sc crocheted together invisibly)
- sl st: Slip stitch
- BLO: Back loop only
- st(s): Stitch(es)
3. The Body/Backpack Base (Gray)
We'll create a rounded body that can be opened for storage.
- R1: 6 sc in MR (6)
- R2: 6 inc (12)
- R3: (1 sc, inc) x 6 (18)
- R4: (2 sc, inc) x 6 (24)
- R5: (3 sc, inc) x 6 (30)
- R6: (4 sc, inc) x 6 (36)
- R7-15: 36 sc (36) [9 rows]
- Note: This creates the main body depth.
- R16: (4 sc, dec) x 6 (30)
- R17: 30 sc (30)
- Note: This begins shaping for the head area.
- Finishing: Fasten off, leaving opening for stuffing/access. If making functional backpack, leave a larger opening and add zipper or buttons.
What you'll master: Creating a sturdy, rounded container shape.
4. The Head (Gray)
The head is worked separately and attached to the body.
- R1: 6 sc in MR (6)
- R2: 6 inc (12)
- R3: (1 sc, inc) x 6 (18)
- R4: (2 sc, inc) x 6 (24)
- R5: (3 sc, inc) x 6 (30)
- R6-10: 30 sc (30) [5 rows]
- Eye Placement: Insert safety eyes between R7-8, spaced 8-10 stitches apart.
- R11: (3 sc, dec) x 6 (24)
- R12: (2 sc, dec) x 6 (18)
- Stuffing: Stuff firmly before closing.
- R13: (1 sc, dec) x 6 (12)
- Finishing: Fasten off, leaving tail for sewing to body.
What you'll master: Shaping a spherical head and positioning facial features.
5. The Mask (Black)
This iconic raccoon feature frames the eyes.
- Instructions: Make 2 pieces (one for each eye area)
- R1: 6 sc in MR (6)
- R2: 6 inc (12)
- R3: (1 sc, inc) x 6 (18)
- R4: (2 sc, inc) x 6 (24)
- Finishing: Fasten off, leaving tail. Flatten slightly and sew around the safety eyes on the face.
What you'll master: Creating facial appliqués.
6. The Muzzle (White/Cream)
A sweet little snout completes the raccoon look.
- R1: 6 sc in MR (6)
- R2: 6 inc (12)
- R3: (1 sc, inc) x 6 (18)
- R4: 18 sc (18)
- Finishing: Fasten off, leaving tail. Sew to the front of the face below the eyes. Embroider a small black nose at the tip.
What you'll master: Creating a 3D facial feature.
7. The Ears (Gray & White, Make 2)
Outer Ear (Gray):
- R1: 6 sc in MR (6)
- R2: 6 inc (12)
- R3: (1 sc, inc) x 6 (18)
- Finishing: Fasten off.
Inner Ear (White):
- R1: 4 sc in MR (4)
- R2: 4 inc (8)
- Finishing: Fasten off.
Assembly: Sew white center onto gray ear, then attach ears to top of head.
8. The Arms & Legs (Gray & Black)
Arms (Make 2, Gray):
- R1: 6 sc in MR (6)
- R2-8: 6 sc (6) [7 rows]
- Finishing: Fasten off, leaving tail. Flatten top for sewing.
Legs (Make 2):
- R1-3 (Gray): Work as arms
- R4-5 (Black): Switch to black for paws
- Finishing: Fasten off.
What you'll master: Color changing for multi-toned limbs.
9. The Striped Tail (Gray & Black)
- R1 (Gray): 6 sc in MR (6)
- R2: 6 inc (12)
- R3-5 (Gray): 12 sc (12)
- R6-8 (Black): Switch to black. 12 sc.
- R9-11 (Gray): Switch to gray. 12 sc.
- R12-14 (Black): Switch to black. 12 sc.
- Finishing: Fasten off. Stuff firmly.
What you'll master: Creating striped patterns with color changes.
10. The Witch Hat (Black & Orange)
Hat Body (Black):
- R1: 6 sc in MR (6)
- R2: 6 inc (12)
- R3: (1 sc, inc) x 6 (18)
- R4: (2 sc, inc) x 6 (24)
- R5-15: 24 sc (24) [11 rows]
- Note: This creates the tall cone shape.
- Finishing: Fasten off, leaving tail. Stuff lightly.
Hat Brim (Black):
- R1: 8 sc in MR (8)
- R2: 8 inc (16)
- R3: (1 sc, inc) x 8 (24)
- R4: (2 sc, inc) x 8 (32)
- Finishing: Fasten off.
Orange Band:
- Ch 20. Sc across. Sew around the base of the hat cone.
Assembly: Sew cone to center of brim, then attach hat to raccoon's head.
11. Assembly & The Magic of Details
Now for the most rewarding part: bringing your raccoon to life!
- Attach Head to Body: Sew the head securely to the top of the body, angling it slightly forward.
- Attach Limbs: Sew arms to the sides and legs to the bottom, positioning so the raccoon can sit.
- Attach Tail: Sew the striped tail to the back of the body, curving it naturally.
- Add the Hat: Place the witch hat on top of the head and sew securely through the brim.
- Final Details:
- Embroider the nose on the muzzle
- Add any additional facial embroidery
- Weave in all ends
- If making functional backpack, add straps and closure mechanism
What you'll master: Multi-step assembly and creating a functional amigurumi.
Final Section: Where to Go from Here
Congratulations! You've just crafted an adorable Witch Hat Raccoon that's both a cuddly friend and a practical backpack. This project combines amigurumi skills with functional design, creating a unique piece that's perfect for Halloween or year-round whimsy.
From here, try experimenting with different hats! You could make a Santa hat for Christmas, a graduation cap for celebrations, or even a chef's hat for a cooking theme. You could also change the animal to a fox, cat, or bear while keeping the hat design. Happy crocheting, and enjoy your magical new companion!