September 15, 2026
Kawaii Pastel Box Bag – A Cute & Colorful Crochet Project
Carry your essentials in style with this adorable Kawaii Pastel Box Bag! Featuring a sturdy purple base, a sweet pink flap, and a collection of cute character appliqués (including a star, little blobs, and hearts), this bag is a fun, intermediate-friendly project. It’s perfect for adding a pop of playful color to any outfit.
Jump to pattern instructions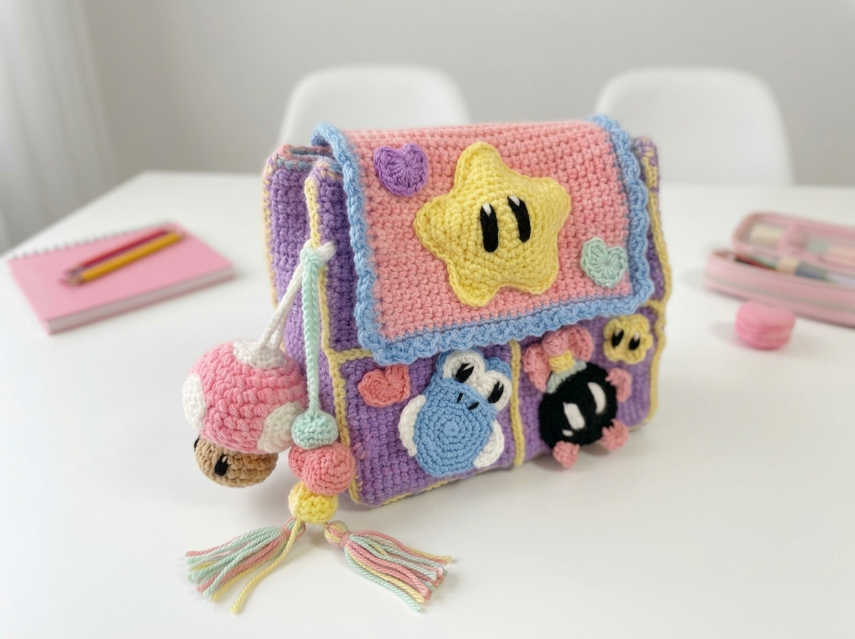
Kawaii Pastel Box Bag – Complete Step-by-Step Pattern
1. Gathering Your Supplies
To get that structured, boxy look, a sturdy cotton or acrylic blend yarn is best.
- Yarn: Worsted weight (Size 4) cotton yarn (e.g., YarnArt Jeans, Catania, or similar). You will need small amounts of:
- Purple (Lilac): Main color for the body (approx. 100g).
- Pink (Pastel): For the flap and mushroom cap (approx. 50g).
- Blue (Light): For the flap border and blue character (approx. 30g).
- Yellow: For the star and trim details (approx. 20g).
- White, Black, Brown: Tiny amounts for details and faces.
- Mint Green: Tiny amount for the heart and tassel.
- Hook: 3.5 mm or 4.0 mm (choose the size that gives you a firm, dense fabric).
- Notions:
- Tapestry needle for sewing.
- Scissors.
- Poly-fil stuffing (for the mushroom charm and 3D elements).
- Snap button or magnetic clasp (for the closure).
- Optional: A pre-made chain strap or yarn for a crochet strap.
What you'll master: Constructing a 3D box bag, creating various appliqués, and assembling a multi-textured accessory.
2. Abbreviations & Special Techniques
Let’s quickly review a few terms. If you're new to any of these, don't worry—you'll be a pro by the time you attach the first star!
- ch: Chain
- sc: Single crochet
- inc: Increase (2 sc in one stitch)
- dec: Decrease (2 sc crocheted together invisibly)
- sl st: Slip stitch
- MR: Magic ring
- BLO/FLO: Back/Front Loop Only
3. The Main Body Panels (Purple)
We will create the front, back, and a long strip for the sides and bottom to form a box shape.
Front & Back Panels (Make 2, Purple):
- Row 1: Ch 21. Sc in the 2nd ch from the hook and each ch across. (20 sc)
- Rows 2-16: Ch 1, turn. Sc in each st across. (20 sc)
- Finishing: Fasten off. You should have a rectangle approx. 15 cm x 20 cm.
Side/Bottom Gusset (Purple):
- Row 1: Ch 11. Sc in the 2nd ch from the hook and each ch across. (10 sc)
- Rows 2-50: Ch 1, turn. Sc in each st across. (10 sc)
- Note: This long strip will wrap around the sides and bottom of the bag. 50 rows is an estimate; measure your front panel (20 cm wide + 10 cm deep + 20 cm wide = 50 cm length needed).
- Finishing: Fasten off.
What you'll master: Creating structural panels for a box bag.
4. The Flap (Pink & Blue)
The flap covers the top of the bag.
-
Base (Pink):
- Row 1: Ch 21. Sc in the 2nd ch from the hook and each ch across. (20 sc)
- Rows 2-10: Ch 1, turn. Sc in each st across. (20 sc)
- Finishing: Do not fasten off yet. Switch to Blue yarn for the border.
-
Blue Border:
- Work a round of sc evenly around the entire pink rectangle (3 sides only, leaving the top edge open if attaching to the back panel, or all 4 sides if sewing on later). Let's do 3 sides (Left, Bottom, Right).
- Row 1 of Border: Ch 1. Sc evenly down the side, across the bottom, and up the other side.
- Row 2 of Border: Ch 1, turn. Sc in each st across. Fasten off.
What you'll master: Adding a contrasting border for a polished look.
5. The Cute Appliqués
This is where the magic happens! We will make the characters seen on the bag.
The Yellow Star:
- Instructions: Ch 2. Sc in 2nd ch from hook. (Ch 3, sl st in same st, ch 3, sl st in same st) x 5 to create points?
- Simpler Star: MR. (Ch 3, sc in 2nd ch, sl st in MR, ch 3, sc in 2nd ch, sl st in MR) x 5. Fasten off.
- Face: Embroider two vertical black ovals for eyes.
The Blue Blob (Kirby-style friend):
- Body (Blue): MR. 6 sc. R2: 6 inc (12). R3: (1 sc, inc) x 6 (18). R4-6: 18 sc. Fasten off. (Flat oval).
- Feet/Belly (White): Small white ovals sewn to the bottom.
- Face: Embroider large white ovals with black pupils.
The Black Blob (Bomb/Ink style):
- Body (Black): Similar to Blue Blob but black yarn.
- Details: Pink limbs (tiny tubes) and big white eyes.
Hearts (Make 3-4 in Pink, Purple, Mint):
- Instructions: Ch 3. 2 sc in 2nd ch, 2 sc in last ch. Ch 1, turn. 2 sc, 2 sc, 2 sc, 2 sc (forming the top bumps). Sl st to join. Fasten off.
The Mushroom Charm (3D):
- Cap (Pink): MR. 6 sc. R2: 6 inc (12). R3: (1 sc, inc) x 6 (18). Work in BLO for R4: 18 sc. R5-6: 18 sc. Fasten off. Stuff lightly.
- Stem (White): MR. 4 sc. R2-4: 4 sc. Fasten off. Stuff.
- Face (Brown): Tiny embroidered face on the stem.
- Assembly: Sew stem to cap. Attach a string of chains to the top for hanging.
What you'll master: Creating character appliqués and 3D charms.
6. Assembly & The Magic of Details
Now for the most rewarding part: bringing your bag to life!
-
Construct the Box:
- Place the Side/Bottom Gusset against the Front Panel. Whip stitch them together along the long edges.
- Attach the Back Panel to the other side of the Gusset. You now have a box shape open at the top.
- Optional: Add Yellow yarn "piping" by sewing a chain of yellow stitches along the seams for that retro look.
-
Attach the Flap:
- Sew the top edge of the Pink Flap to the top edge of the Back Panel. Make sure it folds over neatly to cover the opening.
-
Decorate:
- Sew the Yellow Star to the center of the Flap.
- Sew the Blue and Black Blobs to the front of the bag, near the bottom.
- Scatter the Hearts around the bag and flap.
-
The Charm:
- Attach the Mushroom Charm to the side of the bag using a safety pin or by sewing the chain loop securely.
- Create a tassel using leftover yarn (Pink, Blue, Yellow, Mint) and attach it to the bottom of the mushroom string.
-
Closure:
- Sew a snap button or magnetic clasp to the inside of the flap and the front panel to keep the bag closed.
What you'll master: Multi-step structural assembly and strategic placement of decorative elements.
Final Section: Where to Go from Here
Congratulations! You’ve just crafted a whimsical, one-of-a-kind Kawaii Pastel Box Bag. This project is a fantastic way to use up scrap yarn and practice your appliqué skills.
From here, try experimenting with different characters! You could add a crochet cat, a little flower, or even a mini version of yourself. You could also change the color scheme to "Gothic Lolita" (Black and Purple) or "Sunshine" (Yellow and Orange). Happy crocheting, and enjoy your beautiful new handmade accessory!