September 13, 2026
Enchanted Butterfly Wing Bag – A Textured & Elegant Crochet Pattern
Flutter into style with this whimsical Butterfly Wing Bag! Featuring a stunning ribbed texture that mimics the delicate veins of a butterfly's wings, this bag is worked in a soft, variegated pink yarn and embellished with scattered pearls. It’s a magical, intermediate-friendly project that serves as a perfect statement piece for any outfit.
Jump to pattern instructions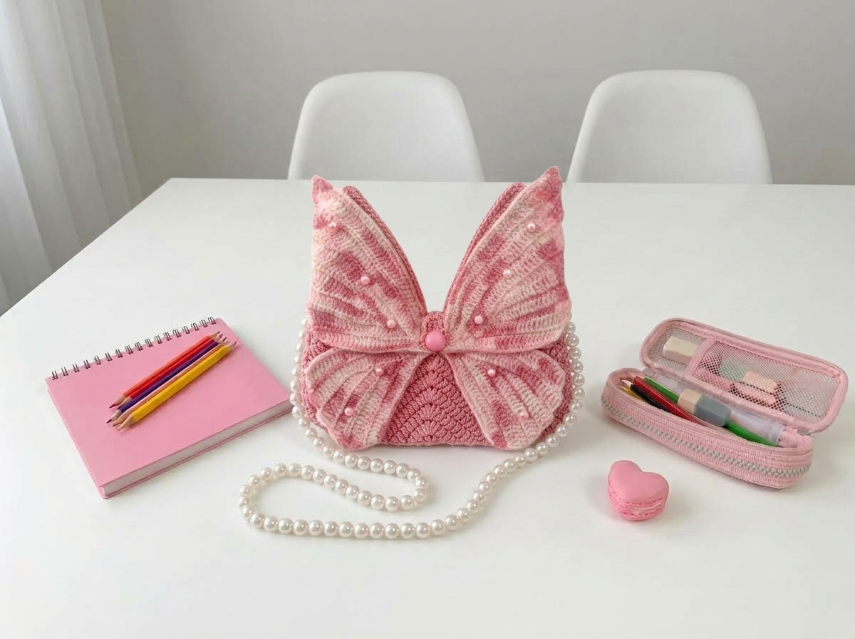
Enchanted Butterfly Wing Bag – Complete Step-by-Step Pattern
1. Gathering Your Supplies
To achieve that soft, plush look with beautiful stitch definition, a velvet yarn or a high-quality cotton blend works best. The variegated color adds depth to the ribbed texture.
- Yarn: Variegated Pink Yarn (Velvet/Chenille or Cotton blend, approx. 100-150g).
- Hook: 4.0 mm or 4.5 mm (depending on your yarn weight; aim for a fabric that isn't too loose).
- Notions:
- 1 large packet of small pearl beads (for scattering on the wings).
- 1 larger pink button or bead (for the center).
- A pearl chain strap (approx. 100–120 cm long).
- Tapestry needle and scissors.
- Stitch markers.
What you'll master: The "Half Double Crochet in the 3rd Loop" technique for a knit-like ribbed effect, and assembling multi-part 3D shapes.
2. Abbreviations & Special Techniques
This bag relies on a specific stitch to create those beautiful, radiating lines on the wings.
- ch: Chain
- sl st: Slip stitch
- hdc: Half double crochet
- Hdc 3rd Loop: This is the magic stitch! Instead of inserting your hook under the top two loops (the V), insert it under the horizontal bar that sits behind the V (the third loop). This pushes the top V forward, creating a ribbed texture on the front and a smooth look on the back.
- dec: Decrease (hdc 2 together)
3. The Upper Wings (Make 2)
The upper wings are large, dramatic triangles. We work them in rows, turning at the end of each row.
- Row 1: Ch 40. Hdc in the 3rd loop of the 2nd ch from the hook and in each ch across. (39 sts)
- Row 2: Ch 1, turn. Hdc 3rd loop in the first st, Hdc 3rd loop in each st across to the last 2 sts, hdc 2 tog (decrease) over the last 2 sts. (38 sts)
- Rows 3–38: Repeat Row 2, decreasing 1 stitch at the end of every row, until you have only 1 stitch left.
- Finishing: Fasten off, leaving a long tail for sewing. Do not cut the yarn on the second wing yet if you plan to join them, but for this pattern, we will sew them separately.
Note: The "ribs" should run diagonally across the wing. If you want them to run vertically, you would work the increases/decreases differently, but the diagonal look is very trendy!
What you'll master: Consistent decreasing to create a clean triangular shape and maintaining the 3rd loop texture.
4. The Lower Wings (Make 2)
The lower wings are smaller and slightly more rounded, but we can use a similar triangular construction, just shorter.
- Row 1: Ch 30. Hdc in the 3rd loop of the 2nd ch from the hook and in each ch across. (29 sts)
- Row 2: Ch 1, turn. Hdc 3rd loop in the first st, Hdc 3rd loop in each st across to the last 2 sts, hdc 2 tog over the last 2 sts. (28 sts)
- Rows 3–28: Repeat Row 2, decreasing 1 stitch at the end of every row, until you have only 1 stitch left.
- Finishing: Fasten off, leaving a long tail.
What you'll master: Scaling down a pattern for proportional design.
5. The Body (The Center Piece)
This small rectangular piece holds the bag together and creates the opening for your essentials.
- Row 1: Ch 15. Hdc in the 3rd loop of the 2nd ch from the hook and in each ch across. (14 sts)
- Rows 2–20: Ch 1, turn. Hdc 3rd loop in each st across. (14 sts)
- Note: You can make this taller or shorter depending on how deep you want the bag to be.
- Finishing: Fasten off, leaving long tails on both ends for sewing.
What you'll master: Creating a sturdy, structured base for a bag.
6. Assembly & The Magic of Pearls
Now for the most rewarding part: bringing your butterfly to life!
- Layout: Lay the Body piece flat. Place one Upper Wing and one Lower Wing on the left side of the body, aligning their straight edges with the side of the body. Do the same for the right side. It should look like a butterfly!
- Sewing: Using your long tails and a tapestry needle, whip stitch the wings securely to the sides of the Body piece. Make sure to sew through all layers so the bag is sturdy.
- The Center Button: Sew your large pink button or bead to the very center of the Body piece, right where the wings meet. This hides the seams and adds a cute focal point.
- Pearl Embellishment: Thread a needle with a thin, clear thread (or matching pink thread). Scatter the small pearl beads across the wings. You can sew them on randomly, or follow the "ribs" of the texture for a more organized look. Pro Tip: Don't put too many near the edges where the bag opens/closes.
- The Strap: Attach the pearl chain strap to the top corners of the Upper Wings. You can use small jump rings if your yarn is thick enough, or sew the ends of the chain securely to the fabric.
What you'll master: Multi-part assembly and adding delicate, professional embellishments.
Final Section: Where to Go from Here
Congratulations! You’ve just crafted a truly unique and enchanting Butterfly Wing Bag. This project is a fantastic way to practice textured stitches and creative assembly.
From here, try experimenting with different colorways! A deep purple and black yarn would make a perfect "Gothic Butterfly" bag for Halloween, while a bright yellow and black would look like a Monarch butterfly. You could even swap the pearl strap for a gold chain for a more evening-glam look. Happy crocheting, and enjoy your beautiful new accessory!