September 17, 2026
"Long Dog" Dachshund Scarf – A Whimsical Crochet Project
Keep your neck warm and your spirits high with this adorable Dachshund (Sausage Dog) Scarf! Featuring a long, cozy body, a cute 3D head with floppy ears, and tiny little legs, this project is a fun conversation starter. It’s an intermediate-friendly pattern that combines a simple scarf with amigurumi techniques.
Jump to pattern instructions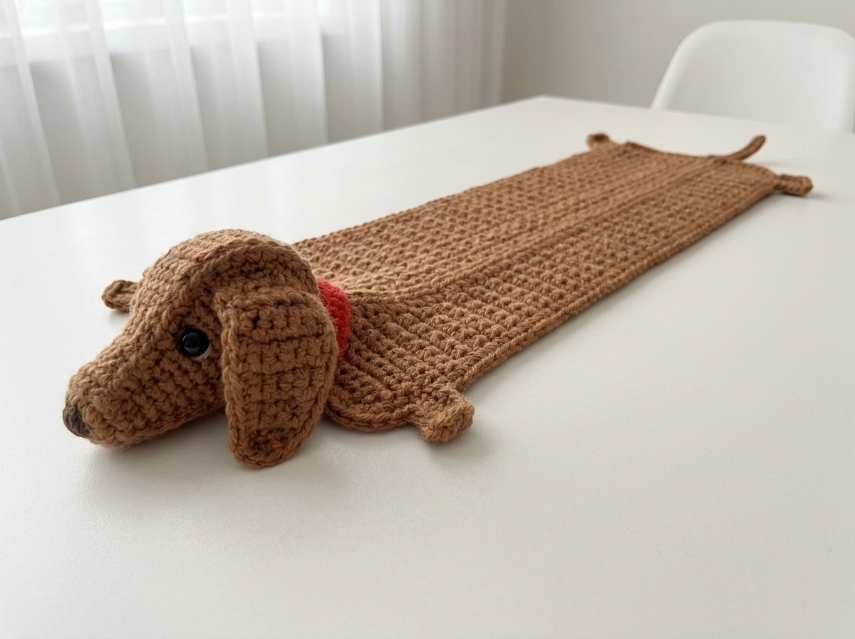
"Long Dog" Dachshund Scarf – Complete Step-by-Step Pattern
1. Gathering Your Supplies
To get that dense, warm fabric for the scarf body and a sturdy head, a worsted weight acrylic or wool blend is perfect.
- Yarn: Worsted weight (Size 4) yarn.
- Brown: Main color (approx. 300–400g). You need a lot for the length!
- Black: Tiny amount (for the nose and eyes).
- Red: Tiny amount (for the collar).
- Hook: 4.0 mm (US G/6) or 4.5 mm (US 7).
- Notions:
- 10-12 mm black safety eyes (2).
- Poly-fil stuffing (for the head).
- Tapestry needle.
- Scissors.
- Stitch markers.
- Finished Size: Approx. 120 cm (48 inches) long (excluding head).
What you'll master: Combining flat crochet (scarf) with 3D amigurumi (head), and creating a character accessory.
2. Abbreviations & Special Techniques
- ch: Chain
- sc: Single crochet
- hdc: Half double crochet (used for the scarf body for a nice drape).
- inc: Increase (2 sc in one stitch)
- dec: Decrease (2 sc crocheted together invisibly)
- sl st: Slip stitch
- MR: Magic ring
- BLO: Back loop only
3. The Scarf Body (The "Sausage")
This is the long, rectangular part of the dog. We will use Half Double Crochet (hdc) for a texture that looks a bit like knitting and is very warm.
- Foundation: With Brown yarn, Ch 15 (this determines the width of the dog's back).
- Row 1: Hdc in the 3rd ch from the hook and each ch across. Turn. (13 hdc)
- Rows 2–100 (or desired length): Ch 2 (counts as first hdc), hdc in each st across. Turn.
- Note: Keep your tension even! This will take a while, so put on a movie.
- Finishing: Fasten off, leaving a long tail for sewing the head later.
What you'll master: Creating a long, consistent fabric panel.
4. The Head (3D Amigurumi)
We will work the head separately and sew it on for easier stuffing. We start at the nose.
- R1 (Snout Base): Ch 8. Sc in the 2nd ch from the hook, sc in next 5 ch, 3 sc in last ch. Working down the opposite side: sc in next 5 ch, 2 sc in last ch. (16 sts)
- R2-5: Sc in each st around. (16 sts) [4 rows]
- Note: This creates the long snout.
- R6 (Head Expansion): (3 sc, inc) x 4. (20 sts)
- R7: (4 sc, inc) x 4. (24 sts)
- R8: (5 sc, inc) x 4. (28 sts)
- R9-12: 28 sc (28) [4 rows]
- Eye Placement: Insert safety eyes between R10 and R11, spaced about 6-8 stitches apart.
- R13: (5 sc, dec) x 4. (24 sts)
- R14: (4 sc, dec) x 4. (20 sts)
- Stuffing: Stuff the head firmly, especially the snout.
- R15: (3 sc, dec) x 4. (16 sts)
- Finishing: Fasten off, leaving a long tail. Weave tail through front loops to close the hole at the back of the head.
What you'll master: Shaping a complex head structure (snout to skull).
5. The Ears (Brown, Make 2)
Dachshunds are famous for their long, floppy ears.
- Instructions: Ch 25.
- Row 1: Sc in the 2nd ch from the hook, hdc in next 2, dc in next 15, hdc in next 2, sc in last ch.
- Row 2: Ch 1, turn. Work sc evenly down the opposite side of the chain to create a long, thin oval.
- Finishing: Fasten off, leaving a tail. Do not stuff.
What you'll master: Creating long, flat shapes.
6. The Legs & Tail
Legs (Make 4):
- Instructions: Ch 6. Sc in 2nd ch from hook and across. (5 sc).
- Row 2: Ch 1, turn. Sc across.
- Finishing: Fasten off. These are little nubs.
Tail:
- Instructions: Ch 10. Sc in 2nd ch from hook and across.
- Finishing: Fasten off.
The Collar (Red):
- Instructions: Ch 20 (measure around the "neck" of the scarf). Sc across. Fasten off.
7. Assembly & The Magic of Details
Now for the most rewarding part: bringing your Long Dog to life!
- Attach Head: Position the 3D head at one short end of the long scarf body. Using your long tails, sew the head securely to the scarf. Make sure it's centered.
- Attach Ears: Sew the long ears to the sides of the head, just behind the eyes. Let them flop down over the scarf body.
- Attach Legs:
- Sew two legs to the sides of the scarf, just below the head (front legs).
- Sew two legs to the sides of the scarf, near the opposite end (back legs).
- Attach Tail: Sew the small tail to the very end of the scarf, opposite the head.
- The Collar: Wrap the red strip around the "neck" (where the head meets the scarf) and sew the ends together to form a loop.
- Face Details: If you didn't use safety eyes, embroider black eyes. Embroider a black nose at the very tip of the snout.
What you'll master: Multi-step assembly and character styling.
Final Section: Where to Go from Here
Congratulations! You’ve just crafted a whimsical "Long Dog" Scarf. This project is incredibly fun and makes a perfect gift for dog lovers.
From here, try experimenting with different colors! You could make a "Black and Tan" dachshund using black yarn with brown paws and snout, or a "Dapple" version using variegated yarn. You could even make a cat version with a long body and pointy ears. Happy crocheting, and stay warm!